Thread 基本入門
在 Java 中,可以透過繼承 java.lang.Thread class 或是實作 java.lang.Runnable interface 的方式,讓 object 具有多執行緒(Multi-Thread)的功能。
而實際上,CPU 並非真的實際"同時"作多項工作,而是在 processs 中的多個 thread 之間快速的轉換(代表一個 process 可以包含多個 thread),而由於轉換速度很快,因此就感覺向是同時在作多項工作般。
以下用個範例來說明:(使用繼承 java.lang.Thread 的方式)
EraseThread.java
EraseThreadDemo.javapublic class EraseThread extends Thread {
private boolean active;
private String mask;
public EraseThread() {
this('*');
}
public EraseThread(char maskChar) {
active = true;
mask = "\010" + maskChar;
}
public void setActive(boolean active) {
this.active = active;
}
public boolean isActive() {
return active;
}
//重新定義 run 方法
public void run() {
while(isActive()) {
System.out.print(mask);
try {
// sleep 方法會丟出 InterruptedException 例外
Thread.currentThread().sleep(50);
}
catch(InterruptedException e) {
e.printStackTrace();
}
}
}
}
import java.util.Scanner;

public class EraseThreadDemo {
   public static void main(String args[]) {
       Scanner scanner = new Scanner(System.in);

       while(true) {
           System.out.print("輸入名稱:");
           String name = scanner.next();

           System.out.print("輸入密碼:");
           EraseThread thread = new EraseThread('#');
           thread.start();
           String passwd = scanner.next();
           thread.setActive(false);

           if(name.equals("godleon") && passwd.equals("1234"))
               System.out.println("歡迎 godleon");
           else
               System.out.println(name + ",名稱或密碼錯誤,請重新輸入!");
       }
   }
}
另外還有一種方法可以讓 object 擁有 Multi-Thread 的能力,則是實作 java.lang.Runnable interface,並實作其中的 run() method,而程式碼的部分,跟上面則是大同小異,主要只是繼承 class 與實作 interface 的差異而已。
不過建議多使用實作 Runnable interface 的方式,如此一來可擁有 Multi-Thread 的功能,又保留了繼承其他 class 的彈性。
Daemon
除了 main thread 之外,還可以運用多個 thread 在背景進行其他工作,此種 thread 即稱為 daemon。
例如 Linux 中許多 listen tcp port 的服務即為 daemon,而一般來說,當 main thread 結束後,則其他附屬於 main thread 中的 daemon 也應該會自動終止,以下用一個簡單程式來示範:
public class DaemonThread {
   public static void main(String args[]) {
       Thread thread = new Thread(new Runnable() {
           public void run() {
               while(true)
                   System.out.print("T");
           }
       });

       //必須使用 setDaemon() method 將 thread 設定為 daemon
       //否則 main thread 結束後,此 thread 還是會繼續執行
       thread.setDaemon(true);
       thread.start();
執行緒生命週期
thread 的狀態有四種,分別是:(如下圖,節錄自 Java Gossip)
- New Thread (建立執行緒)
- Runnable
- Not Runnable
- Dead
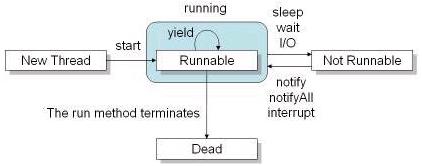
當 new 一個 thread 物件並執行 start() method 後,會進入 Runnable 狀態,而 JVM 中會有一個 scheduler 專門負責處理所有狀態為 Runnable 的 thread 排程,因此即使狀態是 Runnable 的 thread,也必須要被排入執行才會真的執行 run() method 中的程式。而 thread 之間工作切換的速度很快,因此看來就像在同時執行一般。
而 thread 執行時也有其優先順序,可以利用 setPriority() method 去進行調整(1~10),數值越大優先權越高。
其中比較需要注意的是 yield() method,這是在不支援 Timeslicing 的 OS 上撰寫 multi-thread 程式才需要用到的 method,可讓目前執行中的 thread 暫停,去執行另外一個 thread 的工作;而當 thread 使用 yield() 讓出執行權時,他會再度回到 Runnable 的狀態等待 scheduler 的排程。
接著,如上圖所示,有幾個狀況會讓 thread 進入 Not Runnable 的狀態:
會從 Runnable 轉換為 Not Runnable 的情形大多是發生在 thread 等待使用者的文字輸入、傾聽網路連線.....等情況時,而若是發生以下情形,則 thead 會再度回到 Runnable 的狀態:
- 完成 I/O 的動作
- 呼叫 interrupt() method()
- 呼叫 notify()、notifyAll() .... 等 method
- 取得物件鎖定
最後,當工作完成或發生例外,而離開了 run() method,則進入 Dead 狀態,可透過 isAlive() method 來測試 thread 是否還存活。
以下用一個簡單範例來說明:
若要暫停 thread 的執行,但時間不確定是多久,使用 sleep() 就不是一個好方式了,此時可以用 wait() 讓 thread 進入 Not Runnable 的狀態,並透過別的 thread 使用 notify() or notifyAll() 讓 thread 的狀態回到 Runnable。public class InterruptDemo {
public static void main(String args[]) {
Thread thread = new Thread(new Runnable() {
public void run() {
try {
//使用 sleep(),進入 Not Runnable 狀態
Thread.sleep(99999);
}
catch(InterruptedException e) {
System.out.println("I'm interrupted !!");
}
}
});
thread.start();
//使用 interrupt(),回到 Runnable 狀態
//但會丟出 InterruptedException 例外
thread.interrupt();
}
}
執行緒的加入
若 Thread A 正在執行,臨時需要加入 Thread B,並優先處理,此時可以用 join() method 來處理此種情況。以下用個範例程式來說明:
public class ThreadA {
   public static void main(String args[]) {
       System.out.println("Thread A 執行");

       Thread threadB = new Thread(new Runnable() {
           public void run() {
               try {
                   System.out.println("Thread B 開始");
                   for(int i = 0 ; i < 5 ; i++) {
                       Thread.sleep(1000);
                       System.out.println("Thread B 執行.......");
                   }
                   System.out.println("Thread B 即將結束");
               }
               catch(InterruptedException e) {
                   e.printStackTrace();
               }
           }
       });

       threadB.start();

       try {
           threadB.join(); //使用 join()
       }
       catch(InterruptedException e) {
           e.printStackTrace();
       }

       //threadB 透過 join() 加入,因此必須等 threadB 執行完後才會執行此行
       //若沒用 join(),很快就會執行到這邊
       System.out.println("Thread A 執行");
   }
}
執行緒的停止
在 J2SE 6.0 API 中,Thread class 中的 stop()、suspend()、resume() ....等 method,分別都被註記為「Deprecated」,因此表示使用者若需要這些功能,就必須自己實作囉!
以 stop 來說,若需要讓 thread 停止,就必須要想辦法讓 thread 完成 run() 中的流程,以下用個程式作範例:
public class SomeThread implements Runnable {
   public static void main(String args[]) {
       Thread thread = new Thread(new SomeThread());
       thread.start();
       //透過 interrupt() 丟出 InterruptedException 例外
       //讓 run() 順利結束
       thread.interrupt();
   }

   public void run() {
       System.out.println("sleep......至 block 狀態");
       try {
           Thread.sleep(9999);
       }
       catch(InterruptedException e) {
           System.out.println("I am interrupted");
       }
   }
ThreadGroup
每一個 thread 都隸屬於某一個 ThreadGroup,若產生的 thread 沒有指定 ThreadGroup,則此 thread 則屬於產生它的 thread (一般來說是 main thread)。而必須注意的是,當 thread 歸入某個 ThreadGroup 後,就無法再更換到其他 ThreadGroup 了!
而透過 java.lang.ThreadGroup,可以管理整個 group 中的 thread,例如 interrupt 群組中所有的 thread,或是設定優先權....等等,詳細的操作方式可以參考官方文件。
此外,若在 ThreadGroup 中有 thread 發生了例外,可透過實作 Thread.UncaughtExceptionHandler 的方式來進行處理,以下用一段簡單的程式碼來介紹:
ThreadExceptionHandler.java
ThreadGroupDemo.javapublic class ThreadExceptionHandler implements Thread.UncaughtExceptionHandler {
public void uncaughtException(Thread t, Throwable e) {
System.out.println(t.getName() + " : " + e.getMessage());
}
}
public class ThreadGroupDemo {
   public static void main(String args[]) {
       ThreadExceptionHandler handler = new ThreadExceptionHandler();
       ThreadGroup group1 = new ThreadGroup("group1");

       //指定 thread 屬於 group1
        Thread thread1 = new Thread(group1, new Runnable() {
           public void run() {
               //丟出例外由指定的 Handler 處理
               //但也同時結束了 thread
               throw new RuntimeException("測試例外");
           }
       });

       thread1.setUncaughtExceptionHandler(handler);   //設定例外處理的 Hanlder
       thread1.start();
   }
}
同步(Synchronized)
執行緒同步
當有一個物件,同時可能有多個 thread 進行存取時,就會可能有資料不同步的情況發生,此時在寫程式時就必須考慮到這個問題並加以解決,以下用一個範例程式來說明:
PersonalInfo.java
PersonalInfoTest.javapublic class PersonalInfo {
private String name;
private String id;
private int count;
public PersonalInfo() {
name = "nobody";
id = "N/A";
}
public synchronized void setNameAndID(String name, String id) {
this.name = name;
this.id = id;
if(!checkNameAndIDEqual())
System.out.println(count + ") illegal name or ID.....");
count++;
}
private boolean checkNameAndIDEqual() {
return (name.charAt(0) == id.charAt(0)) ? true : false;
}
}
在這邊,所使用的關鍵字就是「synchronized」,透過此關鍵字,就可以將 PersonalInfo 物件鎖定,確保不會有同時有多個 thread 執行使用關鍵字 synchronized 設定過的 setNameAndID() method。public class PersonalInfoTest {
public static void main(String args[]) {
final PersonalInfo person = new PersonalInfo();
Thread t1 = new Thread(new Runnable() {
public void run() {
while(true)
person.setNameAndID("Tzeng Chien Ming", "TCM");
}
});
Thread t2 = new Thread(new Runnable() {
public void run() {
while(true)
person.setNameAndID("Leon Tzeng", "LT");
}
});
//這邊多跑幾次就會出錯了
//但若在 method 前加入「synchronized」關鍵字就可以將物件鎖定
System.out.println("開始測試....");
t1.start();
t2.start();
}
}
此外,synchronized 關鍵字不僅可以用於於 method,也可以用在任何程式片段中,有興趣的人就自行 google 囉!
wait()、notify()、notifyAll()
首先先來一張圖(節錄自 JavaWorld@TW):
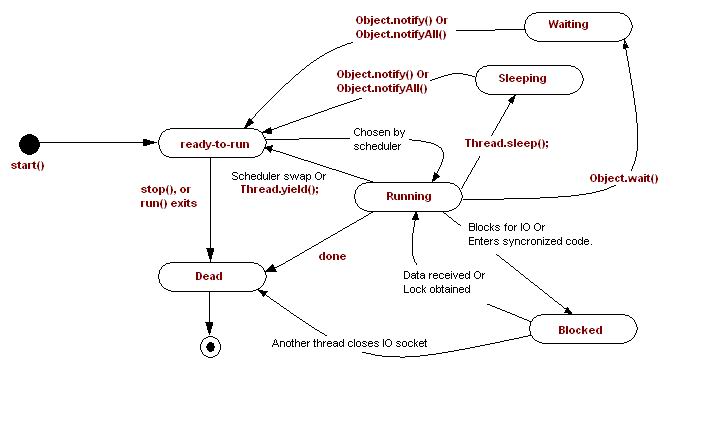
從圖中可以看出,wait()、notify()、notifyAll() 三個 method 都是從 java.lang.Object class 繼承下來的,而這幾個 method 在定義時已經使用了 final 關鍵字,因此也沒辦法 override 囉!
首先,先說明 wait() 的部分:
若要使用 wait(),必須是在有標註 synchronized 的 method 中才可以呼叫此方法,而當 wait() 被呼叫後,目前 thread 的狀態會從 Running 變成 Waiting。
接著是 notify() 與 notifyAll() 的部分:
使用 notify()、notifyAll() 則會讓 thread 從 Waiting 狀態回到 ready-to-run;但其中的差異在於,notify() 僅會一次影響 1 個 thread,而 notifyAll() 則是一次將 Waiting 狀態的 thread 通通變成 ready-to-run 的狀態。
因此,簡單來說,當 thread 呼叫 object 的 wait() method 時,表示 thread 必須讓出物件的鎖定並等待通知,直到再被通知(notify or notifyAll)時,就會回到 ready-to-run 的狀態與其他 thread 一同競爭物件的鎖定。
以下用一個範例來說明:
Clerk.java
Producer.javapublic class Clerk {
//-1 表示無商品
private int product = -1;
public synchronized void setProduct(int product) {
if(this.product != -1) {
try {
//目前店員沒有空間收產品,請稍後
wait();
}
catch(InterruptedException e) {
e.printStackTrace();
}
}
this.product = product;
System.out.println("生產者設定 " + this.product);
//通知等待中的消費者可以來消費了!
notify();
}
public synchronized int getProduct() {
if(this.product == -1) {
try {
wait();
}
catch(InterruptedException e) {
e.printStackTrace();
}
}
int p = this.product;
System.out.println("消費者取走 " + this.product);
this.product = -1;
//通知生產者工作
notify();
return p;
}
}
Consumer.javapublic class Producer implements Runnable {
private Clerk clerk;
public Producer(Clerk clerk) {
this.clerk = clerk;
}
public void run() {
System.out.println("生產者開始生產整數......");
for(int product = 1 ; product <= 10 ; product++) {
try {
//暫停隨機時間
Thread.sleep((int)(Math.random() * 3000));
}
catch(InterruptedException e) {
e.printStackTrace();
}
//將產品交給店員
clerk.setProduct(product);
}
}
}
ProductTest.javapublic class Consumer implements Runnable {
private Clerk clerk;
public Consumer(Clerk clerk) {
this.clerk = clerk;
}
public void run() {
System.out.println("消費者開始消耗整數......");
for(int i = 1 ; i <= 10 ; i++) {
try {
//等待隨機時間
Thread.sleep((int)Math.random() * 3000);
}
catch(InterruptedException e) {
e.printStackTrace();
}
//從店員處取走整數
clerk.getProduct();
}
}
}
以上這些程式碼,其實也只是兩個 thread 狀態的處理而已,因此比較簡單;而若是 thread 數量又更多且必須有資料同步的考量時,狀態的處理就必須要更小心了。public class ProductTest {
public static void main(String args[]) {
Clerk clerk = new Clerk();
//生產者 thread
Thread producerThread = new Thread(new Producer(clerk));
//消費者 thread
Thread ConsumerThread = new Thread(new Consumer(clerk));
producerThread.start();
ConsumerThread.start();
}
}
資源共用的考量
基本上,要撰寫 multi-thread 且安全的程式是很不容易的,因為有共用資源的問題,為了讓資源共用不產生衝突,必須作很多額外的檢查工作以及 thread 的狀態轉換。
而若是從另外一種角度來思考,每一個 thread 都擁有自己的資源,那程式開發難度相對就減少許多了!
而在 J2SE 中提供了 java.lang.ThreadLocal class,就是用來實現這個概念。
而這個部分,就下次有用到的時候再來探討好了............有興趣的人就自己網路找文件看吧!
java.util.concurrent package
在 J2SE 5.0 以後,新增了 java.util.concurrent package,裡面提供了許多 class,讓撰寫 multi-thread 的程式更為方便,而這個部分較為深入,這邊就不探討了,以後如果有需要使用到這一塊,再來慢慢研究....
參考資料
沒有留言:
張貼留言