今天偶然聽見可以用更快的方法處理 XML! (原本用的是 XMLDocument)
後來想想要怎麼樣可以讓程式處理 XML 的效率最好呢? 當然是 in-memory 的處理啦!
不然就像 DataReader 一樣,僅提供 forward-only traverse,當然我需要完整 DOM 的功能,forward-only 的方案(XMLTextReader)就完全不考慮啦!
接著,google 到幾篇覺得還蠻不錯的文章.....就留下來參考參考了
2007年8月24日 星期五
2007年8月14日 星期二
Offline Web Application
今天跟廠商開會,聽到了 Offline Web Application....
於是上網查了一些資料,原來這種機制是透過在 client 端放個小型資料庫達成的 (一般來說是 SQLite) .....
目前支援這種運作模式的工具有 Google Gears 、Adobe Integrated Runtime(AIR,前身為 Apollo)、Dojo Offline Toolkit .... 等等
看來這些東西未來會掀起一番革命....
有看到幾篇不錯的文章,先留下來作紀念.....
於是上網查了一些資料,原來這種機制是透過在 client 端放個小型資料庫達成的 (一般來說是 SQLite) .....
目前支援這種運作模式的工具有 Google Gears 、Adobe Integrated Runtime(AIR,前身為 Apollo)、Dojo Offline Toolkit .... 等等
看來這些東西未來會掀起一番革命....
有看到幾篇不錯的文章,先留下來作紀念.....
2007年8月13日 星期一
將 MP3 ID3 資訊轉為 Unicode 編碼
剛從 Windows 跳到 Linux 的使用者通常都會有這個問題...
為什麼聽 mp3 時,檔名都沒辦法正確顯示呢?
答案就是因為在 Linux 中的音樂播放軟體,顯示的不是歌曲的名稱,而是 ID3 資訊,不過通常 ID3 資訊都不是以 Unicode 編碼(因為 Windows 搞出來的 MP3 的 ID3 都不會是 Unicode 編碼),因此顯示出來都會是亂碼...
那.......要怎麼處理呢?
在 Windows 上,可以用 ConvertZ 去轉換! 這一套軟體很強,檔名可以轉,ID3 資訊也可以轉。
在 Linux 上,檔名可以用 iconv 轉換,而 ID3 資訊可以用 python-mutagen 套件轉換!
以下說明轉換 ID3 資訊的方式,假設 ID3 編碼為 Big5,只要進入要轉換的目錄,下達以下指令即可:
PS. 還是 Unicode 比較好.......畢竟支援多國語言嘛!
參考資訊
為什麼聽 mp3 時,檔名都沒辦法正確顯示呢?
答案就是因為在 Linux 中的音樂播放軟體,顯示的不是歌曲的名稱,而是 ID3 資訊,不過通常 ID3 資訊都不是以 Unicode 編碼(因為 Windows 搞出來的 MP3 的 ID3 都不會是 Unicode 編碼),因此顯示出來都會是亂碼...
那.......要怎麼處理呢?
在 Windows 上,可以用 ConvertZ 去轉換! 這一套軟體很強,檔名可以轉,ID3 資訊也可以轉。
在 Linux 上,檔名可以用 iconv 轉換,而 ID3 資訊可以用 python-mutagen 套件轉換!
以下說明轉換 ID3 資訊的方式,假設 ID3 編碼為 Big5,只要進入要轉換的目錄,下達以下指令即可:
shell> find . -iname "*.mp3" -execdir mid3iconv -e Big5 {} ;如此一來就解決 ID3 編碼非 Unicode 的問題囉!
PS. 還是 Unicode 比較好.......畢竟支援多國語言嘛!
參考資訊
Windows 2003 自動清除遠端 login session
一直以來都要手動去關閉遠端登入者的 session,現在知道怎麼讓系統在特定時間後自動清除囉! 感謝陳展今天提供這個有用的資訊!
設定方式如下:(For Windows 2003)
設定方式如下:(For Windows 2003)
群組原則gpedit.msc
=> 電腦設定
=> 系統管理範本
=> windows元件
=> 終端機服務
=> 工作階段
=> 設定已斷線工作階段的時間限制
=> 啟用並限制時間
2007年8月12日 星期日
Java 學習筆記 (9) - Thread
現在 CPU 速度越來越快啦! 若是要更妥善利用他,希望他可以同時間多做一些事情,程式要怎麼寫呢?? 答案就是「執行緒(Thread)」。
Thread 基本入門
在 Java 中,可以透過繼承 java.lang.Thread class 或是實作 java.lang.Runnable interface 的方式,讓 object 具有多執行緒(Multi-Thread)的功能。
而實際上,CPU 並非真的實際"同時"作多項工作,而是在 processs 中的多個 thread 之間快速的轉換(代表一個 process 可以包含多個 thread),而由於轉換速度很快,因此就感覺向是同時在作多項工作般。
以下用個範例來說明:(使用繼承 java.lang.Thread 的方式)
EraseThread.java
另外還有一種方法可以讓 object 擁有 Multi-Thread 的能力,則是實作 java.lang.Runnable interface,並實作其中的 run() method,而程式碼的部分,跟上面則是大同小異,主要只是繼承 class 與實作 interface 的差異而已。
不過建議多使用實作 Runnable interface 的方式,如此一來可擁有 Multi-Thread 的功能,又保留了繼承其他 class 的彈性。
Daemon
除了 main thread 之外,還可以運用多個 thread 在背景進行其他工作,此種 thread 即稱為 daemon。
例如 Linux 中許多 listen tcp port 的服務即為 daemon,而一般來說,當 main thread 結束後,則其他附屬於 main thread 中的 daemon 也應該會自動終止,以下用一個簡單程式來示範:
執行緒生命週期
thread 的狀態有四種,分別是:(如下圖,節錄自 Java Gossip)
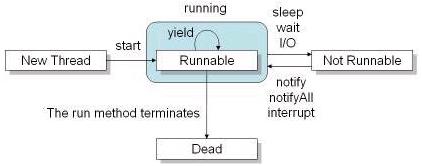
當 new 一個 thread 物件並執行 start() method 後,會進入 Runnable 狀態,而 JVM 中會有一個 scheduler 專門負責處理所有狀態為 Runnable 的 thread 排程,因此即使狀態是 Runnable 的 thread,也必須要被排入執行才會真的執行 run() method 中的程式。而 thread 之間工作切換的速度很快,因此看來就像在同時執行一般。
而 thread 執行時也有其優先順序,可以利用 setPriority() method 去進行調整(1~10),數值越大優先權越高。
其中比較需要注意的是 yield() method,這是在不支援 Timeslicing 的 OS 上撰寫 multi-thread 程式才需要用到的 method,可讓目前執行中的 thread 暫停,去執行另外一個 thread 的工作;而當 thread 使用 yield() 讓出執行權時,他會再度回到 Runnable 的狀態等待 scheduler 的排程。
接著,如上圖所示,有幾個狀況會讓 thread 進入 Not Runnable 的狀態:
會從 Runnable 轉換為 Not Runnable 的情形大多是發生在 thread 等待使用者的文字輸入、傾聽網路連線.....等情況時,而若是發生以下情形,則 thead 會再度回到 Runnable 的狀態:
最後,當工作完成或發生例外,而離開了 run() method,則進入 Dead 狀態,可透過 isAlive() method 來測試 thread 是否還存活。
以下用一個簡單範例來說明:
執行緒的加入
若 Thread A 正在執行,臨時需要加入 Thread B,並優先處理,此時可以用 join() method 來處理此種情況。以下用個範例程式來說明:
執行緒的停止
在 J2SE 6.0 API 中,Thread class 中的 stop()、suspend()、resume() ....等 method,分別都被註記為「Deprecated」,因此表示使用者若需要這些功能,就必須自己實作囉!
以 stop 來說,若需要讓 thread 停止,就必須要想辦法讓 thread 完成 run() 中的流程,以下用個程式作範例:
ThreadGroup
每一個 thread 都隸屬於某一個 ThreadGroup,若產生的 thread 沒有指定 ThreadGroup,則此 thread 則屬於產生它的 thread (一般來說是 main thread)。而必須注意的是,當 thread 歸入某個 ThreadGroup 後,就無法再更換到其他 ThreadGroup 了!
而透過 java.lang.ThreadGroup,可以管理整個 group 中的 thread,例如 interrupt 群組中所有的 thread,或是設定優先權....等等,詳細的操作方式可以參考官方文件。
此外,若在 ThreadGroup 中有 thread 發生了例外,可透過實作 Thread.UncaughtExceptionHandler 的方式來進行處理,以下用一段簡單的程式碼來介紹:
ThreadExceptionHandler.java
同步(Synchronized)
執行緒同步
當有一個物件,同時可能有多個 thread 進行存取時,就會可能有資料不同步的情況發生,此時在寫程式時就必須考慮到這個問題並加以解決,以下用一個範例程式來說明:
PersonalInfo.java
此外,synchronized 關鍵字不僅可以用於於 method,也可以用在任何程式片段中,有興趣的人就自行 google 囉!
wait()、notify()、notifyAll()
首先先來一張圖(節錄自 JavaWorld@TW):
從圖中可以看出,wait()、notify()、notifyAll() 三個 method 都是從 java.lang.Object class 繼承下來的,而這幾個 method 在定義時已經使用了 final 關鍵字,因此也沒辦法 override 囉!
首先,先說明 wait() 的部分:
若要使用 wait(),必須是在有標註 synchronized 的 method 中才可以呼叫此方法,而當 wait() 被呼叫後,目前 thread 的狀態會從 Running 變成 Waiting。
接著是 notify() 與 notifyAll() 的部分:
使用 notify()、notifyAll() 則會讓 thread 從 Waiting 狀態回到 ready-to-run;但其中的差異在於,notify() 僅會一次影響 1 個 thread,而 notifyAll() 則是一次將 Waiting 狀態的 thread 通通變成 ready-to-run 的狀態。
因此,簡單來說,當 thread 呼叫 object 的 wait() method 時,表示 thread 必須讓出物件的鎖定並等待通知,直到再被通知(notify or notifyAll)時,就會回到 ready-to-run 的狀態與其他 thread 一同競爭物件的鎖定。
以下用一個範例來說明:
Clerk.java
資源共用的考量
基本上,要撰寫 multi-thread 且安全的程式是很不容易的,因為有共用資源的問題,為了讓資源共用不產生衝突,必須作很多額外的檢查工作以及 thread 的狀態轉換。
而若是從另外一種角度來思考,每一個 thread 都擁有自己的資源,那程式開發難度相對就減少許多了!
而在 J2SE 中提供了 java.lang.ThreadLocal class,就是用來實現這個概念。
而這個部分,就下次有用到的時候再來探討好了............有興趣的人就自己網路找文件看吧!
java.util.concurrent package
在 J2SE 5.0 以後,新增了 java.util.concurrent package,裡面提供了許多 class,讓撰寫 multi-thread 的程式更為方便,而這個部分較為深入,這邊就不探討了,以後如果有需要使用到這一塊,再來慢慢研究....
參考資料
Thread 基本入門
在 Java 中,可以透過繼承 java.lang.Thread class 或是實作 java.lang.Runnable interface 的方式,讓 object 具有多執行緒(Multi-Thread)的功能。
而實際上,CPU 並非真的實際"同時"作多項工作,而是在 processs 中的多個 thread 之間快速的轉換(代表一個 process 可以包含多個 thread),而由於轉換速度很快,因此就感覺向是同時在作多項工作般。
以下用個範例來說明:(使用繼承 java.lang.Thread 的方式)
EraseThread.java
EraseThreadDemo.javapublic class EraseThread extends Thread {
private boolean active;
private String mask;
public EraseThread() {
this('*');
}
public EraseThread(char maskChar) {
active = true;
mask = "\010" + maskChar;
}
public void setActive(boolean active) {
this.active = active;
}
public boolean isActive() {
return active;
}
//重新定義 run 方法
public void run() {
while(isActive()) {
System.out.print(mask);
try {
// sleep 方法會丟出 InterruptedException 例外
Thread.currentThread().sleep(50);
}
catch(InterruptedException e) {
e.printStackTrace();
}
}
}
}
import java.util.Scanner;

public class EraseThreadDemo {
   public static void main(String args[]) {
       Scanner scanner = new Scanner(System.in);

       while(true) {
           System.out.print("輸入名稱:");
           String name = scanner.next();

           System.out.print("輸入密碼:");
           EraseThread thread = new EraseThread('#');
           thread.start();
           String passwd = scanner.next();
           thread.setActive(false);

           if(name.equals("godleon") && passwd.equals("1234"))
               System.out.println("歡迎 godleon");
           else
               System.out.println(name + ",名稱或密碼錯誤,請重新輸入!");
       }
   }
}
另外還有一種方法可以讓 object 擁有 Multi-Thread 的能力,則是實作 java.lang.Runnable interface,並實作其中的 run() method,而程式碼的部分,跟上面則是大同小異,主要只是繼承 class 與實作 interface 的差異而已。
不過建議多使用實作 Runnable interface 的方式,如此一來可擁有 Multi-Thread 的功能,又保留了繼承其他 class 的彈性。
Daemon
除了 main thread 之外,還可以運用多個 thread 在背景進行其他工作,此種 thread 即稱為 daemon。
例如 Linux 中許多 listen tcp port 的服務即為 daemon,而一般來說,當 main thread 結束後,則其他附屬於 main thread 中的 daemon 也應該會自動終止,以下用一個簡單程式來示範:
public class DaemonThread {
   public static void main(String args[]) {
       Thread thread = new Thread(new Runnable() {
           public void run() {
               while(true)
                   System.out.print("T");
           }
       });

       //必須使用 setDaemon() method 將 thread 設定為 daemon
       //否則 main thread 結束後,此 thread 還是會繼續執行
       thread.setDaemon(true);
       thread.start();
執行緒生命週期
thread 的狀態有四種,分別是:(如下圖,節錄自 Java Gossip)
- New Thread (建立執行緒)
- Runnable
- Not Runnable
- Dead
當 new 一個 thread 物件並執行 start() method 後,會進入 Runnable 狀態,而 JVM 中會有一個 scheduler 專門負責處理所有狀態為 Runnable 的 thread 排程,因此即使狀態是 Runnable 的 thread,也必須要被排入執行才會真的執行 run() method 中的程式。而 thread 之間工作切換的速度很快,因此看來就像在同時執行一般。
而 thread 執行時也有其優先順序,可以利用 setPriority() method 去進行調整(1~10),數值越大優先權越高。
其中比較需要注意的是 yield() method,這是在不支援 Timeslicing 的 OS 上撰寫 multi-thread 程式才需要用到的 method,可讓目前執行中的 thread 暫停,去執行另外一個 thread 的工作;而當 thread 使用 yield() 讓出執行權時,他會再度回到 Runnable 的狀態等待 scheduler 的排程。
接著,如上圖所示,有幾個狀況會讓 thread 進入 Not Runnable 的狀態:
會從 Runnable 轉換為 Not Runnable 的情形大多是發生在 thread 等待使用者的文字輸入、傾聽網路連線.....等情況時,而若是發生以下情形,則 thead 會再度回到 Runnable 的狀態:
- 完成 I/O 的動作
- 呼叫 interrupt() method()
- 呼叫 notify()、notifyAll() .... 等 method
- 取得物件鎖定
最後,當工作完成或發生例外,而離開了 run() method,則進入 Dead 狀態,可透過 isAlive() method 來測試 thread 是否還存活。
以下用一個簡單範例來說明:
若要暫停 thread 的執行,但時間不確定是多久,使用 sleep() 就不是一個好方式了,此時可以用 wait() 讓 thread 進入 Not Runnable 的狀態,並透過別的 thread 使用 notify() or notifyAll() 讓 thread 的狀態回到 Runnable。public class InterruptDemo {
public static void main(String args[]) {
Thread thread = new Thread(new Runnable() {
public void run() {
try {
//使用 sleep(),進入 Not Runnable 狀態
Thread.sleep(99999);
}
catch(InterruptedException e) {
System.out.println("I'm interrupted !!");
}
}
});
thread.start();
//使用 interrupt(),回到 Runnable 狀態
//但會丟出 InterruptedException 例外
thread.interrupt();
}
}
執行緒的加入
若 Thread A 正在執行,臨時需要加入 Thread B,並優先處理,此時可以用 join() method 來處理此種情況。以下用個範例程式來說明:
public class ThreadA {
   public static void main(String args[]) {
       System.out.println("Thread A 執行");

       Thread threadB = new Thread(new Runnable() {
           public void run() {
               try {
                   System.out.println("Thread B 開始");
                   for(int i = 0 ; i < 5 ; i++) {
                       Thread.sleep(1000);
                       System.out.println("Thread B 執行.......");
                   }
                   System.out.println("Thread B 即將結束");
               }
               catch(InterruptedException e) {
                   e.printStackTrace();
               }
           }
       });

       threadB.start();

       try {
           threadB.join(); //使用 join()
       }
       catch(InterruptedException e) {
           e.printStackTrace();
       }

       //threadB 透過 join() 加入,因此必須等 threadB 執行完後才會執行此行
       //若沒用 join(),很快就會執行到這邊
       System.out.println("Thread A 執行");
   }
}
執行緒的停止
在 J2SE 6.0 API 中,Thread class 中的 stop()、suspend()、resume() ....等 method,分別都被註記為「Deprecated」,因此表示使用者若需要這些功能,就必須自己實作囉!
以 stop 來說,若需要讓 thread 停止,就必須要想辦法讓 thread 完成 run() 中的流程,以下用個程式作範例:
public class SomeThread implements Runnable {
   public static void main(String args[]) {
       Thread thread = new Thread(new SomeThread());
       thread.start();
       //透過 interrupt() 丟出 InterruptedException 例外
       //讓 run() 順利結束
       thread.interrupt();
   }

   public void run() {
       System.out.println("sleep......至 block 狀態");
       try {
           Thread.sleep(9999);
       }
       catch(InterruptedException e) {
           System.out.println("I am interrupted");
       }
   }
ThreadGroup
每一個 thread 都隸屬於某一個 ThreadGroup,若產生的 thread 沒有指定 ThreadGroup,則此 thread 則屬於產生它的 thread (一般來說是 main thread)。而必須注意的是,當 thread 歸入某個 ThreadGroup 後,就無法再更換到其他 ThreadGroup 了!
而透過 java.lang.ThreadGroup,可以管理整個 group 中的 thread,例如 interrupt 群組中所有的 thread,或是設定優先權....等等,詳細的操作方式可以參考官方文件。
此外,若在 ThreadGroup 中有 thread 發生了例外,可透過實作 Thread.UncaughtExceptionHandler 的方式來進行處理,以下用一段簡單的程式碼來介紹:
ThreadExceptionHandler.java
ThreadGroupDemo.javapublic class ThreadExceptionHandler implements Thread.UncaughtExceptionHandler {
public void uncaughtException(Thread t, Throwable e) {
System.out.println(t.getName() + " : " + e.getMessage());
}
}
public class ThreadGroupDemo {
   public static void main(String args[]) {
       ThreadExceptionHandler handler = new ThreadExceptionHandler();
       ThreadGroup group1 = new ThreadGroup("group1");

       //指定 thread 屬於 group1
        Thread thread1 = new Thread(group1, new Runnable() {
           public void run() {
               //丟出例外由指定的 Handler 處理
               //但也同時結束了 thread
               throw new RuntimeException("測試例外");
           }
       });

       thread1.setUncaughtExceptionHandler(handler);   //設定例外處理的 Hanlder
       thread1.start();
   }
}
同步(Synchronized)
執行緒同步
當有一個物件,同時可能有多個 thread 進行存取時,就會可能有資料不同步的情況發生,此時在寫程式時就必須考慮到這個問題並加以解決,以下用一個範例程式來說明:
PersonalInfo.java
PersonalInfoTest.javapublic class PersonalInfo {
private String name;
private String id;
private int count;
public PersonalInfo() {
name = "nobody";
id = "N/A";
}
public synchronized void setNameAndID(String name, String id) {
this.name = name;
this.id = id;
if(!checkNameAndIDEqual())
System.out.println(count + ") illegal name or ID.....");
count++;
}
private boolean checkNameAndIDEqual() {
return (name.charAt(0) == id.charAt(0)) ? true : false;
}
}
在這邊,所使用的關鍵字就是「synchronized」,透過此關鍵字,就可以將 PersonalInfo 物件鎖定,確保不會有同時有多個 thread 執行使用關鍵字 synchronized 設定過的 setNameAndID() method。public class PersonalInfoTest {
public static void main(String args[]) {
final PersonalInfo person = new PersonalInfo();
Thread t1 = new Thread(new Runnable() {
public void run() {
while(true)
person.setNameAndID("Tzeng Chien Ming", "TCM");
}
});
Thread t2 = new Thread(new Runnable() {
public void run() {
while(true)
person.setNameAndID("Leon Tzeng", "LT");
}
});
//這邊多跑幾次就會出錯了
//但若在 method 前加入「synchronized」關鍵字就可以將物件鎖定
System.out.println("開始測試....");
t1.start();
t2.start();
}
}
此外,synchronized 關鍵字不僅可以用於於 method,也可以用在任何程式片段中,有興趣的人就自行 google 囉!
wait()、notify()、notifyAll()
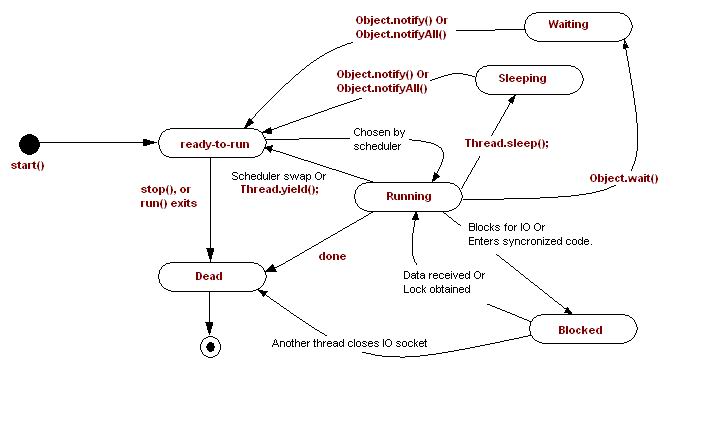
首先先來一張圖(節錄自 JavaWorld@TW):
從圖中可以看出,wait()、notify()、notifyAll() 三個 method 都是從 java.lang.Object class 繼承下來的,而這幾個 method 在定義時已經使用了 final 關鍵字,因此也沒辦法 override 囉!
首先,先說明 wait() 的部分:
若要使用 wait(),必須是在有標註 synchronized 的 method 中才可以呼叫此方法,而當 wait() 被呼叫後,目前 thread 的狀態會從 Running 變成 Waiting。
接著是 notify() 與 notifyAll() 的部分:
使用 notify()、notifyAll() 則會讓 thread 從 Waiting 狀態回到 ready-to-run;但其中的差異在於,notify() 僅會一次影響 1 個 thread,而 notifyAll() 則是一次將 Waiting 狀態的 thread 通通變成 ready-to-run 的狀態。
因此,簡單來說,當 thread 呼叫 object 的 wait() method 時,表示 thread 必須讓出物件的鎖定並等待通知,直到再被通知(notify or notifyAll)時,就會回到 ready-to-run 的狀態與其他 thread 一同競爭物件的鎖定。
以下用一個範例來說明:
Clerk.java
Producer.javapublic class Clerk {
//-1 表示無商品
private int product = -1;
public synchronized void setProduct(int product) {
if(this.product != -1) {
try {
//目前店員沒有空間收產品,請稍後
wait();
}
catch(InterruptedException e) {
e.printStackTrace();
}
}
this.product = product;
System.out.println("生產者設定 " + this.product);
//通知等待中的消費者可以來消費了!
notify();
}
public synchronized int getProduct() {
if(this.product == -1) {
try {
wait();
}
catch(InterruptedException e) {
e.printStackTrace();
}
}
int p = this.product;
System.out.println("消費者取走 " + this.product);
this.product = -1;
//通知生產者工作
notify();
return p;
}
}
Consumer.javapublic class Producer implements Runnable {
private Clerk clerk;
public Producer(Clerk clerk) {
this.clerk = clerk;
}
public void run() {
System.out.println("生產者開始生產整數......");
for(int product = 1 ; product <= 10 ; product++) {
try {
//暫停隨機時間
Thread.sleep((int)(Math.random() * 3000));
}
catch(InterruptedException e) {
e.printStackTrace();
}
//將產品交給店員
clerk.setProduct(product);
}
}
}
ProductTest.javapublic class Consumer implements Runnable {
private Clerk clerk;
public Consumer(Clerk clerk) {
this.clerk = clerk;
}
public void run() {
System.out.println("消費者開始消耗整數......");
for(int i = 1 ; i <= 10 ; i++) {
try {
//等待隨機時間
Thread.sleep((int)Math.random() * 3000);
}
catch(InterruptedException e) {
e.printStackTrace();
}
//從店員處取走整數
clerk.getProduct();
}
}
}
以上這些程式碼,其實也只是兩個 thread 狀態的處理而已,因此比較簡單;而若是 thread 數量又更多且必須有資料同步的考量時,狀態的處理就必須要更小心了。public class ProductTest {
public static void main(String args[]) {
Clerk clerk = new Clerk();
//生產者 thread
Thread producerThread = new Thread(new Producer(clerk));
//消費者 thread
Thread ConsumerThread = new Thread(new Consumer(clerk));
producerThread.start();
ConsumerThread.start();
}
}
資源共用的考量
基本上,要撰寫 multi-thread 且安全的程式是很不容易的,因為有共用資源的問題,為了讓資源共用不產生衝突,必須作很多額外的檢查工作以及 thread 的狀態轉換。
而若是從另外一種角度來思考,每一個 thread 都擁有自己的資源,那程式開發難度相對就減少許多了!
而在 J2SE 中提供了 java.lang.ThreadLocal class,就是用來實現這個概念。
而這個部分,就下次有用到的時候再來探討好了............有興趣的人就自己網路找文件看吧!
java.util.concurrent package
在 J2SE 5.0 以後,新增了 java.util.concurrent package,裡面提供了許多 class,讓撰寫 multi-thread 的程式更為方便,而這個部分較為深入,這邊就不探討了,以後如果有需要使用到這一塊,再來慢慢研究....
參考資料
2007年8月8日 星期三
[AWStats] IIS Log Analyzer 拾遺補缺
之前用了這套去處理 ADOC 的網頁流量分析....發現其實所呈現出來的訊息還蠻詳細的!
不過測試到後來有發現幾個問題,不過有逐一解決了...
無法 parse 之前的 log file
這個問題聽起來似乎很可怕.....其實還好...
假設在 awstats.testSite.conf 設定檔中,節錄設定如下:
假設只透過以下指令:
假設我們要從八月初開始到今日的所有 log 分析,就必須做兩個動作:
【註】summary 檔案是以一個月為單位作儲存。
程式不會自動每日分析 log
這個部分真是始料未及,原本以為他會自己做,到後來國貿局的小姐發現了跟我說,我才知道這回事.....真是汗顏....@_@
解決的方式很容易,就只要設定工作排程,每日的 23:59 讓他分析 log 就好了,不過程式執行的路徑要完整指定清楚就是了!
以下給個範例:
不過測試到後來有發現幾個問題,不過有逐一解決了...
無法 parse 之前的 log file
這個問題聽起來似乎很可怕.....其實還好...
假設在 awstats.testSite.conf 設定檔中,節錄設定如下:
# 指定所要分析的 log 檔案
LogFile="D:/webLog/W3SVC1/ex%YY-0%MM-0%DD-0.log"
# 分析結果(summary)檔案存放的位置
DirData="C:/Inetpub/wwwroot/awstats_data"
假設只透過以下指令:
perl awstats.pl -config=testSite -update則僅僅是是分析當天的 log 檔案,而假設當天為 2007/08/08,那分析完該檔案後,若要分析該日之前的 log 檔案,則會被認為是 old 的資料而不會將分析結果加入 summary 檔案中。
假設我們要從八月初開始到今日的所有 log 分析,就必須做兩個動作:
- 刪除 summary 檔案
- 再執行以下指令:
perl awstats.pl -config=testSite -LogFile="D:/webLog/W3SVC1/ex20070801.log" -update當然,也可以寫個批次檔(.bat)去跑,這樣就省事多了。
perl awstats.pl -config=testSite -LogFile="D:/webLog/W3SVC1/ex20070802.log" -update
perl awstats.pl -config=testSite -LogFile="D:/webLog/W3SVC1/ex20070803.log" -update
perl awstats.pl -config=testSite -LogFile="D:/webLog/W3SVC1/ex20070804.log" -update
perl awstats.pl -config=testSite -LogFile="D:/webLog/W3SVC1/ex20070805.log" -update
perl awstats.pl -config=testSite -LogFile="D:/webLog/W3SVC1/ex20070806.log" -update
perl awstats.pl -config=testSite -LogFile="D:/webLog/W3SVC1/ex20070807.log" -update
perl awstats.pl -config=testSite -LogFile="D:/webLog/W3SVC1/ex20070808.log" -update
【註】summary 檔案是以一個月為單位作儲存。
程式不會自動每日分析 log
這個部分真是始料未及,原本以為他會自己做,到後來國貿局的小姐發現了跟我說,我才知道這回事.....真是汗顏....@_@
解決的方式很容易,就只要設定工作排程,每日的 23:59 讓他分析 log 就好了,不過程式執行的路徑要完整指定清楚就是了!
以下給個範例:
C:\Perl\bin\perl.exe D:\myweb\log\cgi-bin\awstats.pl -config=myweb -update記得要加入例行性的工作囉!
2007年8月7日 星期二
Java 學習筆記 (8) - I/O
I/O 是個相當大的主題,若要深入探討, 包括各式設備的 I/O,可以寫厚厚的一本書,不過在這邊只是學習入門而已,因此就圍繞在檔案 I/O 部分,以下就慢慢來說明。
檔案
首先必須瞭解在 Java 中,是如何表示檔案的。
File class
在不同的 OS 中,檔案路徑的表示法也大不相同,例如:
因此在實作上就必須要額外多注意些了! 以下用個範例簡單說明 File class 的使用方式:
RandomAccessFile class
一般來說,檔案都是以循序的方式進行存取,但有時候會必須要針對檔案中的某個區段進行修改,也就是要能夠進行隨機存取(random access),此時就可以使用 java.io.RandomAccessFile class 中的 seek() method 來處理。
跟 C 相同,seek() 並不會回傳任何資料,而是將 file pointer 指向指定的位置上。而在 C 中,每筆資料可以透過 structure 的方式設定其大小、結構....等等資訊,而在 Java 中則可以透過定義 class 的方式達到設定資料結構的目的。
以下使用範例來說明:
Student.java
位元串流
Java 將資料在來源與目的地之間的流動,抽象化為一個 stream(串流),而 stream 所流動的則是以 byte 為單位的資料。
而在 Java SE 中有兩個 class 用來作為 stream 的抽象表示,分別是 java.io.InputStream(例如:System.in)以及 java.io.OutputStream(例如:System.out),以下用簡單的程式碼來示範用 in 物件與 out 物件讀取及輸出 stream 資料:
FileInputStream & FileOuputStream
由名稱即可知道,這兩個 class 繼承了 java.io.InputStream 以及 java.io.OutputStream 是專門處理檔案之用的,當產生 FileInputStream 或是 FileOutputSteam object 時,就表示 stream 已經被開啟,而使用完之後務必記得關閉 stream,以免消耗不必要的系統資源,以下用範例程式說明:
BufferedInputStream & BufferedOutputStream
在上一段的例子中,使用了一個 byte array 作為 buffer,但由於這是檔案存取,因此利用硬碟作為 buffer 遠比使用實體記憶體作為 buffer 速度要慢的多,因此 J2SE 中提供了 java.io.BufferedInputStream 以及 java.io.BufferedOutputStream 來協助處理需要記憶體作為 buffer 的工作。
需要注意的是,若要使用 BufferedInputStream 的功能,必須指定一個 InputStream 供其使用;同樣的,要使用 BufferedOutputStream,也要指定 OutputStream 供其使用。以下用個範例程式來說明:
這段要介紹的是 Java SE 中提供用來讀寫基本型態(Primitive Type)資料用的 class,分別是 java.io.DataInputStream 以及 java.io.DataOutputStream,其中提供了用來處理各種型態資料的 method,因此不論在不同的平台上,都不需要考慮到型態的大小,以下用範例程式來說明:
Member.java
ObjectInputStream & ObjectOutputStream
在 Java 中,許多資料都是以 object 的方式呈現,而 Java SE 中還提供將 object 直接存入檔案中的功能,而未來需要用到時,也提供從檔案中還原出 object 的功能。而提供這些功能的,則是 java.io.ObjectInputStream 以及 java.io.ObjectOutputStream。
而必須注意的是,此兩個 class 所使用的方式是將 object 序列化後,再存入檔案,因此要存入檔案的 object,其 class 就必須實作 Serializable interface,此 interface 並沒有任何 method 需要實作,僅僅是宣告此 class 所產生的 object 是可以序列化的。以下用範例程式來說明:
User.java
PrintStream
之前介紹的 OuputStream 物件,都是直接將 memory 中的資料寫至目的地,而若是想要顯示純資料的話,就必須使用 PrintStream class,以下用個範例來說明:
ByteArrayInputStream & ByteArrayOutputStream
stream 的來源或目的不一定是檔案,也可以是記憶體空間,例如這部分要說明的 java.io.ByteArrayInputStream 以及 java.io.ByteArrayOutputStream 即是使用 byte array 作為 stream 的來源與目的。以下用一個範例來說明:
字元串流
有別於位元串流,字元串流是以一個字元(2 bytes)的長度為單位進行處理,並進行適當的字元編碼轉換,而 J2SDK 中則提供了 java.io.Reader 以及 java.io.Writer 作為字元串流的處理(即為純文字檔案的處理)。
由於 java.io.Reader 以及 java.io.Writer 皆為 abstract class,因此真正提供處理功能的都是其 sub class,以下就逐一介紹比較常用的幾個 class。
InputStreamReader & OutputStreamWriter
若要使用 InputStream 以及 OutputStream 進行字元處理,可使用 java.io.InputStreamReader 以及 java.io.OutputStreamWriter 來加上字元處理的功能,如此一來就不需要自行判斷字元的編碼(InputStream 以及 OutputStream 一次僅能處理 1 byte 長度的資料)。
以下用個簡單的範例來說明:
FileReader & FileWriter
若要存取的是純文字檔案,可以直接使用 java.io.FileReader 以及 java.io.FileWriter 兩個 class 進行處理,不過僅能使用系統預設編碼,若要指定其他編碼,則還是必須使用 java.io.InputStreamReader 以及 java.io.OutputStreamWriter,然而使用方法上則是大同小異。
BufferedReader & BufferedWriter
java.io.BufferedReader 與 java.io.BufferedWriter 在讀取文字檔案時,會先將資料讀入 buffer 中,而使用 read() method 時是先從 buffer 將資料取出,除非等到 buffer 資料取光時,才會到檔案中再度取資料進 buffer 中存放。而透過 buffer 的方式,可以減少磁碟 I/O 的動作,因此效率會較好。
以下有一段官方文件說明:
PrintWriter
此 class 與之前介紹過的 java.io.PrintStream 功能是類似的,都可將 Java 的 primitive type 的資料直接轉換為系統預設編碼下的對應字元,然後輸出至 OutputStream 中;而 java.io.PrintWriter 則還可以接受 Writer object 作為參數。以下用個範例示範 PrintStream 與 PrintWriter 的用法:
CharArrayReader & CharArrayWriter
與之前介紹的 java.io.ByteArrayInputStream 與 java.io.ByteArrayOutputStream 類似,只是這邊所介紹的 java.io.CharArrayReader 與 java.io.CharArrayWriter 是將字元陣列作為資料輸入來源與輸出目的,用來處理 ASCII 與各種不同非西歐國家語系文字混雜的檔案很合適。以下用個範例來說明:
檔案
首先必須瞭解在 Java 中,是如何表示檔案的。
File class
在不同的 OS 中,檔案路徑的表示法也大不相同,例如:
- Windows => D:\Software\Free
- Unix-Like => /var/log/messages
因此在實作上就必須要額外多注意些了! 以下用個範例簡單說明 File class 的使用方式:
上述範例僅是檔案、目錄名稱的讀取,而若要實際上處理檔案的 I/O,還是必須搭配其他的 class 來使用才行。package net.twcic;
import java.io.File;
import java.util.ArrayList;
public class FileDemo {
public static void main(String args[]) {
try {
File file = new File("D:\");
if(file.isFile()) {
System.out.println("D:\ 檔案");
System.out.print((file.canRead() ? "可讀" : "不可讀") + " ");
System.out.print((file.canWrite() ? "可寫" : "不可寫") + " ");
System.out.println(file.length() + "位元組");
}
else {
//列出所有檔案與目錄
File[] files = file.listFiles();
ArrayList<File> fileList = new ArrayList<File>();
for(int i = 0 ; i < files.length ; i++) {
if(files[i].isDirectory()) //若是目錄就直接列出
System.out.println("[" + files[i].getPath() + "]");
else
fileList.add(files[i]); //檔案先存入 ArrayList,等會列出
}
for(File f : fileList)
System.out.println(f.toString());
System.out.println();
}
}
catch(ArrayIndexOutOfBoundsException e) {
System.out.println("using: Java FileDemo pathname");
}
}
}
RandomAccessFile class
一般來說,檔案都是以循序的方式進行存取,但有時候會必須要針對檔案中的某個區段進行修改,也就是要能夠進行隨機存取(random access),此時就可以使用 java.io.RandomAccessFile class 中的 seek() method 來處理。
跟 C 相同,seek() 並不會回傳任何資料,而是將 file pointer 指向指定的位置上。而在 C 中,每筆資料可以透過 structure 的方式設定其大小、結構....等等資訊,而在 Java 中則可以透過定義 class 的方式達到設定資料結構的目的。
以下使用範例來說明:
Student.java
RandomAccessFileDemo.javapackage net.twcic;
public class Student {
private String name;
private int score;
public Student() {
setName("noname");
}
public Student(String name, int score) {
setName(name);
this.score = score;
}
public void setName(String name) {
StringBuilder builder = null;
if(name != null)
builder = new StringBuilder(name);
else
builder = new StringBuilder(15);
builder.setLength(15);
this.name = builder.toString();
}
public void setScore(int score) {
this.score = score;
}
public String getName() {
return name;
}
public int getScore() {
return score;
}
public static int size() {
return 34;
}
}
在上述範例中,有以下幾個重點:package net.twcic;
import java.io.IOException;
import java.io.File;
import java.io.RandomAccessFile;
import java.util.Scanner;
public class RandomAccessFileDemo {
public static void main(String args[]) {
Student[] students = {
new Student("godleon", 95),
new Student("leon", 90),
new Student("bill", 85),
new Student("john", 80)
};
try {
//開啟檔案,並指定讀寫方式
File file = new File("myStudents.list");
RandomAccessFile raf = new RandomAccessFile(file, "rw");
for(int i = 0 ; i < students.length ; i++) {
//使用 RandomAccessFile class 所提供的寫入方式
raf.writeChars(students[i].getName());
raf.writeInt(students[i].getScore());
}
Scanner scanner = new Scanner(System.in);
System.out.print("讀取第幾筆資料? ");
int num = scanner.nextInt();
raf.seek((num-1) * Student.size());
//使用 RandomAccessFile class 所提供的資料讀取方式
Student student = new Student();
student.setName(readName(raf));
student.setScore(raf.readInt());
System.out.println("姓名:" + student.getName());
System.out.println("分數:" + student.getScore());
raf.close(); //關閉檔案
}
catch(ArrayIndexOutOfBoundsException e) {
System.out.println("請指定檔案名稱");
}
catch(IOException e) {
e.printStackTrace();
}
}
private static String readName(RandomAccessFile raf) throws IOException {
char[] name = new char[15]; //姓名長度為15
for(int i = 0 ; i < name.length ; i++)
name[i] = raf.readChar();
return (new String(name)).replace('0', ' ');
}
}
- 開啟檔案,並指定讀寫的方式
- 如何使用 class 中所提供的寫入與讀取方法
- 使用完後必須關閉檔案
位元串流
Java 將資料在來源與目的地之間的流動,抽象化為一個 stream(串流),而 stream 所流動的則是以 byte 為單位的資料。
而在 Java SE 中有兩個 class 用來作為 stream 的抽象表示,分別是 java.io.InputStream(例如:System.in)以及 java.io.OutputStream(例如:System.out),以下用簡單的程式碼來示範用 in 物件與 out 物件讀取及輸出 stream 資料:
package net.twcic;

import java.io.IOException;

public class StreamDemo {
   public static void main(String args[]) {
       try {
           System.out.print("輸入字元:");
           System.out.println("輸入字元十進位表示:" + System.in.read());
       }
       catch(IOException e) {
           e.printStackTrace();
       }
   }
}
FileInputStream & FileOuputStream
由名稱即可知道,這兩個 class 繼承了 java.io.InputStream 以及 java.io.OutputStream 是專門處理檔案之用的,當產生 FileInputStream 或是 FileOutputSteam object 時,就表示 stream 已經被開啟,而使用完之後務必記得關閉 stream,以免消耗不必要的系統資源,以下用範例程式說明:
package net.twcic;

import java.io.IOException;
import java.io.File;
import java.io.FileInputStream;
import java.io.FileOutputStream;

public class FileStreamDemo {
   public static void main(String args[]) {
       try {
           byte[] buffer = new byte[1024]; //作為緩衝區之用

           //定義來源目的檔案
           String srcFileName = "srcMyFile";
           String dstFileName = "dstMyFile";

           FileInputStream input = new FileInputStream(new File(srcFileName));
           FileOutputStream output = new FileOutputStream(new File(dstFileName));

           System.out.println("複製檔案:" + input.available() + " bytes.");
           while(true) {
               if(input.available() < 1024) {
                   int remain = -1;
                   while((remain = input.read()) != -1)    //每次 read() 取得 1 byte 的資料
                       output.write(remain);   //因為是 btye,所以可以用 int 表示
                   break;
               }
               else {
                   //使用 buffer,一次寫入長度為 1024 byets 的 stream
                   input.read(buffer);
                   output.write(buffer);
               }
           }

           //關閉 stream
           input.close();
           output.close();

           System.out.println("複製完成");
       }
       catch(ArrayIndexOutOfBoundsException e) {
           System.out.println("using: java FileStreamDemo src dst");
       }
       catch(IOException e) {
           e.printStackTrace();
       }
   }
}
BufferedInputStream & BufferedOutputStream
在上一段的例子中,使用了一個 byte array 作為 buffer,但由於這是檔案存取,因此利用硬碟作為 buffer 遠比使用實體記憶體作為 buffer 速度要慢的多,因此 J2SE 中提供了 java.io.BufferedInputStream 以及 java.io.BufferedOutputStream 來協助處理需要記憶體作為 buffer 的工作。
需要注意的是,若要使用 BufferedInputStream 的功能,必須指定一個 InputStream 供其使用;同樣的,要使用 BufferedOutputStream,也要指定 OutputStream 供其使用。以下用個範例程式來說明:
DataInputStream & DataOutputStreampackage net.twcic;
import java.io.IOException;
import java.io.File;
import java.io.FileInputStream;
import java.io.FileOutputStream;
import java.io.BufferedInputStream;
import java.io.BufferedOutputStream;
public class BufferedStreamDemo {
public static void main(String args[]) {
try {
byte[] data = new byte[1];
//定義來源目的檔案
File srcFile = new File("srcMyFile");
File dstFile = new File("dstMyFile");
BufferedInputStream bufInput = new BufferedInputStream(new FileInputStream(srcFile));
BufferedOutputStream bufOutput = new BufferedOutputStream(new FileOutputStream(dstFile));
System.out.println("複製檔案:" + srcFile.length() + " bytes");
while(bufInput.read(data) != -1)
bufOutput.write(data);
bufOutput.flush(); //將緩衝區資料全部寫出,確保 buffer 中的資料完全寫入檔案中
//關閉 stream
bufInput.close();
bufOutput.close();
System.out.println("複製完成");
}
catch(ArrayIndexOutOfBoundsException e) {
System.out.println("using: java UseFileStream src dst.");
}
catch(IOException e) {
e.printStackTrace();
}
}
}
這段要介紹的是 Java SE 中提供用來讀寫基本型態(Primitive Type)資料用的 class,分別是 java.io.DataInputStream 以及 java.io.DataOutputStream,其中提供了用來處理各種型態資料的 method,因此不論在不同的平台上,都不需要考慮到型態的大小,以下用範例程式來說明:
Member.java
DataStreamDemo.javapackage net.twcic;
public class Member {
private String name;
private int age;
public Member() {
}
public Member(String name, int age) {
this.name = name;
this.age = age;
}
public void setName(String name) {
this.name = name;
}
public void setAge(int age) {
this.age = age;
}
public String getName() {
return name;
}
public int getAge() {
return age;
}
}
package net.twcic;

import java.io.IOException;
import java.io.FileOutputStream;
import java.io.DataOutputStream;
import java.io.FileInputStream;
import java.io.DataInputStream;

public class DataStreamDemo {
   public static void main(String args[]) {
       Member[] members = {
           new Member("游錫堃", 30),
           new Member("逃喆", 20),
           new Member("比爾", 30),
           new Member("許功蓋碁", 40)
       };

       try {
           //宣告 DataOutputStream,必須內含 FileOutputStream object
           DataOutputStream dataOutput = new DataOutputStream(new FileOutputStream("myMemberList.txt."));
           for(Member m : members) {
               dataOutput.writeUTF(m.getName());
               dataOutput.writeInt(m.getAge());
           }
           dataOutput.flush(); //將緩衝區資料全部倒出至檔案
           dataOutput.close(); //關閉 stream

           //宣告 DataInputStream,必須內含 FileInputStream object
           DataInputStream dataInput = new DataInputStream(new FileInputStream("myMemberList.txt"));
           for(int i = 0 ; i < members.length ; i++) {
               String name = dataInput.readUTF();
               int age = dataInput.readInt();
               members[i] = new Member(name, age);
           }
           dataInput.close();  //關閉 stream

           for(Member m : members)
               System.out.println(m.getName() + " : " + m.getAge());
       }
       catch(IOException e) {
           e.printStackTrace();
       }
   }
}
ObjectInputStream & ObjectOutputStream
在 Java 中,許多資料都是以 object 的方式呈現,而 Java SE 中還提供將 object 直接存入檔案中的功能,而未來需要用到時,也提供從檔案中還原出 object 的功能。而提供這些功能的,則是 java.io.ObjectInputStream 以及 java.io.ObjectOutputStream。
而必須注意的是,此兩個 class 所使用的方式是將 object 序列化後,再存入檔案,因此要存入檔案的 object,其 class 就必須實作 Serializable interface,此 interface 並沒有任何 method 需要實作,僅僅是宣告此 class 所產生的 object 是可以序列化的。以下用範例程式來說明:
User.java
ObjectStreamDemo.javapackage net.twcic;
import java.io.Serializable;
public class User implements Serializable {
//用來維持版本一致之用,以免發生 java.io.InvalidClassException
private static final long serialVersionUID = 1L;
private String name;
private int number;
public User() {
}
public User(String name, int number) {
this.name = name;
this.number = number;
}
public void setName(String name) {
this.name = name;
}
public void setNumber(int number) {
this.number = number;
}
public String getName() {
return name;
}
public int getNumber() {
return number;
}
}
其中有幾個重點是必須注意的:package net.twcic;
import java.io.IOException;
import java.io.FileNotFoundException;
import java.io.File;
import java.io.FileInputStream;
import java.io.FileOutputStream;
import java.io.ObjectInputStream;
import java.io.ObjectOutputStream;
import java.util.List;
import java.util.ArrayList;
public class ObjectStreamDemo {
public static void main(String args[]) {
User[] users = {
new User("godleon", 12),
new User("Leon", 22)
};
String strFileName = "objFile.txt";
writeObjectToFile(users, strFileName);
try {
users = readObjectFromFile(strFileName);
for(User user : users)
System.out.println(user.getName() + "t" + user.getNumber());
System.out.println();
users = new User[2];
users[0] = new User("Bill", 1);
users[1] = new User("Mary", 33);
appendObjectToFile(users, strFileName);
users = readObjectFromFile(strFileName);
for(User user : users)
System.out.println(user.getName() + "t" + user.getNumber());
}
catch(FileNotFoundException e) {
e.printStackTrace();
}
}
//將 object 寫入檔案
public static void writeObjectToFile(Object[] objs, String filename) {
try {
//宣告 ObjectOutputStream,且必須代入 FileOutputStream object
ObjectOutputStream objOutput = new ObjectOutputStream(new FileOutputStream(new File(filename)));
for(Object obj : objs)
objOutput.writeObject(obj); //將 serialize 後的 object 寫入檔案
objOutput.close(); //關閉 stream
}
catch(IOException e) {
e.printStackTrace();
}
}
//將 object 從檔案中讀出
public static User[] readObjectFromFile(String filename) throws FileNotFoundException {
File file = new File(filename);
if(!file.exists())
throw new FileNotFoundException();
//宣告 List 作為 object container
List<User> list = new ArrayList<User>();
try {
FileInputStream fileInput = new FileInputStream(file);
//宣告 ObjectInputStream,且必須代入 FileInputStream object
ObjectInputStream objInput = new ObjectInputStream(fileInput);
while(fileInput.available() > 0) //檢查檔案中的 object 是否讀取完
list.add((User)objInput.readObject());
objInput.close(); //關閉 stream
}
catch(ClassNotFoundException e) {
e.printStackTrace();
}
catch(IOException e) {
e.printStackTrace();
}
//將讀取出來的 List 轉為物件
User[] users = new User[list.size()];
return list.toArray(users);
}
//將 object 附加到檔案中
public static void appendObjectToFile(Object[] objs, String filename) throws FileNotFoundException {
File file = new File(filename);
if(!file.exists())
throw new FileNotFoundException();
try {
//要以附加的方式加入資料到檔案中,必須設定第二個參數為 true
ObjectOutputStream objOutput = new ObjectOutputStream(new FileOutputStream(file, true)) {
//override writeStreamHeader(),避免 header 不一致的情形發生
protected void writeStreamHeader() throws IOException {}
};
for(Object obj : objs)
objOutput.writeObject(obj);
objOutput.close();
}
catch(IOException e) {
e.printStackTrace();
}
}
- 在 class 中宣告 serialVersionUID 的目的是為了維持版本訊息的一致
- 讀寫 object 的方法分別是 ObjectInputStream.readObject() 與 ObjectOutputStream.writeObject()
- 若檔案被附加(append)多次,就會包含多個 stream header,進行讀取檢查的時候會發生 java.io.StreamCorruptedException,為了解決這個問題,必須重新定義 ObjectOutputStream.writeStreamHeader()
PrintStream
之前介紹的 OuputStream 物件,都是直接將 memory 中的資料寫至目的地,而若是想要顯示純資料的話,就必須使用 PrintStream class,以下用個範例來說明:
package net.twcic;

import java.io.IOException;
import java.io.File;
import java.io.PrintStream;
import java.io.FileOutputStream;

public class StreamTest {
   public static void main(String args[]) throws IOException {
       //使用 FileOutputStream
       FileOutputStream fileOutput = new FileOutputStream(new File("streamTest.txt"));
       fileOutput.write(1);    //檔案中的資料為記憶體中的資料
       fileOutput.close();

       //使用 PrintStream
       PrintStream print = new PrintStream(new FileOutputStream(new File("printStreamTest.txt")));
       print.println(1); //為正常的純文字資料
       print.close();
   }
}
ByteArrayInputStream & ByteArrayOutputStream
stream 的來源或目的不一定是檔案,也可以是記憶體空間,例如這部分要說明的 java.io.ByteArrayInputStream 以及 java.io.ByteArrayOutputStream 即是使用 byte array 作為 stream 的來源與目的。以下用一個範例來說明:
package net.twcic;

import java.io.*;
import java.util.Scanner;

public class ByteArrayStreamDemo {
   public static void main(String args[]) {
       try {
           File file = new File("ByteArrayStream.txt");
           BufferedInputStream bufInput = new BufferedInputStream(new FileInputStream(file));
           ByteArrayOutputStream byteOutput = new ByteArrayOutputStream();

           byte[] bytes = new byte[1];
           while(bufInput.read(bytes) != -1)   //使用 BufferedInputStream 讀取檔案資料
               byteOutput.write(bytes);    //將資料寫入 byteArrayOutputStream
           byteOutput.close();
           bufInput.close();

           //以字元的方式顯示 ByteArray 內容
           bytes = byteOutput.toByteArray();
           for(int i = 0 ; i < bytes.length ; i++)
               System.out.print((char)bytes[i]);
           System.out.println();

           Scanner scanner = new Scanner(System.in);
           System.out.print("輸入修改位置:");
           int pos = scanner.nextInt();
           System.out.print("輸入修改字元:");
           bytes[pos-1] = (byte)scanner.next().charAt(0);  //修改陣列中的字元

           //將 byte array 中的內容存回檔案
           ByteArrayInputStream byteInput = new ByteArrayInputStream(bytes);
           BufferedOutputStream bufOutput = new BufferedOutputStream(new FileOutputStream(file));
           byte[] tmp = new byte[1];
           while(byteInput.read(tmp) != -1)    //從 byte stream 中取得資料並存入 tmp 中
               bufOutput.write(tmp);   //將 tmp 中的資料寫入檔案
           byteInput.close();
           bufOutput.flush();
           bufOutput.close();
       }
       catch(ArrayIndexOutOfBoundsException e) {
           e.printStackTrace();
       }
       catch(IOException e) {
           e.printStackTrace();
       }
   }
}
字元串流
有別於位元串流,字元串流是以一個字元(2 bytes)的長度為單位進行處理,並進行適當的字元編碼轉換,而 J2SDK 中則提供了 java.io.Reader 以及 java.io.Writer 作為字元串流的處理(即為純文字檔案的處理)。
由於 java.io.Reader 以及 java.io.Writer 皆為 abstract class,因此真正提供處理功能的都是其 sub class,以下就逐一介紹比較常用的幾個 class。
InputStreamReader & OutputStreamWriter
若要使用 InputStream 以及 OutputStream 進行字元處理,可使用 java.io.InputStreamReader 以及 java.io.OutputStreamWriter 來加上字元處理的功能,如此一來就不需要自行判斷字元的編碼(InputStream 以及 OutputStream 一次僅能處理 1 byte 長度的資料)。
以下用個簡單的範例來說明:
在編碼的部分,可以參考官方文件說明。package net.twcic;
import java.io.*;
public class StreamReaderWriterDemo {
public static void main(String args[]) {
try {
//設定檔案為 UTF-8 編碼
InputStreamReader streamReader = new InputStreamReader(new FileInputStream("ReaderWriterText.txt"), "UTF-8");
OutputStreamWriter streamWriter = new OutputStreamWriter(new FileOutputStream("ReaderWriterText_bak.txt"), "UTF-8");
int ch = 0;
while((ch = streamReader.read()) != -1) { //讀取字元
System.out.print((char)ch);
streamWriter.write(ch);
}
System.out.println();
streamReader.close();
streamWriter.close();
}
catch(IOException e) {
e.printStackTrace();
}
}
}
FileReader & FileWriter
若要存取的是純文字檔案,可以直接使用 java.io.FileReader 以及 java.io.FileWriter 兩個 class 進行處理,不過僅能使用系統預設編碼,若要指定其他編碼,則還是必須使用 java.io.InputStreamReader 以及 java.io.OutputStreamWriter,然而使用方法上則是大同小異。
BufferedReader & BufferedWriter
java.io.BufferedReader 與 java.io.BufferedWriter 在讀取文字檔案時,會先將資料讀入 buffer 中,而使用 read() method 時是先從 buffer 將資料取出,除非等到 buffer 資料取光時,才會到檔案中再度取資料進 buffer 中存放。而透過 buffer 的方式,可以減少磁碟 I/O 的動作,因此效率會較好。
以下有一段官方文件說明:
Without buffering, each invocation of read() or readLine() could cause bytes to be read from the file, converted into characters, and then returned, which can be very inefficient.接著用個範例來說明:
package net.twcic;

import java.io.*;

public class BufferedReaderWriterDemo {
   public static void main(String args[]) {
       try {
           //緩衝 System.in 輸入 stream
           BufferedReader bufReader = new BufferedReader(new InputStreamReader(System.in));
           //緩衝 FileWriter 字元輸出 stream
           BufferedWriter bufWriter = new BufferedWriter(new FileWriter("bufWriter.txt"));

           //每讀一行進行一次寫入動作
           String input = null;
           while(!(input = bufReader.readLine()).equals("quit")) {
               bufWriter.write(input);
               bufWriter.newLine();
           }
           bufReader.close();
           bufWriter.close();

       }
       catch(IOException e) {
           e.printStackTrace();
       }
   }
}
PrintWriter
此 class 與之前介紹過的 java.io.PrintStream 功能是類似的,都可將 Java 的 primitive type 的資料直接轉換為系統預設編碼下的對應字元,然後輸出至 OutputStream 中;而 java.io.PrintWriter 則還可以接受 Writer object 作為參數。以下用個範例示範 PrintStream 與 PrintWriter 的用法:
package net.twcic;

import java.io.*;

public class StreamWriterDemo {
   public static void main(String args[]) {
       try {
           byte[] sim = {
               (byte)0xbc, (byte)0xf2,
               (byte)0xcc, (byte)0xe5,
               (byte)0xd6, (byte)0xd0,
               (byte)0xce, (byte)0xc4
           };

           //資料來源
           ByteArrayInputStream byteInput = new ByteArrayInputStream(sim);
           InputStreamReader inputReader = new InputStreamReader(byteInput, "GB2312");

           //使用 PrintWriter
           PrintWriter printWriter = new PrintWriter(new OutputStreamWriter(new FileOutputStream("printWriter.txt"), "GB2312"));
           int in = 0;
           printWriter.write("PrintWriter:");
           while((in = inputReader.read()) != -1)
               printWriter.print((char)in);
           printWriter.println();
           printWriter.close();

           //使用 PrintStream
           byteInput.reset();
           PrintStream printStream = new PrintStream(new FileOutputStream("printWriter.txt", true), true, "GB2312");
           printStream.print("PrintStream:");
           while((in = inputReader.read()) != -1)
               printStream.print((char)in);
           printStream.println();
           printStream.close();
       }
       catch(IOException e) {
           e.printStackTrace();
       }
   }
}
CharArrayReader & CharArrayWriter
與之前介紹的 java.io.ByteArrayInputStream 與 java.io.ByteArrayOutputStream 類似,只是這邊所介紹的 java.io.CharArrayReader 與 java.io.CharArrayWriter 是將字元陣列作為資料輸入來源與輸出目的,用來處理 ASCII 與各種不同非西歐國家語系文字混雜的檔案很合適。以下用個範例來說明:
package net.twcic;

import java.io.*;
import java.util.*;

public class CharArrayReaderWriterDemo {
   public static void main(String args[]) {
       try {
           File file = new File("CharArray.txt");

           BufferedReader bufReader = new BufferedReader(new FileReader(file));
           CharArrayWriter charWriter = new CharArrayWriter();
           char[] array = new char[1];
           while(bufReader.read(array) != -1)
               charWriter.write(array);    //將 array 中的資料寫入 buffer
           charWriter.close();
           bufReader.close();

           array = charWriter.toCharArray();
           for(char ch : array)
               System.out.print(ch);
           System.out.println();
       }
       catch(IOException e) {
           e.printStackTrace();
       }
   }
}
訂閱:
文章 (Atom)