2014年10月14日 星期二

OpenStack Swift 簡介

OpenStack Swift 簡介

目錄


1、OpenStack Swift 是什麼?

以下截至 StackSwift 的定義:
OpenStack Swift is a multi-tenant, highly scalable and durable object storage system that was designed to store large amounts of unstructured data at low cost via a RESTful HTTP API.
從上述簡單的定義,無法完全表達 Swift 的強大,因此以下列出 Swift 的特色:
  • open source & 免費。
  • 目前有許多大型的 object storage 雲端服務使用 Swift (例如:Rackspace、Cloud Files、HP Cloud … etc)。
  • Swift 可以單獨提供 storage 服務,也可以與其他的雲端環境進行整合。
  • 只要是標準的 x86 架構的硬體,搭配標準的 Linux 系統,就可以運行 Swift。
  • Swift 跟 Amazon S3 相同,提供最終一致性(eventual consistency),因此也提供了強大的水平擴展能力。
  • 所有儲存在 Swift 的物件、檔案都有一個 URL。
  • 提供標準的 RESTful HTTP API,因此非常合適作為經由 web-based 存取資料的用戶端、裝置、應用程式。
  • 儲存於 Swift 的物件可以擁有可擴展性的 metadata,可用來有效率的進行索引 & 搜尋。
  • 所有儲存在 Swift 的物件都會有多個複本存在於其他的 Zone or Region。
  • Swift 透過增加額外的節點就可以很簡單的進行擴展。
  • 當增加或更換硬體時,不需要將原本的資料移動到其他的節點內。
  • 在 Swift 運行中,可隨時增加 or 移除節點。
  • 設計在低成本的前提下,可儲存超大量非結構性資料(檔案、圖片、影像 … 等等)。

2、Swift Request

Swift 有個重要特性:
所有儲存在 Swift 的物件、檔案都有一個 URL,並可透過 HTTP RESTful API 存取
接著來看看實際上 object 是如何存放在 Swift 中的,用下圖來說明:
object storage localtion in Swift
上圖一共有三個部分,分別是:

2.1 Account

Account storage 在整個 Swift storage 中是一個獨一無二的名稱,但 Account storage 在概念上並不屬於特定使用者的帳號 or 認證資訊,而是屬於儲存區域(storage area)的概念
在 Account storage 中,包含了與 Account 相關的 metadata 之外,就是儲存包含在此 Account 內的 Container 資訊。

2.2 Container

Container storage 則是屬於使用者自行定義的儲存區域,除了包含一些與 Container 本身相關的 metadata 之外,裡面主要就是 object 存放的地方。

2.3 Object

Object storage 存放的資料除了檔案本身之外,還包含了與檔案相關的 metadata。

2.4 Object URL 組成

有了 Account / Container / Object 三種概念後,就可以進一步來了解每個 object 的 URL 組成,每個 object 都會有一個專屬的 URL 可供存取,結構如下:
https://swift.example.com/v1/account/container/object
其中 URL 結構包含兩個主要部分:

3、Swift Processes

只要有運行 Swift process 或是 service 的機器,稱為 “node”。
運行 Proxy server process 的機器稱為 Proxy Node。
運行 Account / Container / Object process 的機器稱為 Storage Node。(當然也另外包含了處理資料一致性的 consistent service)
以下可以用一張簡單的圖說明 proxy node & storage node 在處理資料時的關係:
Swift Proxy Node & Storage Node

3.1 Proxy Layer

Proxy server process 是 Swift 中直接與外部的 client 連線的部分,用來處理來自外部的 HTTP request & response。
在整個架構中建議至少使用兩個 proxy node,以避免 single point failure 的狀況發生。
當 proxy server 收到 client request 後,會決定某個 storage node 來處理,收到 storage node 處理完的通知後會再回應給 client。

3.2 Account Layer

Account server process 用來處理與 Account 相關的 metadata & Account 內所包含的 Container 資訊,而這些資訊是存放再 Account server process 所在機器內的 SQLite 資料庫中。

3.3 Container Layer

Container server process 用來處理 Container metadata & 包含在內的 object 資訊需求,這些資料同樣也是存在 Container server process 所在機器內的 SQLite 的資料庫中。

3.4 Object Layer

Object server process 負責實際檔案的儲存,檔案是以二進位的方式儲存於磁碟中。
除了二進位資料外,還包含了很重要的時間戳記(timestamp)資訊,時間戳記資訊可以讓 Swift 同時儲存多種不同版本的檔案,
而 object 的 metadata 則是以副檔名 xattrs 的方式,與 object 儲存在一起,Swift 會負責將這些資料複製到多個不同節點上。

4、Swift Consistency Services

為了確保每個 storage node 之間的資料一致,Swift 提供了兩個重要的 Service,分別是 Auditor & Replicator

4.1 Auditor

Auditor service 運作在每一個 storage node 中,持續掃描磁碟確認沒有任何錯誤的發生,若是有錯誤發生,Auditor service 就會將有問題的 object 移到隔離區。
每一個 process(Account / Container / Object) 都有專屬的 Auditor 進行資料檢查之用。
Audit Service

4.2 Replicator

同樣的 Account / Container / Object process 也都有相對應的 replicator,功能主要用來確保本地端的資料與 Cluster 中其他 storage node 的資料是一致的。
比較需要注意的是,replicator service 只會將新的資料送到其他的 storage node,而不會從其他的 storage node 抓取新資料回來更新本地端資料。
而 replicator service 是透過 checksum 的方式來達到各 storage node 資料的一致:
Replicator Service

5、Swift Cluster 分群概念

Swift 是由一堆 proxy node & storage node 所組成,為了容易區分,因此有 Region & Zone 兩種邏輯上的分群概念。
以下直接用一張圖來說明 Region & Zone 的樣子:
Swift Cluster Architecture
Zone 是由多個 storage node 所組成,一般常用來作為資料中心內部同機櫃的分類之用,或是用來將特別用途的 node 歸類之用。
Region 則是由多個 Zone 組成,一般常用來區分不同區域的資料中心。
Region & Zone 是可以隨使用者自行定義的,上述只是範例而已。

6、Swift 資料存取設計

6.1 Partition

Swift 為了有效的跨 storage node 來存放資料,並可以達到快速存取的目的,在資料存放的模型有經過特別設計,以下用一張簡單的圖來說明:
Swift Partition
從上圖可以看到有三種元素,分別是:
  1. Storage Node
  2. Disk
  3. Partition
每個 Storage node 可能會有好幾個 Disk。
而 Partition 在這邊並不是傳統磁碟分割的概念來看,而是應該把它當作是 Disk 的一個目錄的概念來看,所以一個 Disk 會有很多個 Partition。
Partition 是 Swift process 處理的最小單位,也是資料實際存放的地方,而 consistency process 則是以 partition 為單位在檢查資料的一致性,資料在不同的硬碟(or 設備)間移動也是以 partition 為單位。
透過以 paritition 為單位來處理的方式,Swift 可以減少 process & 網路的負擔。

6.2 Ring

Ring 在 Swift 架構中是個相當重要的部分,它是一個映射(mapping)檔案,由一致性的 hash 演算法所產生,種類有三種,分別是 Account Ring / Container Ring / Object Ring。
透過 Ring 就可以知道每一個 object 實際對應到的 Account & Container & 實際存放的位置(partition),如下圖:
Swift Ring
Ring 存在於 Swift Storage Cluster 中的每一個 node 中,透過 Ring,可以確保每個 object 在 Swift Storage Cluster 中有多個複本存在於不同的 storage 內,也可以確保後續可以進行快速的存取。
透過維持一致性的 Ring,Swift Storage Cluster 不僅避免了單點錯誤的狀況發生,提升存取的速度,也大大的增加水平擴展的能力。

7、Switch 完整架構

最後來個 Swift Storage Cluster 的完整架構概觀:
OpenStack Swift Architecture
  • Proxy Server 是直接接受來自 client 請求的部分。
  • Proxy Server 收到 client 請求後,會透過 Ring 快速地進行 object 的存取 or 將資料同步到不同的 Object Server(storage node) 上。
  • 不同的 Object Server 可能會根據不同的規劃(地理區域、服務對象、功能性….等),區分成不同的 Zone(or Region) 作為管理之用。

8、參考資料

2014年10月11日 星期六

Ceph 簡介

Ceph 簡介

目錄

1、前言

什麼是 Ceph?

它是以 RADOS (Reliable Autonomic Distributed Object Store) 為主要設計方式的分散式儲存平台,因此在水平擴展的能力極為強大。

以下截錄一段在 inktank 網站上的說明:

Ceph is an open-source, massively scalable, software-defined storage system which provides object, block and file system storage in a single platform. It runs on commodity hardware—saving you costs, giving you flexibility—and because it’s in the Linux kernel, it’s easy to consume.

從以上的內容可以看出,Ceph 是個軟體定義的儲存系統有以下幾個特點:

  1. 在同一平台下可同時提供 Object Storgae & Block Storage & File System 等三種不同的服務。
  2. 強大的擴展能力。
  3. 不受限於任何硬體規格,no vendor lock-in !

一個平台可以同時提供三種服務,簡直是健達出奇蛋一樣,三種願望一次滿足。XD

2、Ceph 功能

Ceph 在三種不同的功能(object / block / file system)中,分別提供了以下特性:

CEPH OBJECT STORE CEPH BLOCK DEVICE CEPH FILESYSTEM
RESTful Interface Thin-provisioned POSIX-compliant semantics
S3- and Swift-compliant APIs Images up to 16 exabytes Separates metadata from data
S3-style subdomains Configurable striping Dynamic rebalancing
Unified S3/Swift namespace In-memory caching Subdirectory snapshots
User management Snapshots Configurable striping
Usage tracking Copy-on-write cloning Kernel driver support
Striped objects Kernel driver support FUSE support
Cloud solution integration KVM/libvirt support NFS/CIFS deployable
Multi-site deployment Back-end for cloud solutions Use with Hadoop (replace HDFS)
Disaster recovery Incremental backup

3、與 OpenStack 整合狀況

Folsom 版本開始,Ceph 就已經正式整合進 OpenStack 了。

Ceph for OpenStack

Ceph 提供了 Block Device service 給 Cinder & Glance & Nova 使用,還包含了其他強大的特性,例如:High Availability、Fault Tolerant … 等等。

此外 Ceph 也完全相容 Swift API,因此可以取代 Swift 提供 Object Storage service 之用;當然認證部分當然也整合了 Keystone。

由於以上原因,Ceph 可說是提供了一個完整的 storage solution 可用來整合進 OpenStack 中。

4、Ceph 基礎元素

在開始研究 Ceph 之前,有些基礎的元素是需要先了解的,以下逐一介紹:

4.1 CRUSH

CRUSH 在整個資料分散上扮演著重要角色,從「CRUSH: Controlled, Scalable, Decentralized Placement of Replicated Data」一文中可以看出 CRUSH 的功能:

CRUSH, a scalable pseudo-random data distribution function designed for distributed object-based storage system that efficiently maps data objects to storage devices without relying on a central directory.

CRUSH is designed to facilitate the addition and removal of storage while minimizing unnecessary data movement.

The algorithm accommodates a wide variety of data replication and reliability mechanisms and distributes data in terms of user-defined policies that enforce separation of replicas across failure domains.

從上面的說明可以看出,CRUSH 提供了以下功能:

  1. 將資料有效率的存放在不同的儲存裝置中。
  2. 即使移除整個 cluster 中的儲存裝置,也不會影響到資料正常的存取。
  3. 不需要有任何主要的管理裝置(or 節點)來做為控管之用。
  4. 可依照使用者所定義的規則來處理資料分散的方式。

CRUSH 包含了兩個部分,分別是 Algorithm & Map。

4.1.1 CRUSH Algorithm

CRUSH Algorithm 的用途在於可透過資料儲存位置的計算,決定如何存取資料;也因為是透過演算法計算的方式,可以有效避免 single point of failure 的問題發生。

4.1.2 CRUSH Map

CRUSH Map 是一群資訊的集合,包含了:

  1. OSD(Object Storage Daemon) 集合的資訊
  2. 由多個 device 所匯集而成的實體位置資訊
  3. 多個用來指定 Ceph 應該如何在 ceph cluster pool 進行資料複製的規則

透過以上資訊,CRUSH 可以將資料分散存放在不同的實體位置,並避免單點錯誤造成資料無法存取的狀況發生。

4.2 Placement Group

首先用下圖來說明 object / Placement Group / OSD 之間的關係:

Placement Group

當使用者把資料(object)存到 cluster 中時,每個 object 都會對應到一個 placement group(PG),而每一個 PG 都會對應到一組 OSD,其中第一個 OSD 為 primary,其他則是 replica。

多個 PG 也可以對應到同一個 OSD,因此 PG & OSD 其實是種多對多的關係。

而 OSD 在幹嘛? 就是把資料存入到不同的實體位置囉!

4.3 Object Storage Daemon (OSD)

Ceph OSD(Object Storage Daemon) Daemon 的主要工作就是透過網路,進行實際資料(object)的存取,但 OSD 完整個功能主要有以下幾項:

  1. 資料儲存
  2. 資料複製
  3. 資料回復
  4. 資料回填(backfilling, 通常發生於新 OSD 加入時)
  5. Rebalance (發生於新 OSD 加入 CRUSH map 時)
  6. 以 heartbeat 的方式取得其他 OSD 的狀態,並將資訊提供 Ceph Monitor

4.4 Monitor

為了有效的在分散式的環境下存取檔案,每一個 Ceph Monitor daemon 維護著很多份與 cluster 相關的映射資料(map),包含:

  1. Monitor map
  2. OSD map
  3. Placement Group (PG) map
  4. CRUSH map
  5. MDS map (若使用 Ceph File System,還會有這組映射資料)

主要是用來監控 Ceph Storage Cluster 上的即時狀態,確保 Ceph 可以運作無誤。

4.5 Metadata Server (MDS)

負責管理 Ceph File System 上的 metadata,且讓使用者可以把 Ceph File System 當作一般的檔案系統操作。

Ceph Object Storage & Ceph Block Device 不會使用到 MDS。

5、Ceph Storage Cluster 架構

5.1 Ceph Node 類型

組成 Ceph Storage Cluster 的元素稱為 Ceph node,而 Ceph node 共有以下類型:

5.1.1 Ceph OSD Daemons

實際與 client 溝通進行資料存取的即為 OSD daemon。

每個 object 被儲存到多個 PG(placement group) 中,每個 PG 再被存放到多個 OSD 中。

為了達到 Active + Clean 的狀態,確認每份資料都有兩份的儲存,每個 Ceph Storage Cluster 中至少都必須要有兩個 Ceph OSD。

5.1.2 Monitor

在每一個 Ceph Storage Cluster 中,都有多個 Monitor 存在,每個 Monitor 都維護著上述的五種映射資訊(monitor map / OSD map / PG map / CRUSH map / MDS map),以及 monitor / OSD / PG …等狀態的歷史資訊。

5.1.3 MDS

作為處理 Ceph File System 的 metadata 之用,若僅使用 Block or Object storage,就不會用到這部分功能。

5.2 完整架構

首先用下圖來表示完整的 Ceph 架構:

Ceph Architecture

其中最底層的 RADOS 是由 OSD & Monitor & MDS 三種所組成:

enter image description here

以上則是提供不同的 middleware( radosgw / rbd / cephfs),呼叫 librados 進行資料存取,來提供不同的 service(Object / Block / File System)。

5.2.1 Object Storage

Ceph Object Storage 的架構如下:

Ceph Object Storage

其中底層由 OSD & Monitor 來組成,透過 librados 來控制協調;上層則提供了 RADOSGW 來達成與 OpenStack Swift & Amazon S3 APIs 的一致性。

5.2.2 Block Storage

Ceph Block Storage 的架構如下:

Ceph Block Storage

Ceph Block device 提供了 thin-provison / 可調整大小 / 分散儲存 / 快照 / 一致性 … 等功能。

Ceph block storage 除了可以被 Linux kernel 直接使用外,也可以被 KVM / Qemu 使用,也可以透過 LIBRBD 與其他雲端系統(例如:OpenStack、CloudStack)整合。

5.2.3 File System

Ceph File System 的架構如下:

Ceph File System

底層的部分同樣是由 RADOS(OSDs + Monitors + MDSs) 提供,在上一層同樣與 librados 溝通,最上層則是有不同的 library 將其轉換成標準的 POSIX 檔案系統供使用。

6、參考資料

2014年10月8日 星期三

安裝 OpenStack @ Ubuntu 14.04 (8) - 安裝 Block Storage Service (Cinder)

安裝 OpenStack @ Ubuntu 14.04 (8) - 安裝 Block Storage Service (Cinder)

目錄

1、安裝環境說明

  • OS:Ubuntu 14.04 LTS

  • Controller

    • IP:10.0.0.11 / 24
    • Gateway:10.0.0.1
  • Network

    • Management IP:10.0.0.21 / 24 (eth0)
    • Gateway:10.0.0.1
    • Instance Tunnel IP:10.0.1.21 / 24 (eth1)
    • External Interface (eth2)
      • IP:不指定 IP
      • 設定方式如下:(修改 /etc/network/interfaces)

    auto eth2
    iface eth2 inet manual
    up ip link set dev $IFACE up
    down ip link set dev $IFACE down

  • Compute 1

    • Management IP:10.0.0.31 / 24
    • Gateway:10.0.0.1
    • Instance Tunnel IP:10.0.1.31
  • Block Storage 1

    • Management IP:10.0.0.41 / 24
    • Gateway:10.0.0.1
    • Instance Tunnel IP:10.0.1.41
  • 修改每個 node 的 /etc/hosts 檔案,並加入以下內容:

    10.0.0.11 controller
    10.0.0.21 network
    10.0.0.31 compute1
    10.0.0.41 block1

    • 使用者身分:root

    2、Block Storage Service(Cinder) 概觀

    OpenStack Block Storage(Cinder) 的工作包含 volume、volume 快照、volume 類型的管理,主要用來提供給 VM 區塊等級(Block Level)的永久性儲存空間,提供快照、資料回復…等功能,還可以整合其他商業化的企業儲存平台,例如 NetApp、Nexenta … 等。

    3、Cinder 服務元件架構

    在安裝之前,可以先用以下這張圖來了解一下 Cinder 是由那些 component 組合而成的(截錄自工研院-OpenStack Cinder Tutorial 一文):

    Cinder Interaction

    從上圖可看出,Cinder 共包含了以下重要的部分:

    3.1 cinder-api

    用來接受來自外部對於 volume 空間的請求後,透過 message queue 將請求轉給 cinder-scheduler 後再轉給 cinder-volume 進行後續處理。

    3.2 cinder-scheduler

    類似 nova-schedular 的角色,接收到來自 message queue 的命令後,會從多個(如果有)提供 block storage 服務的 node 挑選出一個最合適來建立 volume。

    3.3 cinder-volume

    cinder-volume 的工作大概有幾項:

    1. 接收來自 cinder-scheduler 的命令,建立新的 volume。
    2. 接收來自 message queue 的訊息,進行 volume 空間的讀寫。
    3. 透過不同的 driver,還可以使用多種不同的 storage provider 所提供的設備。

    3.4 message queue

    負責將訊息派送給各個 Block Storage service。

    4、安裝 & 設定 Block Storage Service Controller

    了解 Block Storage 各個不同服務之後,接下來要來進行各個服務的安裝,首先這邊要先安裝的是 cinder-api & cinder-scheduler

    由於這兩個服務並不牽涉到真正磁碟空間的存取 or 外部儲存設備的控制,因此這邊選擇在 controller node 上進行安裝。

    4.1 安裝服務套件

    controller# apt-get install cinder-api cinder-scheduler

    4.2 設定資料庫

    首先建立資料庫 & 設定權限:

    # 登入 MySQL
    controller# mysql -u root -p
    Enter password:
    
    # 建立 cinder 資料庫
    mysql> create database cinder;
    Query OK, 1 row affected (0.02 sec)
    
    # 設定使用者權限
    mysql> grant all privileges on cinder.* to 'cinder'@'localhost' identified by 'YOUR_CINDER_DB_PASSWORD';
    Query OK, 0 rows affected (0.01 sec)
    
    mysql> grant all privileges on cinder.* to 'cinder'@'%' identified by 'YOUR_CINDER_DB_PASSWORD';
    Query OK, 0 rows affected (0.00 sec)

    接著修改 Cinder 設定檔 /etc/cinder/cinder.conf,加入以下內容:

    [database]
    connection = mysql://cinder:YOUR_CINDER_DB_PASSWORD@controller/cinder

    最後建立 Cinder 資料庫中的相關 table:

    controller# sh -c "cinder-manage db sync" cinder

    4.3 設定 message queue

    此處要設定 Cinder 使用之前所安裝好的 RabbitMQ message broker 作為 message queue 之用。

    修改設定檔 /etc/cinder/cinder.conf,加入以下內容:

    [DEFAULT]
    rpc_backend = rabbit
    rabbit_host = controller
    rabbit_userid = guest
    rabbit_password = YOUR_RABBITMQ_PASSWORD

    4.4 設定 Identity Service 認證

    #建立 Cinder service 用的 user
    controller# keystone user-create --name=cinder --pass=YOUR_CINDER_PASSWORD --email=admin@example.com
    +----------+----------------------------------+
    | Property |              Value               |
    +----------+----------------------------------+
    |  email   |        admin@example.com         |
    | enabled  |               True               |
    |    id    | f31b2ebaf1be446490769637c6987b5b |
    |   name   |              cinder              |
    | username |              cinder              |
    +----------+----------------------------------+
    
    #將 user / service Tenant / admin Role 連結
    controller# keystone user-role-add --user=cinder --tenant=service --role=admin

    4.5 向 Identity Service 註冊 Cinder 服務 & API 服務端點

    首先要修改設定檔 /etc/cinder/cinder.conf,加入設定內容如下:

    [keystone_authtoken]
    auth_uri = http://controller:5000
    auth_host = controller
    auth_port = 35357
    auth_protocol = http
    admin_tenant_name = service
    admin_user = cinder
    admin_password = CINDER_PASS

    向 Identity Service(Keystone) 註冊 Service & API endpoint (version1):

    #註冊 Cinder service (version 1)
    controller# keystone service-create --name=cinder --type=volume --description="OpenStack Block Storage"
    +-------------+----------------------------------+
    |   Property  |              Value               |
    +-------------+----------------------------------+
    | description |     OpenStack Block Storage      |
    |   enabled   |               True               |
    |      id     | 0b1d7ff1bb3f4136be58e32bc73e89bc |
    |     name    |              cinder              |
    |     type    |              volume              |
    +-------------+----------------------------------+
    
    #註冊 Cinder API endpoint (version 1)
    controller#  keystone endpoint-create --service-id=$(keystone service-list | awk '/ volume / {print $2}') --publicurl=http://controller:8776/v1/%\(tenant_id\)s --adminurl=http://controller:8776/v1/%\(tenant_id\)s
    +------------+-----------------------------------------+
    |  Property  |                  Value                  |
    +------------+-----------------------------------------+
    |  adminurl  | http://controller:8776/v1/%(tenant_id)s |
    |     id     |     5a58ee0f46ca4721aaa28be98520dec3    |
    | publicurl  | http://controller:8776/v1/%(tenant_id)s |
    |   region   |                regionOne                |
    | service_id |     0b1d7ff1bb3f4136be58e32bc73e89bc    |
    +------------+-----------------------------------------+

    接著向 Identity Service(Keystone) 註冊 Service & API endpoint (version2):

    #註冊 Cinder service (version 2)
    controller#  keystone service-create --name=cinderv2 --type=volumev2 --description="OpenStack Block Storage v2"
    +-------------+----------------------------------+
    |   Property  |              Value               |
    +-------------+----------------------------------+
    | description |    OpenStack Block Storage v2    |
    |   enabled   |               True               |
    |      id     | 6e20dad30957436fb142c20d1848ce91 |
    |     name    |             cinderv2             |
    |     type    |             volumev2             |
    +-------------+----------------------------------+
    
    #註冊 Cinder API endpoint (version 2)
    controller# keystone endpoint-create --service-id=$(keystone service-list | awk '/ volumev2 / {print $2}') --publicurl=http://controller:8776/v2/%\(tenant_id\)s --internalurl=http://controller:8776/v2/%\(tenant_id\)s --adminurl=http://controller:8776/v2/%\(tenant_id\)s
    +-------------+-----------------------------------------+
    |   Property  |                  Value                  |
    +-------------+-----------------------------------------+
    |   adminurl  | http://controller:8776/v2/%(tenant_id)s |
    |      id     |     39d9a5060449490fbd1016cbcd1f4904    |
    | internalurl | http://controller:8776/v2/%(tenant_id)s |
    |  publicurl  | http://controller:8776/v2/%(tenant_id)s |
    |    region   |                regionOne                |
    |  service_id |     6e20dad30957436fb142c20d1848ce91    |
    +-------------+-----------------------------------------+

    4.6 啟動服務

    最後啟動 controller 上的 cinder-scheduler & cinder-api 服務:

    controller# service cinder-scheduler restart
    controller# service cinder-api restart

    5、安裝 &設定 Block Storage Service node

    5.1 Block Storage Node 環境說明

    controller 安裝完畢後,接著要安裝實際提供磁碟存取空間的 service 到擁有磁碟空間的 storage node 上。

    這邊準備了另外一台電腦(block1),除了以下是目前磁碟的狀況:

    block1# # fdisk -l

    Disk /dev/sda: 8589 MB, 8589934592 bytes
    …..
    Device Boot Start End Blocks Id System
    /dev/sda1 * 2048 14680063 7339008 83 Linux
    /dev/sda2 14682110 16775167 1046529 5 Extended
    /dev/sda5 14682112 16775167 1046528 82 Linux swap / Solaris

    Disk /dev/sdb: 17.2 GB, 17179869184 bytes
    …..
    Disk /dev/sdb doesn’t contain a valid partition table

    Disk /dev/sdc: 17.2 GB, 17179869184 bytes
    …..
    Disk /dev/sdc doesn’t contain a valid partition table

    這邊將會以兩個空白的磁碟作 LVM 來提供磁碟空間的服務。

    網路設定在前面的安裝環境說明有提供。

    5.2 建立 LVM 磁區

    首先安裝 LVM 所需套件:

    block1# apt-get install lvm2

    5.3 建立 LVM Physical Volumes & Logical Volumes

    #建立 physical volume
    block1# pvcreate /dev/sdb
      Physical volume "/dev/sdb" successfully created
    
    #建立 physical volume
    block1# pvcreate /dev/sdc
      Physical volume "/dev/sdc" successfully created
    
    #建立 logical volume
    block1# vgcreate cinder-volumes /dev/sdb /dev/sdc
      Volume group "cinder-volumes" successfully created

    修改設定檔 /etc/lvm/lvm.conf,確認 filter 設定有包含上述的 /dev/sdb & /dev/sdc:

    #預設是允許所有 device
    filter = [ "a/.*/" ]

    最後確認 PV & LV 的狀態:

    #physical volume 狀態
    block1# # pvdisplay
      --- Physical volume ---
      PV Name               /dev/sdb
      VG Name               cinder-volumes
      PV Size               16.00 GiB / not usable 4.00 MiB
      Allocatable           yes
      PE Size               4.00 MiB
      Total PE              4095
      Free PE               4095
      Allocated PE          0
      PV UUID               peJ31b-ef8x-2x60-3uZS-ovGA-dTLb-1WfpBL
    
      --- Physical volume ---
      PV Name               /dev/sdc
      VG Name               cinder-volumes
      PV Size               16.00 GiB / not usable 4.00 MiB
      Allocatable           yes
      PE Size               4.00 MiB
      Total PE              4095
      Free PE               4095
      Allocated PE          0
      PV UUID               191rYU-Tfdp-7Sop-x76M-o1cn-F4Mp-S7QhoF
    
    #logical volume 狀態
    block1# vgdisplay
      --- Volume group ---
      VG Name               cinder-volumes
      System ID
      Format                lvm2
      Metadata Areas        2
      Metadata Sequence No  1
      VG Access             read/write
      VG Status             resizable
      MAX LV                0
      Cur LV                0
      Open LV               0
      Max PV                0
      Cur PV                2
      Act PV                2
      VG Size               31.99 GiB
      PE Size               4.00 MiB
      Total PE              8190
      Alloc PE / Size       0 / 0
      Free  PE / Size       8190 / 31.99 GiB
      VG UUID               ii5kLD-8K94-wqZw-W1CN-nqSq-tLkW-0l74oZ

    若想更了解 LVM,可參考「紐菲斯的部落格 » 好用的Linux LVM 管理」一文。

    5.4 安裝 & 設定 Block Storage service

    5.4.1 安裝套件

    除了 cinder-volume 要裝之外,python-mysqldb 也別忘記裝了,否則 cinder-volume service 無法與 controller 的 MySQL service 互動

    block1# apt-get install cinder-volume python-mysqldb

    5.4.2 設定檔調整

    修改設定檔 /etc/cinder/cinder.conf,要加入的設定包含四個部分,分別是:

    1. Identity Service(Keystone)、
    2. Message Broker (RabbitMQ)
    3. Database
    4. Image Service (Glance)

    加入的設定內容如下:

    #Identity Service (Keystone)
    [keystone_authtoken]
    auth_uri = http://controller:5000
    auth_host = controller
    auth_port = 35357
    auth_protocol = http
    admin_tenant_name = service
    admin_user = cinder
    admin_password = CINDER_PASSWORD
    
    #Message Broker (RabbitMQ)
    [DEFAULT]
    rpc_backend = rabbit
    rabbit_host = controller
    rabbit_port = 5672
    rabbit_userid = guest
    rabbit_password = YOUR_RABBITMQ_PASS
    
    #Database
    [database]
    connection = mysql://cinder:YOUR_CINDER_DBPASSWORD@controller/cinder
    
    #Image Service(Glance)
    [DEFAULT]
    glance_host = controller

    最後啟動相關服務即可:

    block1# service cinder-volume restart
    block1# service tgt restart

    6、驗證安裝是否成功

    controller# source ~/OpenStack/demo-openrc.sh
    controller# cinder create --display-name myVolume 1
    +---------------------+--------------------------------------+
    |       Property      |                Value                 |
    +---------------------+--------------------------------------+
    |     attachments     |                  []                  |
    |  availability_zone  |                 nova                 |
    |       bootable      |                false                 |
    |      created_at     |      2014-10-07T21:19:50.061350      |
    | display_description |                 None                 |
    |     display_name    |               myVolume               |
    |      encrypted      |                False                 |
    |          id         | d92f805d-7bdb-4280-80c1-ba562de405cc |
    |       metadata      |                  {}                  |
    |         size        |                  1                   |
    |     snapshot_id     |                 None                 |
    |     source_volid    |                 None                 |
    |        status       |               creating               |
    |     volume_type     |                 None                 |
    +---------------------+--------------------------------------+
    
    #顯示剛剛建立的 volume 資訊,若是看到 available 就表示成功囉!
    controller#  cinder list
    +--------------------------------------+-----------+--------------+------+-------------+----------+-------------+
    |                  ID                  |   Status  | Display Name | Size | Volume Type | Bootable | Attached to |
    +--------------------------------------+-----------+--------------+------+-------------+----------+-------------+
    | d92f805d-7bdb-4280-80c1-ba562de405cc | available |   myVolume   |  1   |     None    |  false   |             |
    +--------------------------------------+-----------+--------------+------+-------------+----------+-------------+

    登入 Horizon 之後同樣也可以看的到:
    Project - Volumes

    7. 障礙排除

    一開始按照官網文件設定好時,建立好的 volume 的狀態都是 error,於是檢查了一下位於 controller 上的 log 資訊 (/var/log/cinder/cinder-scheduler.log),出現以下訊息:

    2014-10-07 21:51:51.378 16282 INFO oslo.messaging._drivers.impl_rabbit [req-a51641a5-f260-4540-86f1-88afe19d796f - - - - -] Reconnecting to AMQP server on localhost:5672
    2014-10-07 21:51:51.379 16282 INFO oslo.messaging._drivers.impl_rabbit [req-a51641a5-f260-4540-86f1-88afe19d796f - - - - -] Delaying reconnect for 1.0 seconds…
    2014-10-07 21:51:55.393 16282 ERROR oslo.messaging._drivers.impl_rabbit [req-a51641a5-f260-4540-86f1-88afe19d796f - - - - -] AMQP server on localhost:5672 is unreachable: Socket closed. Trying again in 30 seconds.
    2014-10-07 21:52:25.420 16282 INFO oslo.messaging._drivers.impl_rabbit [req-a51641a5-f260-4540-86f1-88afe19d796f - - - - -] Reconnecting to AMQP server on localhost:5672
    2014-10-07 21:52:25.420 16282 INFO oslo.messaging._drivers.impl_rabbit [req-a51641a5-f260-4540-86f1-88afe19d796f - - - - -] Delaying reconnect for 1.0 seconds…
    2014-10-07 21:52:29.440 16282 ERROR oslo.messaging._drivers.impl_rabbit [req-a51641a5-f260-4540-86f1-88afe19d796f - - - - -] AMQP server on localhost:5672 is unreachable: Socket closed. Trying again in 30 seconds.
    2014-10-07 21:52:41.508 16282 INFO cinder.openstack.common.service [-] Caught SIGTERM, exiting
    2014-10-07 21:52:42.284 8458 AUDIT cinder.service [-] Starting cinder-scheduler node (version 2014.1.2)
    2014-10-07 21:52:42.299 8458 INFO oslo.messaging._drivers.impl_rabbit [req-8e0f3895-d447-4f27-a3b4-f5789f02b9f8 - - - - -] Connected to AMQP server on controller:5672
    2014-10-07 21:52:43.055 8458 INFO oslo.messaging._drivers.impl_rabbit [-] Connected to AMQP server on controller:5672
    2014-10-07 21:52:58.305 8458 WARNING cinder.context [-] Arguments dropped when creating context: {‘user’: u’bc1ae50e167f45edb064e582702c5792’, ‘tenant’: u’7539436331ca4f9783bf93163e2a2e0f’, ‘user_identity’: u’bc1ae50e167f45edb064e582702c5792 7539436331ca4f9783bf93163e2a2e0f - - -‘}
    2014-10-07 21:52:58.399 8458 ERROR cinder.scheduler.flows.create_volume [req-6c3a8fac-3f20-46d5-bd59-a7689bca561f bc1ae50e167f45edb064e582702c5792 7539436331ca4f9783bf93163e2a2e0f - - -] Failed to schedule_create_volume: No valid host was found.

    從上述資訊可知,cinder-scheduler 服務找不到提供 cinder-volume service 的 node,因此朝向 block1 主機沒有正確的加入 OpenStack 環境中的方向來尋找問題。

    於是到 block1 主機上檢查 Log (/var/log/cinder/cinder-volume.log ),出現以下錯誤訊息:

    2014-10-08 05:15:04.936 6422 ERROR cinder.openstack.common.threadgroup [-] No module named MySQLdb
    2014-10-08 05:15:06.388 6432 ERROR cinder.openstack.common.threadgroup [-] No module named MySQLdb
    2014-10-08 05:15:06.842 6442 ERROR cinder.openstack.common.threadgroup [-] No module named MySQLdb
    2014-10-08 05:15:08.290 6452 ERROR cinder.openstack.common.threadgroup [-] No module named MySQLdb
    2014-10-08 05:15:08.734 6462 ERROR cinder.openstack.common.threadgroup [-] No module named MySQLdb
    2014-10-08 05:15:10.183 6472 ERROR cinder.openstack.common.threadgroup [-] No module named MySQLdb

    看起來是少裝了 python 與 MySQL 相關的 package,找了一下網路資料,原來要補裝 python-mysqldb,所以只要在 block1 主機上補裝這個套件,再重新啟動 cinder-volume 服務即可。

    前面的安裝過程中已經補上,如果按照前面操作下來,應該是不會遇到跟我相同的錯誤。

    8、參考資料

    2014年10月5日 星期日

    安裝 OpenStack @ Ubuntu 14.04 (7) - 安裝 Dashboard (Horizon)

    安裝 OpenStack @ Ubuntu 14.04 (7) - 安裝 Dashboard (Horizon)

    目錄

    1、安裝環境說明

    • OS:Ubuntu 14.04 LTS

    • Controller

      • IP:10.0.0.11 / 24
      • Gateway:10.0.0.1
    • Network

      • Management IP:10.0.0.21 / 24 (eth0)
      • Gateway:10.0.0.1
      • Instance Tunnel IP:10.0.1.21 / 24 (eth1)
      • External Interface (eth2)
        • IP:不指定 IP
        • 設定方式如下:(修改 /etc/network/interfaces)

      auto eth2
      iface eth2 inet manual
      up ip link set dev $IFACE up
      down ip link set dev $IFACE down

  • Compute 1

    • Management IP:10.0.0.31 / 24
    • Gateway:10.0.0.1
    • Instance Tunnel IP:10.0.1.31
  • 修改每個 node 的 /etc/hosts 檔案,並加入以下內容:

    10.0.0.11 controller
    10.0.0.21 network
    10.0.0.31 compute1

    • 使用者身分:root

    2、前言

    首先來看一下官網對 Horizon(Dashboard) 的定義:

    OpenStack Dashboard (Horizon) provides administrators and users a graphical interface to access, provision and automate cloud-based resources. The design allows for third party products and services, such as billing, monitoring and additional management tools. Service providers and other commercial vendors can customize the dashboard with their own brand.

    The dashboard is just one way to interact with OpenStack resources. Developers can automate access or build tools to manage their resources using the native OpenStack API or the EC2 compatibility API.

    簡單來說,Horizon 就是提供使用者可以透過圖形介面(網頁)簡單的管理雲端資源,加入 third-party 的特殊管理功能,還可以自由客製化成任何想要的樣子。

    當然透過 Horizon 操作只是其中一個管理 & 使用 OpenStack 資源的方式,也可以透過直接下指令,甚至可以自行開發程式來呼叫相關 API 達成所需功能。

    畢竟,OpenStack 上所有的 service 都是以 REST API-based 來提供服務的。

    3、安裝需求

    安裝 Horizon 之前,有幾項需求必須達成:

    1. Compute Service(Nova) & Identity Service(Keystone) 必須安裝完成。 (若有按照之前的介紹安裝,此時應該會有 Nova & Keystone)
    2. 必須使用擁有 sudo 權限的使用者來執行 Horizon。 (我們預設使用 root,所以沒問題)
    3. Python 版本為 2.6 or 2.7 且必須支援 Dajango。(我們這邊使用 Ubuntu 14.04,所以也沒問題)

    官網安裝文件要求 Horizon 必須安裝到可以連到 Keystone 的地方,因此文中的示範會將 Horizon 安裝到 controller 上

    目前 Keystone 服務也正是安裝在 controller 上。

    4、安裝 Dashboard (Horizon)

    安裝 Horizon 包含了五個步驟:

    1. 安裝相關套件
    2. 檢查 Horizone 設定
    3. 設定可存取 Horizon 的清單
    4. 啟動相關服務

    4.1 安裝相關套件

    #安裝相關套件
    controller# apt-get -y install apache2 memcached libapache2-mod-wsgi openstack-dashboard
    
    #移除會造成特殊問題的 theme 套件
    controller# apt-get remove --purge openstack-dashboard-ubuntu-theme

    4.2 檢查 Horizone 設定

    1. 確認 /etc/openstack-dashboard/local_settings.py 中的 CACHES[‘default’][‘LOCATION’],是否與 /etc/memcached.conf 中的設定是否一致。

    2. 修改 /etc/openstack-dashboard/local_settings.py,設定如下:

    #指定安裝 Identity Service(Keystone) 的 hostname 給 OPENSTACK_HOST 參數
    OPENSTACK_HOST = "controller"

    4.3 設定可存取 Horizon 的清單

    檢查 /etc/openstack-dashboard/local_settings.py 中的 ALLOWED_HOSTS,確認你所要用來連到 Horizone 的機器有包含在內。

    預設為 ALLOWED_HOSTS = “*”,表示所有機器都可以連到 Horizon。

    4.4 啟動相關服務

    若以上設定檔有任何修改,則重啟以下服務:

    controller# service apache2 restart
    controller# service memcached restart

    5、登入 Horizon

    5.1 登入畫面

    若按照之前的設定到這邊,可選擇 admin 或是 demo 登入。

    OpenStack 登入畫面

    5.2 系統畫面:

    管理員 >> 系統面板 >> 概觀
    Horizon >>管理員 >> 系統面板 >> 概觀

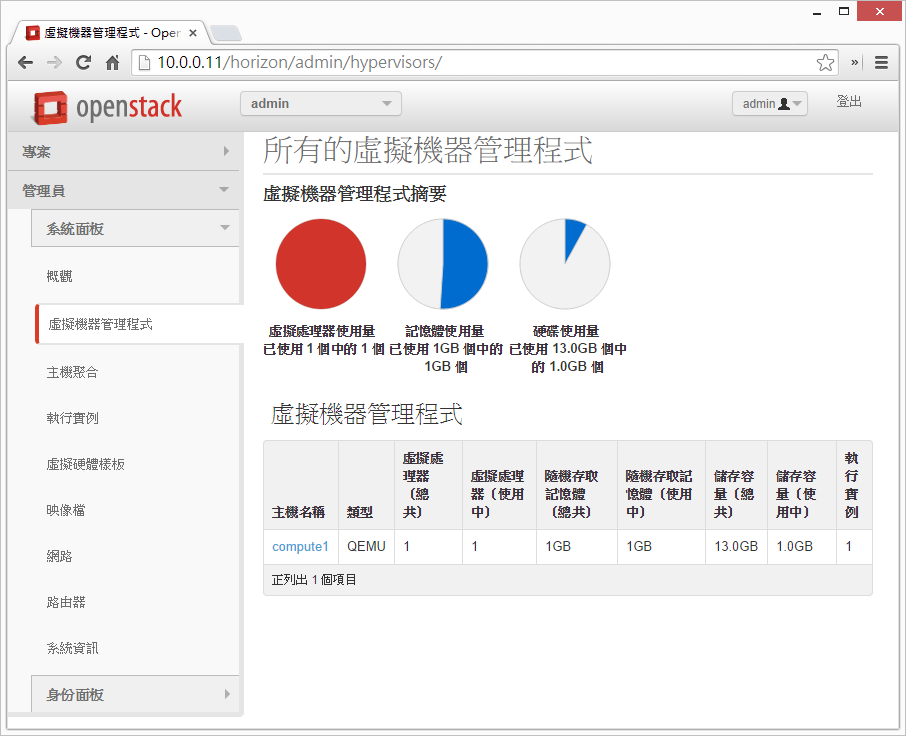
    管理員 >> 系統面板 >> 虛擬機器管理程式
    Horizon >> 管理員 >> 系統面板 >> 虛擬機器管理程式

    管理員 >> 系統面板 >> 主機聚合
    Horizon >> 管理員 >> 系統面板 >> 主機聚合

    管理員 >> 系統面板 >> 執行實例
    Horizon >> 管理員 >> 系統面板 >> 執行實例

    管理員 >> 系統面板 >> 虛擬硬體樣板
    Horizon >> 管理員 >> 系統面板 >> 虛擬硬體樣板

    管理員 >> 系統面板 >> 映像檔
    Horizon >> 管理員 >> 系統面板 >> 映像檔

    管理員 >> 系統面板 >> 網路
    Horizon >> 管理員 >> 系統面板 >> 網路

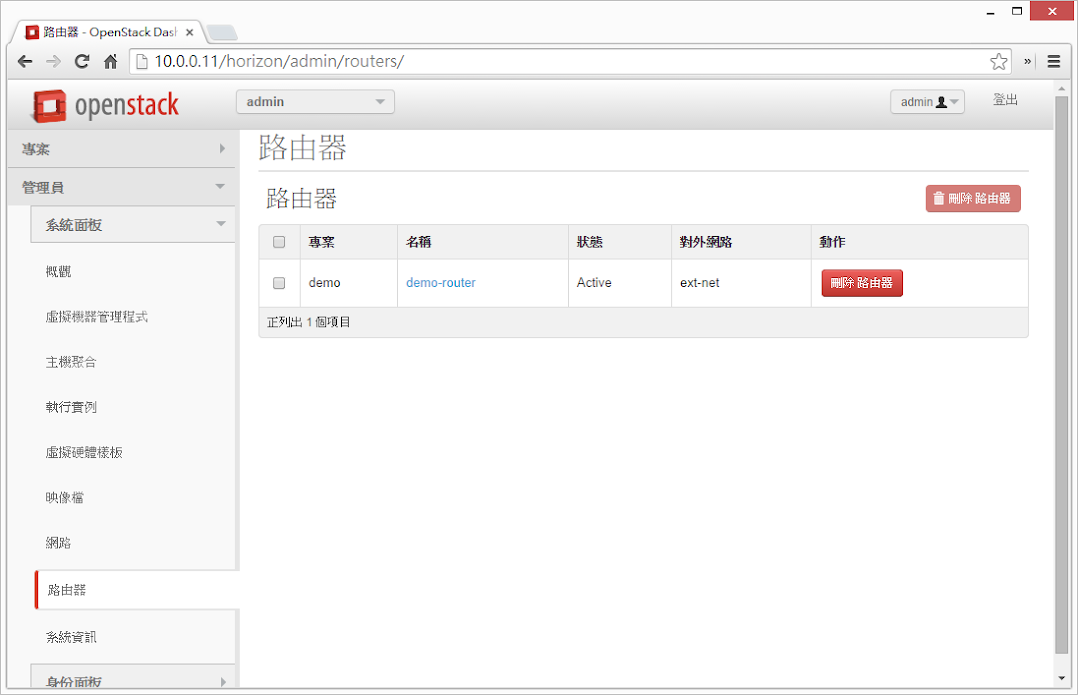
    管理員 >> 系統面板 >> 路由器
    Horizon >> 管理員 >> 系統面板 >> 路由器

    管理員 >> 系統面板 >> 系統資訊(伺服機)
    Horizon >> 管理員 >> 系統面板 >> 系統資訊

    管理員 >> 系統面板 >> 系統資訊(運算伺服機)
    Horizon >> 管理員 >> 系統面板 >> 系統資訊

    管理員 >> 系統面板 >> 系統資訊(網路代理)
    Horizon >> 管理員 >> 系統面板 >> 系統資訊

    管理員 >> 身分面板 >> 虛擬私人網路連線
    Horizon >> 管理員 >> 身分面板 >> 虛擬私人網路連線

    管理員 >> 身分面板 >> 使用者
    Horizon >> 管理員 >> 身分面板 >> 使用者

    6、參考資料

    OpenStack 障礙排除 - VM 無法正常啟動 (No valid host was found)

    OpenStack 障礙排除 - VM 無法正常啟動 (No valid host was found)

    目錄

    1、障礙說明

    昨天按照著官方網站的安裝手冊將 Neutron 安裝好之後,準備要來啟動第一個在 OpenStack 上的 VM,結果下完 nova boot xxxxxxx 的指令之後,我檢查了一下 VM 狀態,發現 status ERROR:

    controller#  nova list
    +--------------------------------------+----------------+--------+------------+-------------+----------+
    | ID                                   | Name           | Status | Task State | Power State | Networks |
    +--------------------------------------+----------------+--------+------------+-------------+----------+
    | b7eb4c0f-ef39-4034-b4a9-1d9f7f90b553 | demo-instance1 | ERROR  | -          | NOSTATE     |          |
    +--------------------------------------+----------------+--------+------------+-------------+----------+

    2、檢查過程

    2.1 檢查 Controller node

    2.1.1 查詢 nova 錯誤訊息:

     nova show demo-instance1
    +--------------------------------------+------------------------------------------------------------------------------------------------------------------------+
    | Property                             | Value                                                                                                                  |
    +--------------------------------------+------------------------------------------------------------------------------------------------------------------------+
    | OS-DCF:diskConfig                    | MANUAL                                                                                                                 |
    | OS-EXT-AZ:availability_zone          | nova                                                                                                                   |
    | OS-EXT-STS:power_state               | 0                                                                                                                      |
    | OS-EXT-STS:task_state                | -                                                                                                                      |
    | OS-EXT-STS:vm_state                  | error                                                                                                                  |
    | OS-SRV-USG:launched_at               | -                                                                                                                      |
    | OS-SRV-USG:terminated_at             | -                                                                                                                      |
    | accessIPv4                           |                                                                                                                        |
    | accessIPv6                           |                                                                                                                        |
    | config_drive                         |                                                                                                                        |
    | created                              | 2014-10-04T13:56:37Z                                                                                                   |
    | fault                                | {"message": "No valid host was found.", "code": 500, "created": "2014-10-03T09:50:40Z"} |
    | flavor                               | m1.tiny (1)                                                                                                            |
    | hostId                               |                                                              |
    | id                                   | b7eb4c0f-ef39-4034-b4a9-1d9f7f90b553                                                                                   |
    | image                                | cirros-0.3.3-x86_64 (77c0d5f8-1bcc-4937-932c-72f4b0eccbc3)                                                             |
    | key_name                             | demo-key                                                                                                               |
    | metadata                             | {}                                                                                                                     |
    | name                                 | demo-instance1                                                                                                         |
    | os-extended-volumes:volumes_attached | []                                                                                                                     |
    | status                               | ERROR                                                                                                                  |
    | tenant_id                            | 7539436331ca4f9783bf93163e2a2e0f                                                                                       |
    | updated                              | 2014-10-04T22:44:43Z                                                                                                   |
    | user_id                              | bc1ae50e167f45edb064e582702c5792                                                                                       |
    +--------------------------------------+------------------------------------------------------------------------------------------------------------------------+

    2.1.2 查詢 /etc/nova/nova-api.log

    出現以下訊息:

    2014-10-04 13:56:38.074 1347 INFO nova.osapi_compute.wsgi.server [req-18fd79ad-0a01-48a0-b8f0-29fac56a5c09 bc1ae50e167f45edb064e582702c5792 7539436331ca4f9783bf93163e2a2e0f] 10.0.0.11 “GET /v2/7539436331ca4f9783bf93163e2a2e0f/images/77c0d5f8-1bcc-4937-932c-72f4b0eccbc3 HTTP/1.1” status: 200 len: 894 time: 0.4527042
    2014-10-04 13:56:38.092 1347 INFO nova.api.openstack.wsgi [req-d508d2a8-4a70-46d6-b11e-e21da95224be bc1ae50e167f45edb064e582702c5792 7539436331ca4f9783bf93163e2a2e0f] HTTP exception thrown: The resource could not be found.
    2014-10-04 13:56:38.094 1347 INFO nova.osapi_compute.wsgi.server [req-d508d2a8-4a70-46d6-b11e-e21da95224be bc1ae50e167f45edb064e582702c5792 7539436331ca4f9783bf93163e2a2e0f] 10.0.0.11 “GET /v2/7539436331ca4f9783bf93163e2a2e0f/flavors/m1.tiny HTTP/1.1” status: 404 len: 272 time: 0.0192289
    2014-10-04 13:56:38.106 1347 INFO nova.osapi_compute.wsgi.server [req-9b6159e7-67ff-454e-a711-46c626354c7d bc1ae50e167f45edb064e582702c5792 7539436331ca4f9783bf93163e2a2e0f] 10.0.0.11 “GET /v2/7539436331ca4f9783bf93163e2a2e0f/flavors HTTP/1.1” status: 200 len: 1383 time: 0.0111101
    2014-10-04 13:56:38.117 1347 INFO nova.osapi_compute.wsgi.server [req-a84e3545-5d20-456f-abad-5e8d5f7bc634 bc1ae50e167f45edb064e582702c5792 7539436331ca4f9783bf93163e2a2e0f] 10.0.0.11 “GET /v2/7539436331ca4f9783bf93163e2a2e0f/flavors HTTP/1.1” status: 200 len: 1383 time: 0.0103061
    2014-10-04 13:56:38.130 1347 INFO nova.osapi_compute.wsgi.server [req-f5888737-0e2a-4c43-bffa-7f61479f3844 bc1ae50e167f45edb064e582702c5792 7539436331ca4f9783bf93163e2a2e0f] 10.0.0.11 “GET /v2/7539436331ca4f9783bf93163e2a2e0f/flavors/1 HTTP/1.1” status: 200 len: 591 time: 0.0125630

    2.1.3 查詢 Nova DB

    在 nova.instance_faults 裡面找到 error detail 為以下內容:

    File “/usr/lib/python2.7/dist-packages/nova/scheduler/filter_scheduler.py”, line 108, in schedule_run_instance
    raise exception.NoValidHost(reason=”“)

    可以研判是 nova schedular 找不到合適的 compute node 作為 host。

    2.2 檢查 Compute node

    2.2.1 查詢 /etc/nova/nova-compute.log

    出現以下訊息:

    2014-10-04 13:56:11.489 18675 INFO oslo.messaging._drivers.impl_rabbit [-] Reconnecting to AMQP server on controller:5672
    2014-10-04 13:56:11.489 18675 INFO oslo.messaging._drivers.impl_rabbit [-] Delaying reconnect for 1.0 seconds…
    2014-10-04 13:56:15.501 18675 ERROR oslo.messaging._drivers.impl_rabbit [-] AMQP server on controller:5672 is unreachable: Socket closed. Trying again in 5 seconds.
    2014-10-04 13:56:20.504 18675 INFO oslo.messaging._drivers.impl_rabbit [-] Reconnecting to AMQP server on controller:5672
    2014-10-04 13:56:20.505 18675 INFO oslo.messaging._drivers.impl_rabbit [-] Delaying reconnect for 1.0 seconds…
    2014-10-04 13:56:24.520 18675 ERROR oslo.messaging._drivers.impl_rabbit [-] AMQP server on controller:5672 is unreachable: Socket closed. Trying again in 7 seconds.
    2014-10-04 13:56:31.525 18675 INFO oslo.messaging._drivers.impl_rabbit [-] Reconnecting to AMQP server on controller:5672
    2014-10-04 13:56:31.525 18675 INFO oslo.messaging._drivers.impl_rabbit [-] Delaying reconnect for 1.0 seconds…
    2014-10-04 13:56:35.536 18675 ERROR oslo.messaging._drivers.impl_rabbit [-] AMQP server on controller:5672 is unreachable: Socket closed. Trying again in 9 seconds.
    ……. (以下省略)

    從上面可以看出 compute node 無法與 RabbitMQ service 進行通訊。

    另外從官網上找到一張圖,說明 Nova 在啟動 VM instance 的完整流程:
    Nova VM Provisioning

    問題就是出在 4~8 這一段,computer node 無法與 (queue)RabbitMQ service 進行通訊,因此無法向 nova-api 通知有可用的 compute node,因此 nova schedular 就找不到合適的 compute node 可用,也因此無法派送佈署的訊息給 queue。

    因為目前環境中只有一台 compute node 的情況下,Nova Scheduler 會找不到可以佈署 VM instance 的 compute node,因此會產生 Error。

    3、解決方式

    確認了 compute node 無法與 RabbitMQ 通訊後,首先檢查 /etc/nova/nova.conf 內的 RabbitMQ 帳號密碼設定是否正確。

    結果發現原來密碼設定錯誤,難怪 compute node 一直無法與 RabbitMQ 通訊,修正後重新啟動 nova-compute 服務就可以正常佈署 VM 了!

    4、參考資料

    2014年10月4日 星期六

    安裝 OpenStack @ Ubuntu 14.04 (6) - 佈署第一個 VM

    安裝 OpenStack @ Ubuntu 14.04 (6) - 佈署第一個 VM

    目錄

    1、安裝環境說明

    • OS:Ubuntu 14.04 LTS

    • Controller

      • IP:10.0.0.11 / 24
      • Gateway:10.0.0.1
    • Network

      • Management IP:10.0.0.21 / 24 (eth0)
      • Gateway:10.0.0.1
      • Instance Tunnel IP:10.0.1.21 / 24 (eth1)
      • External Interface (eth2)
        • IP:不指定 IP
        • 設定方式如下:(修改 /etc/network/interfaces)

      auto eth2
      iface eth2 inet manual
      up ip link set dev $IFACE up
      down ip link set dev $IFACE down

  • Compute 1

    • Management IP:10.0.0.31 / 24
    • Gateway:10.0.0.1
    • Instance Tunnel IP:10.0.1.31
  • 修改每個 node 的 /etc/hosts 檔案,並加入以下內容:

    10.0.0.11 controller
    10.0.0.21 network
    10.0.0.31 compute1

    • 使用者身分:root

    2、前言

    截至目前為止,一共安裝了 OpenStack 的服務包含以下:

    1. Identity Service (Keystone)
    2. Image Service (Glance)
    3. Compute Service (Nova)
    4. Networking Service (Neutron)

    若要啟動一個 VM instance,其實最少只要以上服務即可,接著以下來試著啟動一個 VM instance。

    3、產生金鑰對(keypair)

    大部分雲端系統支援公開金鑰認證(public key authentication)而並非簡單的帳號密碼認證,因此在啟動 VM instance 之前,我們要透過 ssh-keygen 工具來產生金鑰並加入 OpenStack 環境中使用。

    以下命令在 controller node 上執行

    # 以 demo 的身分執行
    controller# source ~/OpenStack/demo-openrc.sh
    
    # 產生金鑰對
    controller# ssh-keygen
    
    # 將產生的金鑰(公開)加入 OpenStack 環境中,並設定名稱為 demo-key
    controller# nova keypair-add --pub-key /root/.ssh/id_rsa.pub demo-key
    
    # 驗證公開金鑰是否已經匯入 OpenStack 環境中
    controller# nova keypair-list
    +----------+-------------------------------------------------+
    | Name     | Fingerprint                                     |
    +----------+-------------------------------------------------+
    | demo-key | 61:fe:66:8b:ee:dc:05:c9:3f:b0:7f:c4:92:34:df:a6 |
    +----------+-------------------------------------------------+

    4、佈署 & 啟動第一台 VM

    在開始佈署 VM instance 之前,有幾個部分是必須先確定的,包含 flavor(VM 的類型)、映像檔、網路、security group、公開金鑰、instance name …. 等等。

    4.1 flavor

    flavor 表示一群 VM 資源定義的集合,而定義中包含 VM 所使用的 vCPU 數量、記憶體大小、儲存空間 … 等資訊,以下列出目前預先定義好的 flavor 資訊:

    controller# nova flavor-list
    +----+-----------+-----------+------+-----------+------+-------+-------------+-----------+
    | ID | Name      | Memory_MB | Disk | Ephemeral | Swap | VCPUs | RXTX_Factor | Is_Public |
    +----+-----------+-----------+------+-----------+------+-------+-------------+-----------+
    | 1  | m1.tiny   | 512       | 1    | 0         |      | 1     | 1.0         | True      |
    | 2  | m1.small  | 2048      | 20   | 0         |      | 1     | 1.0         | True      |
    | 3  | m1.medium | 4096      | 40   | 0         |      | 2     | 1.0         | True      |
    | 4  | m1.large  | 8192      | 80   | 0         |      | 4     | 1.0         | True      |
    | 5  | m1.xlarge | 16384     | 160  | 0         |      | 8     | 1.0         | True      |
    +----+-----------+-----------+------+-----------+------+-------+-------------+-----------+

    從上表可以看到,flavor 的類型從 m1.tiny 到 m1.xlarge 都有,使用者可以根據需求決定要啟動的 VM instance 屬於哪種 flavor。

    以下範例我們將會以 m1.tiny 作示範。

    4.2 映像檔

    以下列出目前可用的映像檔:

    controller#  nova image-list
    +--------------------------------------+---------------------+--------+--------+
    | ID                                   | Name                | Status | Server |
    +--------------------------------------+---------------------+--------+--------+
    | 0985b2f3-058e-4ab9-84e3-65c51f849408 | cirros-0.3.3-x86_64 | ACTIVE |        |
    | 77c0d5f8-1bcc-4937-932c-72f4b0eccbc3 | cirros-0.3.3-x86_64 | ACTIVE |        |
    +--------------------------------------+---------------------+--------+--------+

    以下範例我們將會以 ID 為 77c0d5f8-1bcc-4937-932c-72f4b0eccbc3 的映像檔作示範。

    4.3 網路

    以下列出可用的網路區段:

    controller# neutron net-list
    +--------------------------------------+----------+------------------------------------------------------+
    | id                                   | name     | subnets                                              |
    +--------------------------------------+----------+------------------------------------------------------+
    | 629c575d-5d2e-4258-bb96-d2def517aa04 | ext-net  | 4af846a3-3e14-450d-b620-134cb1479e0d 192.168.20.0/24 |
    | 65c99acc-6438-493e-bbde-b3c0def3f575 | demo-net | eb46a51b-c1b0-4df9-9046-a19612fa532f 192.168.3.0/24  |
    +--------------------------------------+----------+------------------------------------------------------+

    以下範例我們將會使用 demo-net(192.168.3.0/24) 作示範。

    4.4 Security Group

    以下列出目前所有的 security group:

    controller#  nova secgroup-list
    +--------------------------------------+---------+-------------+
    | Id                                   | Name    | Description |
    +--------------------------------------+---------+-------------+
    | 909f974a-771d-4087-ae83-b6ed3aa88e56 | default | default     |
    +--------------------------------------+---------+-------------+

    因為我們先前沒有設定 security group,因此這邊只有 default 一項,而 default 這個群組的設定會阻擋所有來自遠端對 VM instance 的存取。

    4.5 啟動 VM instance

    所有必要條件都確認後,透過以下指令啟動 VM instance:

    nova boot --flavor m1.tiny --image 77c0d5f8-1bcc-4937-932c-72f4b0eccbc3 --nic net-id=65c99acc-6438-493e-bbde-b3c0def3f575 --security-group default --key-name demo-key demo-instance1
    +--------------------------------------+------------------------------------------------------------+
    | Property                             | Value                                                      |
    +--------------------------------------+------------------------------------------------------------+
    | OS-DCF:diskConfig                    | MANUAL                                                     |
    | OS-EXT-AZ:availability_zone          | nova                                                       |
    | OS-EXT-STS:power_state               | 0                                                          |
    | OS-EXT-STS:task_state                | scheduling                                                 |
    | OS-EXT-STS:vm_state                  | building                                                   |
    | OS-SRV-USG:launched_at               | -                                                          |
    | OS-SRV-USG:terminated_at             | -                                                          |
    | accessIPv4                           |                                                            |
    | accessIPv6                           |                                                            |
    | adminPass                            | gzkYV2K7nsHc                                               |
    | config_drive                         |                                                            |
    | created                              | 2014-10-04T04:21:56Z                                       |
    | flavor                               | m1.tiny (1)                                                |
    | hostId                               |                                                            |
    | id                                   | 29706374-fa90-4082-b51b-ca6a6cdf2a5e                       |
    | image                                | cirros-0.3.3-x86_64 (77c0d5f8-1bcc-4937-932c-72f4b0eccbc3) |
    | key_name                             | demo-key                                                   |
    | metadata                             | {}                                                         |
    | name                                 | demo-instance1                                             |
    | os-extended-volumes:volumes_attached | []                                                         |
    | progress                             | 0                                                          |
    | security_groups                      | default                                                    |
    | status                               | BUILD                                                      |
    | tenant_id                            | 7539436331ca4f9783bf93163e2a2e0f                           |
    | updated                              | 2014-10-04T04:21:56Z                                       |
    | user_id                              | bc1ae50e167f45edb064e582702c5792                           |
    +--------------------------------------+------------------------------------------------------------+

    4.6 確認 VM 狀態

    上述指令完成後,Nova Scheduler 會尋找合適的 compute node 將 VM instance 啟動,可以透過以下指令檢查一下目前 VM instance 的狀態:

    controller# nova list
    +--------------------------------------+----------------+--------+------------+-------------+----------------------+
    | ID                                   | Name           | Status | Task State | Power State | Networks             |
    +--------------------------------------+----------------+--------+------------+-------------+----------------------+
    | 29706374-fa90-4082-b51b-ca6a6cdf2a5e | demo-instance1 | ACTIVE | -          | Running     | demo-net=192.168.3.3 |
    +--------------------------------------+----------------+--------+------------+-------------+----------------------+

    從上面可以看到 VM instance 的 ID、Network、Status、IP …. 等資訊。

    5、存取 VM instance 並測試

    因為我們在之前有設定 noVNC,可透過 browser 連線到目前運行中的 VM instance,可透過以下指令取得 noVNC 的連線網址:

    controller# nova get-vnc-console demo-instance1 novnc
    +-------+---------------------------------------------------------------------------------+
    | Type  | Url                                                                             |
    +-------+---------------------------------------------------------------------------------+
    | novnc | http://controller:6080/vnc_auto.html?token=9395dcbd-b9e8-457b-b6fe-c7e07a268ba9 |
    +-------+---------------------------------------------------------------------------------+

    有了以上的網址後,就可以透過 browser 以 noVNC 的方式連線到 VM instance 內。

    6、問題排除

    6.1 無法解析 domain name

    透過 noVNC 連線到剛佈署好的 VM 後,可以連到 internet,但 DNS 忘了設定…..導致於 domain name 無法解析,因此我們在 controller node 加入以下設定來解決:

    # 顯示目前的 subnet
    controller# neutron subnet-list
    +--------------------------------------+-------------+-----------------+----------------------------------------------------+
    | id                                   | name        | cidr            | allocation_pools                                   |
    +--------------------------------------+-------------+-----------------+----------------------------------------------------+
    | 4af846a3-3e14-450d-b620-134cb1479e0d | ext-subnet  | 192.168.20.0/24 | {"start": "192.168.20.11", "end": "192.168.20.30"} |
    | eb46a51b-c1b0-4df9-9046-a19612fa532f | demo-subnet | 192.168.3.0/24  | {"start": "192.168.3.1", "end": "192.168.3.253"}   |
    +--------------------------------------+-------------+-----------------+----------------------------------------------------+
    
    # 為 subnet 補上 domain name server 資訊
    controller# neutron subnet-update demo-subnet --dns_nameservers list=true 8.8.8.8 8.8.4.4

    如此一來,之後產生的 VM 就可以解析 domain name 囉!

    7、參考資料

    2014年10月3日 星期五

    安裝 OpenStack @ Ubuntu 14.04 (5) - 安裝 Networking Service (Neutron)

    安裝 OpenStack @ Ubuntu 14.04 (5) - 安裝 Networking Service (Neutron)

    目錄

    1、安裝環境說明

    • OS:Ubuntu 14.04 LTS

    • Controller

      • IP:10.0.0.11 / 24
      • Gateway:10.0.0.1
    • Network

      • Management IP:10.0.0.21 / 24 (eth0)
      • Gateway:10.0.0.1
      • Instance Tunnel IP:10.0.1.21 / 24 (eth1)
      • External Interface (eth2)
        • IP:不指定 IP
        • 設定方式如下:(修改 /etc/network/interfaces)

      auto eth2
      iface eth2 inet manual
      up ip link set dev $IFACE up
      down ip link set dev $IFACE down

  • Compute 1

    • Management IP:10.0.0.31 / 24
    • Gateway:10.0.0.1
    • Instance Tunnel IP:10.0.1.31
  • 修改每個 node 的 /etc/hosts 檔案,並加入以下內容:

    10.0.0.11 controller
    10.0.0.21 network
    10.0.0.31 compute1

    • 使用者身分:root

    2、Network Service (Neutron) 概觀

    Network Service (Neutron) 負責虛擬網路架構與外部實體網路架構(包含各廠商的設備)之間的整合 & 存取,用以提供 tenant 可自行建立像是防火牆、負載平衡、VPN … 等網路環境。

    網路設定的概念其實跟我們之前所學的並沒有差太多,包含 DHCP、VLAN、Routing … 等等。

    比較值得一提的是 Networking Service 支援了 security group 的概念:

    • 管理者可以針對每個 security group 進行防火牆規則的設定
    • 每個 VM 可以屬於一個或多個 security group

    有了以上的機制,讓 Firewall-as-a-Service & Load-Balancing-as-a-Service 變的很容易實現。

    3、設定 Controller Node

    3.1 建立所需資料庫 & 設定權限

    # 登入 MySQL server
    controller# mysql -u root -p
    Enter password:
    
    # 建立 DB (neutron)
    mysql> create database neutron;
    Query OK, 1 row affected (0.00 sec)
    
    # 設定權限
    mysql> grant all privileges on neutron.* to 'neutron'@'localhost' identified by 'YOUR_DB_PASSWORD';
    Query OK, 0 rows affected (0.00 sec)
    
    # 設定權限
    mysql> grant all privileges on neutron.* to 'neutron'@'%' identified by 'YOUR_DB_PASSWORD';
    Query OK, 0 rows affected (0.00 sec)

    3.2 向 Identity Service (Keystone) 註冊 Network Service

    建立使用者 neutron

    controller# keystone user-create --name neutron --pass YOUR_NEUTRON_PASSWORD --email manager@example.com
    +----------+----------------------------------+
    | Property |              Value               |
    +----------+----------------------------------+
    |  email   |        manager@example.com       |
    | enabled  |               True               |
    |    id    | 7f3839ca2d774d0e81baf7dbba8574a8 |
    |   name   |             neutron              |
    | username |             neutron              |
    +----------+----------------------------------+

    將使用者(neutron)與 Role(admin) & Tenant(service) 綁定

    controller# keystone user-role-add --user neutron --tenant service --role admin

    將 Network Service(Neutron) 註冊到 Identity Service(Keystone) 中

    controller# # keystone service-create --name neutron --type network --description "OpenStack Networking"
    +-------------+----------------------------------+
    |   Property  |              Value               |
    +-------------+----------------------------------+
    | description |       OpenStack Networking       |
    |   enabled   |               True               |
    |      id     | 577265111b73447e8a235946bd4b124c |
    |     name    |             neutron              |
    |     type    |             network              |
    +-------------+----------------------------------+

    建立 Network Service 服務端點資料

    controller# keystone endpoint-create --service-id $(keystone service-list | awk '/ network / {print $2}') --publicurl http://controller:9696 --adminurl http://controller:9696 --internalurl http://controller:9696
    +-------------+----------------------------------+
    |   Property  |              Value               |
    +-------------+----------------------------------+
    |   adminurl  |      http://controller:9696      |
    |      id     | 974f0c66803f427488b60404f47e4931 |
    | internalurl |      http://controller:9696      |
    |  publicurl  |      http://controller:9696      |
    |    region   |            regionOne             |
    |  service_id | 577265111b73447e8a235946bd4b124c |
    +-------------+----------------------------------+

    3.3 安裝相關套件

    controller# apt-get -y install neutron-server neutron-plugin-ml2

    3.4 設定 Networking Service 各元件

    Networking Service 的設定包含了以下幾項:

    1. 資料庫
    2. 認證機制
    3. Message Broker
    4. Topology Change Notifier
    5. Modular Layer 2 Plug-in

    3.4.1 資料庫

    修改 /etc/neutron/neutron.conf,加入資料庫的設定:

    [database]
    connection = mysql://neutron:YOUR_DB_PASSWORD@controller/neutron

    並刪除在 [database] 區段中 SQLite 的相關設定。

    3.4.2 認證機制

    修改 /etc/neutron/neutron.conf,加入認證機制的設定:

    [DEFAULT]
    auth_strategy = keystone
    
    [keystone_authtoken]
    auth_uri = http://controller:5000
    auth_host = controller
    auth_port = 35357
    auth_protocol = http
    admin_tenant_name = service
    admin_user = neutron
    admin_password = YOUR_NEUTRON_PASSWORD

    3.4.3 Message Broker

    修改 /etc/neutron/neutron.conf,加入 Message Broker 的設定:

    [DEFAULT]
    rpc_backend = neutron.openstack.common.rpc.impl_kombu
    rabbit_host = controller
    rabbit_password = RABBIT_PASS

    3.4.4 Topology Change Notifier

    首先取得 Tenant ID (service):

    controller# source ~/OpenStack/admin-openrc.sh
    controller:~# keystone tenant-get service
    +-------------+----------------------------------+
    |   Property  |              Value               |
    +-------------+----------------------------------+
    | description |          Service Tenant          |
    |   enabled   |               True               |
    |      id     | b43a362300c7478193fa26ce5bb0f5c7 |
    |     name    |             service              |
    +-------------+----------------------------------+

    修改 /etc/neutron/neutron.conf,加入 Neutron & Nova 的互動設定:

    [DEFAULT]
    notify_nova_on_port_status_changes = True
    notify_nova_on_port_data_changes = True
    nova_url = http://controller:8774/v2
    nova_admin_username = nova
    # 上面的命令取得 b43a362300c7478193fa26ce5bb0f5c7
    nova_admin_tenant_id = SERVICE_TENANT_ID
    nova_admin_password = NOVA_PASS
    nova_admin_auth_url = http://controller:35357/v2.0

    3.4.5 Modular Layer 2 Plug-in

    修改 /etc/neutron/neutron.conf,加入 ML2 Plug-in 相關設定:

    [DEFAULT]
    core_plugin = ml2
    service_plugins = router
    allow_overlapping_ips = True

    3.5 設定 Modular Layer 2 (ML2) plug-in

    ML2 plug-in 是透過 Opeb vSwitch 建立 VM instances 所使用的虛擬網路架構,以下進行 ML2 相關的設定。

    修改 /etc/neutron/plugins/ml2/ml2_conf.ini,加入以下內容:

    [ml2]
    type_drivers = gre
    tenant_network_types = gre
    mechanism_drivers = openvswitch
    
    [ml2_type_gre]
    tunnel_id_ranges = 1:1000
    
    [securitygroup]
    firewall_driver = neutron.agent.linux.iptables_firewall.OVSHybridIptablesFirewallDriver
    enable_security_group = True

    3.6 修改 Compute 相關設定

    大部分的預設情況下,Compute(Nova) 所使用的是 nova-network,因此這邊必須修改為使用 Neutron。

    修改 /etc/nova/nova.conf,在 Nova 的設定中增加以下內容:

    [DEFAULT]
    network_api_class = nova.network.neutronv2.api.API
    neutron_url = http://controller:9696
    neutron_auth_strategy = keystone
    neutron_admin_tenant_name = service
    neutron_admin_username = neutron
    neutron_admin_password = NEUTRON_PASS
    neutron_admin_auth_url = http://controller:35357/v2.0
    linuxnet_interface_driver = nova.network.linux_net.LinuxOVSInterfaceDriver
    firewall_driver = nova.virt.firewall.NoopFirewallDriver
    security_group_api = neutron

    預設 Compute(Nova) 使用內部的 firewall service,若 Network Service 中包含了 firewall service,就必須停用 Nova 上的 firewall service,改成使用 nova.virt.firewall.NoopFirewallDriver

    3.7 啟動服務

    重新啟動 Compute service (Nova):

    controller# service nova-api restart
    controller# service nova-scheduler restart
    controller# service nova-conductor restart

    重新啟動 Network Service (Neutron):

    controller# service neutron-server restart

    4、設定 Network Node

    4.1 調整 kernel 網路設定

    在 Network node 上,要先將 kernel 的某些網路功能開啟(or 關閉),修改 /etc/sysctl.conf,加入以下設定:

    net.ipv4.ip_forward=1
    net.ipv4.conf.all.rp_filter=0
    net.ipv4.conf.default.rp_filter=0

    套用 kernel 設定:

    network# sysctl -p

    4.2 安裝 Networking Service 相關套件

    network# apt-get -y install neutron-plugin-ml2 neutron-plugin-openvswitch-agent openvswitch-datapath-dkms neutron-l3-agent neutron-dhcp-agent

    4.3 Networking 一般元件設定

    Networking 一般元件設定包含了以下幾項:

    1. 認證機制
    2. Message Broker
    3. Modular Layer 2 Plug-in

    4.3.1 認證機制

    修改 /etc/neutron/neutron.conf,加入以下設定:

    [DEFAULT]
    auth_strategy = keystone
    
    [keystone_authtoken]
    auth_uri = http://controller:5000
    auth_host = controller
    auth_protocol = http
    auth_port = 35357
    admin_tenant_name = service
    admin_user = neutron
    admin_password = YOUR_NEUTRON_PASSWORD

    4.3.2 Message Broker

    修改 /etc/neutron/neutron.conf,加入以下設定:

    [DEFAULT]
    rpc_backend = neutron.openstack.common.rpc.impl_kombu
    rabbit_host = controller
    rabbit_password = YOUR_RABBITMQ_PASSWORD

    4.3.3 Modular Layer 2 Plug-in

    修改 /etc/neutron/neutron.conf,加入以下設定:

    [DEFAULT]
    core_plugin = ml2
    service_plugins = router
    allow_overlapping_ips = True

    4.4 設定 Layer 3 agent

    在 virtual network 中,Layer 3 agent 提供了 routing 的功能,修改 /etc/neutron/l3_agent.ini,加入 Layer 3 agent 相關設定:

    [DEFAULT]
    interface_driver = neutron.agent.linux.interface.OVSInterfaceDriver
    use_namespaces = True

    4.5 設定 DHCP agent

    修改 /etc/neutron/dhcp_agent.ini,加入 DHCP agent 相關設定:

    [DEFAULT]
    interface_driver = neutron.agent.linux.interface.OVSInterfaceDriver
    dhcp_driver = neutron.agent.linux.dhcp.Dnsmasq
    use_namespaces = True
    dnsmasq_config_file = /etc/neutron/dnsmasq-neutron.conf

    新增 /etc/neutron/dnsmasq-neutron.conf 並加入設定:

    network# echo 'dhcp-option-force=26,1454' > /etc/neutron/dnsmasq-neutron.conf

    刪除目前存在的 dnsmasq process:

    network# killall dnsmasq

    4.6 設定 metadata agent

    metadata agent 的功能在提供存取遠端 VM instance 時的相關設定資訊。

    修改 /etc/neutron/metadata_agent.ini,加入以下設定:

    [DEFAULT]
    auth_url = http://controller:5000/v2.0
    auth_region = regionOne
    admin_tenant_name = service
    admin_user = neutron
    admin_password = YOUR_NEUTRON_PASSWORD
    nova_metadata_ip = controller
    metadata_proxy_shared_secret = METADATA_SECRET

    4.6.1 以下兩個步驟回到 controller node 進行設定

    • 修改 /etc/nova/nova.conf,加入以下設定:
    [DEFAULT]
    service_neutron_metadata_proxy = true
    neutron_metadata_proxy_shared_secret = METADATA_SECRET
    • 重新啟動 compute API service:
    controller# service nova-api restart

    4.7 設定 Modular Layer 2 (ML2) plug-in

    修改 /etc/neutron/plugins/ml2/ml2_conf.ini,加入以下設定:

    [ml2]
    type_drivers = gre
    tenant_network_types = gre
    mechanism_drivers = openvswitch
    
    [ml2_type_gre]
    tunnel_id_ranges = 1:1000
    
    [ovs]
    local_ip = 10.0.1.21
    tunnel_type = gre
    enable_tunneling = True
    
    [securitygroup]
    firewall_driver = neutron.agent.linux.iptables_firewall.OVSHybridIptablesFirewallDriver
    enable_security_group = True

    4.8 設定 Open vSwitch(OVS) Service

    Open vSwitch Service 提供虛擬網路架構給 VM instance 使用,不僅處理 VM instance 之間的內部流量,也包含對外實體網路介面的對外流量。

    執行以下命令設定 OVS:

    # 重新啟動 Open vSwitch Service
    network# service openvswitch-switch restart
    
    # 增加處理內部流量用的 bridge interface (br-int)
    network# ovs-vsctl add-br br-int
    
    # 增加處理外部流量的 bridge interface (br-ex)
    network# ovs-vsctl add-br br-ex
    
    # 指定連結外部實體網路卡的 interface name (因內部測試先,這邊暫時先不做)
    network# ovs-vsctl add-port br-ex INTERFACE_NAME

    4.8.1 啟動 Networking Service

    network# service neutron-plugin-openvswitch-agent restart
    network# service neutron-l3-agent restart
    network# service neutron-dhcp-agent restart
    network# service neutron-metadata-agent restart

    5、設定 Compute Node

    5.1 調整 kernel 網路設定

    在 Compute node 上,要先將 kernel 的某些網路功能開啟(or 關閉),修改 /etc/sysctl.conf,加入以下設定:

    net.ipv4.conf.all.rp_filter=0
    net.ipv4.conf.default.rp_filter=0

    套用設定至 kernel:

    sysctl -p

    5.2 安裝 Networking 相關套件

    執行以下命令:

    compute1# apt-get -y install neutron-common neutron-plugin-ml2 neutron-plugin-openvswitch-agent openvswitch-datapath-dkms

    5.3 Networking 一般元件設定

    Networking 一般元件設定包含了以下幾項:

    1. 認證機制
    2. Message Broker
    3. Modular Layer 2 Plug-in

    5.3.1 認證機制

    修改 /etc/neutron/neutron.conf,加入以下設定:

    [DEFAULT]
    auth_strategy = keystone
    
    [keystone_authtoken]
    auth_uri = http://controller:5000
    auth_host = controller
    auth_protocol = http
    auth_port = 35357
    admin_tenant_name = service
    admin_user = neutron
    admin_password = YOUR_NEUTRON_PASSWORD

    5.3.2 Message Broker

    修改 /etc/neutron/neutron.conf,加入以下設定:

    [DEFAULT]
    rpc_backend = neutron.openstack.common.rpc.impl_kombu
    rabbit_host = controller
    rabbit_password = YOUR_RABBIT_PASS

    5.3.3 Modular Layer 2 Plug-in

    修改 /etc/neutron/neutron.conf,加入以下設定:

    [DEFAULT]
    core_plugin = ml2
    service_plugins = router
    allow_overlapping_ips = True

    5.4 設定 Modular Layer 2 (ML2) plug-in

    修改 /etc/neutron/plugins/ml2/ml2_conf.ini,加入以下設定:

    [ml2]
    type_drivers = gre
    tenant_network_types = gre
    mechanism_drivers = openvswitch
    
    [ml2_type_gre]
    tunnel_id_ranges = 1:1000
    
    [ovs]
    local_ip = 10.0.1.31
    tunnel_type = gre
    enable_tunneling = True
    
    [securitygroup]
    firewall_driver = neutron.agent.linux.iptables_firewall.OVSHybridIptablesFirewallDriver
    enable_security_group = True

    5.5 設定 Open vSwitch(OVS) Service

    Open vSwitch Service 提供虛擬網路架構給 VM instance 使用,不僅處理 VM instance 之間的內部流量,也包含對外實體網路介面的對外流量。

    執行以下命令設定 OVS:

    # 啟動 Open vSwitch Service
    compute1# service openvswitch-switch restart
    
    # 增加處理內部流量用的 bridge interface (br-int)
    compute1# ovs-vsctl add-br br-int

    5.6 指定 Compute 使用 Neutron

    大部分狀況下,Compute 所使用的是 nova-network,但因為這邊安裝的是 Neutron,因此要做一些設定上的調整,修改 /etc/nova/nova.conf,加入以下內容:

    [DEFAULT]
    network_api_class = nova.network.neutronv2.api.API
    neutron_url = http://controller:9696
    neutron_auth_strategy = keystone
    neutron_admin_tenant_name = service
    neutron_admin_username = neutron
    neutron_admin_password = NEUTRON_PASS
    neutron_admin_auth_url = http://controller:35357/v2.0
    linuxnet_interface_driver = nova.network.linux_net.LinuxOVSInterfaceDriver
    firewall_driver = nova.virt.firewall.NoopFirewallDriver
    security_group_api = neutron

    因為 Compute 會預設使用畚箕的防火牆服務,但因為在 OpenStack 的環境中,防火牆服務是設定在 Network node 上面,因此要透過設定將防火牆的功能交給 Neutron 來做。

    5.7 重新啟動相關服務

    # 重新啟動 compute service
    compute1# service nova-compute restart
    
    # 重新啟動 Open vSwitch agent
    compute1# service neutron-plugin-openvswitch-agent restart

    6、初始化網路

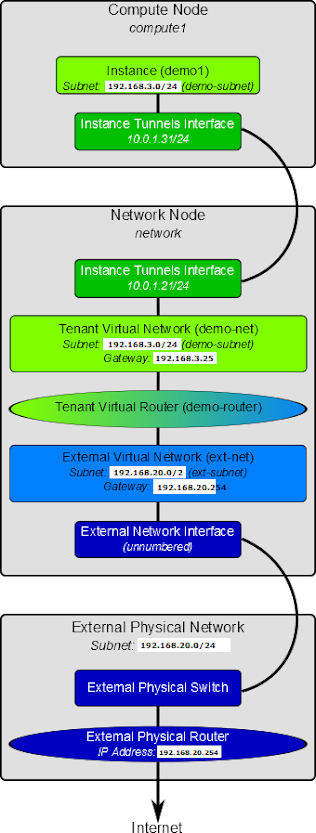
    網路架構圖

    6.1 External network

    外部虛擬網路提供 VM instance 存取網際網路的能力,預設僅能讓 VM instance 透過 NAT 的方式連線到網際網路,若要讓外部可以存取 VM instance,則必須指定 IP & 設定 security group 規則來達成。

    以下指令必須在 controller 上執行,並非 network node

    6.1.1 建立外部虛擬網路 (ext-net)

    controller# source ~/OpenStack/admin-openrc.sh
    controller:~# neutron net-create ext-net --shared --router:external=True
    Created a new network:
    +---------------------------+--------------------------------------+
    | Field                     | Value                                |
    +---------------------------+--------------------------------------+
    | admin_state_up            | True                                 |
    | id                        | 629c575d-5d2e-4258-bb96-d2def517aa04 |
    | name                      | ext-net                              |
    | provider:network_type     | gre                                  |
    | provider:physical_network |                                      |
    | provider:segmentation_id  | 1                                    |
    | router:external           | True                                 |
    | shared                    | True                                 |
    | status                    | ACTIVE                               |
    | subnets                   |                                      |
    | tenant_id                 | 27466ca061e34b469f84da1e57b5605e     |
    +---------------------------+--------------------------------------+

    6.1.2 為外部虛擬網路(ext-net)設定網段資訊

    虛擬網路也像實體網路一樣,需要指定網段(subnet)資訊。

    而 Network node 對外連接的 interface 會與外部實體網路共用相同的 subnet & gateway 等資訊。

    因此以下將外部實體網路的 subnet & gateway 等資訊設定到 Network node 的外部虛擬網路中:

    以下以 192.168.20.0/24 作為外部網路範例

    controller#  neutron subnet-create ext-net --name ext-subnet --allocation-pool start=192.168.20.11,end=192.168.20.30 --disable-dhcp --gateway=192.168.20.254 192.168.20.0/24
    Created a new subnet:
    +------------------+----------------------------------------------------+
    | Field            | Value                                              |
    +------------------+----------------------------------------------------+
    | allocation_pools | {"start": "192.168.20.11", "end": "192.168.20.30"} |
    | cidr             | 192.168.20.0/24                                    |
    | dns_nameservers  |                                                    |
    | enable_dhcp      | False                                              |
    | gateway_ip       | 192.168.20.254                                     |
    | host_routes      |                                                    |
    | id               | 4af846a3-3e14-450d-b620-134cb1479e0d               |
    | ip_version       | 4                                                  |
    | name             | ext-subnet                                         |
    | network_id       | 629c575d-5d2e-4258-bb96-d2def517aa04               |
    | tenant_id        | 27466ca061e34b469f84da1e57b5605e                   |
    +------------------+----------------------------------------------------+

    6.2 Tenant network

    tenant network 提供存取 VM instance 的內部網路,這類型的網路會以 tenant 為單位進行隔離,因此不同 tenant 之間的 VM instance 是無法互相存取的。

    6.2.1 建立 Tenant Virtual Network

    以下指令必須在 controller 上執行,並非 network node

    建立 demo credential 資訊 ~/OpenStack/demo-openrc.sh,並設定內容如下:

    unset OS_USERNAME
    unset OS_PASSWORD
    unset OS_TENANT_NAME
    unset OS_AUTH_URL
    
    export OS_USERNAME=demo
    export OS_PASSWORD=YOUR_DEMO_PASSWORD
    export OS_TENANT_NAME=demo
    export OS_AUTH_URL=http://controller:35357/v2.0

    新增 tenant virtual network

    # 以 demo 的身分執行
    controller# source ~/OpenStack/demo-openrc.sh
    
    # 建立名稱為 demo-net 的 tenant virtual network
    controller:~# neutron net-create demo-net
    Created a new network:
    +----------------+--------------------------------------+
    | Field          | Value                                |
    +----------------+--------------------------------------+
    | admin_state_up | True                                 |
    | id             | 65c99acc-6438-493e-bbde-b3c0def3f575 |
    | name           | demo-net                             |
    | shared         | False                                |
    | status         | ACTIVE                               |
    | subnets        |                                      |
    | tenant_id      | 7539436331ca4f9783bf93163e2a2e0f     |
    +----------------+--------------------------------------+

    6.2.2 在 tenant network(demo-net) 設定網段資訊

    如同外部網路一樣,也必須要給定 tenant network 網段資訊,這邊以上圖為範例,設定 192.168.1.0/24 網段:

    controller# neutron subnet-create demo-net --name demo-subnet --gateway 192.168.3.254 192.168.3.0/24 --dns_nameservers list=true 8.8.8.8 8.8.4.4
    Created a new subnet:
    +------------------+--------------------------------------------------+
    | Field            | Value                                            |
    +------------------+--------------------------------------------------+
    | allocation_pools | {"start": "192.168.3.1", "end": "192.168.3.253"} |
    | cidr             | 192.168.3.0/24                                   |
    | dns_nameservers  | 8.8.4.4                                          |
    |                  | 8.8.8.8                                          |
    | enable_dhcp      | True                                             |
    | gateway_ip       | 192.168.3.254                                    |
    | host_routes      |                                                  |
    | id               | eb46a51b-c1b0-4df9-9046-a19612fa532f             |
    | ip_version       | 4                                                |
    | name             | demo-subnet                                      |
    | network_id       | 65c99acc-6438-493e-bbde-b3c0def3f575             |
    | tenant_id        | 7539436331ca4f9783bf93163e2a2e0f                 |
    +------------------+--------------------------------------------------+

    6.2.3 建立 router 作為外部網路與 tenant network 連結之用

    所有 tenant virtual network 之間的流量,以及 tenant virtual network 到外部網路的流量,都必須由 virtual router 來處理 & 過濾。

    因此這邊有三個步驟要完成:

    1. 建立 virtual router
    2. 將 tenant virtual network (demo-subnet) 附加到 virtual router
    3. 將 external network(ext-net) 附加到 virtual router
    # 建立 virtual router
    controller# neutron router-create demo-router
    Created a new router:
    +-----------------------+--------------------------------------+
    | Field                 | Value                                |
    +-----------------------+--------------------------------------+
    | admin_state_up        | True                                 |
    | external_gateway_info |                                      |
    | id                    | e74b7f9a-9ebe-4e88-8836-cbf558cfc05f |
    | name                  | demo-router                          |
    | status                | ACTIVE                               |
    | tenant_id             | 7539436331ca4f9783bf93163e2a2e0f     |
    +-----------------------+--------------------------------------+
    
    # 將 tenant virtual network (demo-subnet) 附加到 virtual router
    controller# neutron router-interface-add demo-router demo-subnet
    Added interface 5ea27e34-e45d-4a69-9fdb-59be55e07268 to router demo-router.
    
    # 將 external network(ext-net) 附加到 virtual router
    controller# neutron router-gateway-set demo-router ext-net
    Set gateway for router demo-router

    6.3 驗證網路服務是否設定成功

    根據上面的設定,外部網路的網段為 192.168.20.0/24,我們分配了 192.168.20.[11-30] 給了外部網路。

    其中 tenant router gateway 會自動使用最前面的 IP,也就是 192.168.20.11,若是有設定正確,嘗試 ping 這個 IP 就可以取得回應。

    若把 OpenStack 安裝在 VM 的話,記得把虛擬交換器的 promiscuous mode 打開,網路才會通喔!

    我的環境是在 VMware 裡面,就把 192.168.20.0/24 這個網段所在的 port group 的 promiscuous mode 開啟。(不需要開啟整個 vSwitch 的 promiscuous mode)

    7、參考資料