2007年5月8日 星期二

[IPTABLE] Bridging Firewall for ADSL connections

恩,同學研究有需要以下環境:

Internet --- Bridge Firewall Server ---- ADSL client 1 (需要透過撥接取得 Public IP)
--- ADSL client 2 (需要透過撥接取得 Public IP)


中間那台 firewall server 是用來擷取 pcaket 作分析用,只要讓他當一個 Hub or Switch 的角色就好,讓後面的 client 可以直接 ADSL 撥接上網,取得 Public IP。

找了半天,終於找到以下這邊文章....而且還是從 google 庫存頁檔找到的,因為蠻具有參考價值,為了避免不見....就把它留下來了


以下是文章內容:

For a long time I've had the 56k (hah - If I'm lucky) dialup. Between the modem and my local network was a nice Linux firewall, all was good. Then I changed my connection to SDSL from Internode, that was good too. I soon found out that I couldn't put my firewall in as-is, that was bad.

Why Bridging?

The problem is that, like a lot of other DSL networks out there, Internode sees your LAN and their network device at the telephone exchange like its one big Ethernet LAN. Normal firewalls expect two different blocks of IP addresses (or subnets) on their "outside" and "inside" interfaces, eg network number 10 on the inside and 42 on the outside. The problem is with the given setup, network 42 is both on the outside and inside, a real problem for a standard firewall.

A bridging firewall expects all its interfaces on the same network. It looks a lot like an Ethernet switch or a hub and in-fact with no firewall rules it behaves exactly like that. The tricky thing is that it has to act like a switch when passing packets but act like a router when its deciding if it should be passing that packet at all.

It should be mentioned that you only need a bridging firewall when you want the computers on your local network to all have real live addresses (so no NAT) and your ISP is not expecting you to have a router there.

Kernel Patches and changes

The standard Linux kernel has firewalling in it, it also has bridging code, so we're set right? That depends on what version kernel you have. For 2.4.x kernels you need a patch, but the newer 2.6.x kernels have ebtables (which is the project that swallowed up the iptables+bridge code) so no patching is needed.

I a 2.4.x kernel, the bridge code needs a modification so it goes and "asks" the firewall code if it is OK to forward a packet. Without that patch, your bridge code will happily send any packets that come along.

Compiling 2.4.x kernels

Now it used to be quite easy as there was only one source of the firewall-bridge linking code. However the code used to sit with the bridge project at sourceforge but has now moved in with the ebtables project also at sourceforge. The following table may make it easier to understand what patch you need

Kernel versionPatch
2.4.18 bridge-nf-0.0.7-against-2.4.18.diff
2.4.21 ebtables-brnf-3_vs_2.4.21.diff.gz
2.4.22 ebtables-brnf-2_vs_2.4.22.diff.gz

The 2.4.21 kernel patch didn't work cleanly and I needed to manually fix a few files to get it to patch and compile, the good news is the 2.4.22 kernel patch did work cleanly for a stock 2.4.22 kernel.

  • net/Makefile : Add "bridge/netfilter" to the mod-subdirs line
  • net/ipv4/ip_output.c : Add 4 lines from the rej file. Note that in the last file the pointer handle "skb2" is now called "to" and "skb" is called "from" so make sure you make those adjustments when you do your hand-patching.
  • net/bridge/br_netfilter.c : Uses old route table functions and a structure that doesnt have pmtu any more. Use the patch at http://www.linuxhq.com/kernel/v2.5/47/net/bridge/br_netfilter.c.

You probably should also read the documentation with respect to the different patches. Earlier patches have their Bridge document Page while the newer patches are a poorer cousin to ebtables itself on the newer site but you might dredge up something on the ebtables dcoumentation page

For compiling, I enabled bridging, netfilter, iptables and the bridge netfilter support. The kernel compiled fine and I then installed it on the firewall.

Compiling 2.6.x kernels

At the time of this writing, I was unable to use the physdev feature of iptables, which means the bridging firewall was unable to use iptables where the physical interface needed to be specified, iptables gave an invalid argument every time I used -m physdev, I rolled back to kernel 2.4.22.

As previously mentioned, the 2.6.x kernels have ebtables built in, so there is no need for patching. ebtables used to be just for filtering based on layer-2 information, such as ethernet MAC addresses but it now allows the Linux bridge to look at the same things ipfilter can see. Some 2.6 kernel and iptables setups cannot handle the physdev module, so you might need ebtables anyway.

There's two ways of filtering IP packets in 2.6 kernels. You can use ipfilters which can see bridged packets and you can use ebtables which has some limited support of IP. Unless there is a good reason, go with the iptables, it has a lot more features for IP packets.

For compiling, I enabled bridging, netfilter, iptables and iptables physdev. If you want ebtables support too enable , ebtables, ebt: filter table, ebt: log support and ebt: IP filter support. These are found in the networking options submenu of the kernel configuration.

Helper Programs

You will need two helper programs for your firewall. They both don't need patching which is wonderful! The first is iptables for manipulating the firewall rules and the second is bridge-utils which makes the bridges. If you want to use ebtables too, get it as well.

I run the Debian distribution so to download the two required packages was a matter of a apt-get command and I was done. If you don't run Debian I'm sure you'll find the programs for your distribution somewhere.

Configuration

It's remarkably simple to make a bridging firewall. You make the bridge, then you add firewall rules in. I was pleasantly surprised by this; the hardest thing for me was to get a second Ethernet card working in my stupid hardware that has flakey ISA buses and a PCI slot that makes anything in it misbehave, luckily I had 3 other sensible PCI slots.

To make a bridge, I use the following commands:

myfirewall# brctl addbr br0
myfirewall# brctl addif br0 eth0
myfirewall# brctl addif br0 eth1

That was it, one working bridge! This meant that any packets that needed to cross the bridge were allowed through. Next I had to add some firewall rules in. What to put into a firewall is explained much better elsewhere, look at the iptables reference given above.

The way the interfaces are handled changes in the kernels. For 2.4 kernels, you use the standard iptables input and output (-i and -o ) flags to specify what your incoming and outgoing interfaces should be. For 2.6 kernels you need to use the physical device module. So whever you see a rule that has -i or -o flags, replace them with -m physdev --physdev-in or -m physdev --physdev-out to specify which interface you want (this is what breaks on my system). If you use -i and -o it will mis-match because iptables thinks the input and output interfaces are whatever you call the bridge (br0 if you use my example).

Pretty simple stuff. I hope it was helpful for you. If there is a part that doesn't make any sense or you'd like me to explain it better drop me a line at the address below.

Very simple iptables rules example

Here is a very simple example of iptables ruleset. It won't do very much except allow everyone from the inside network to connect and for the reply packets to come back. It's based on Rusty's quick example. It assumes your external interface is eth0. First is the 2.4 kernel example:

iptables -N FORWARD
iptables -A FORWARD -m state --state ESTABLISHED,RELATED -j ACCEPT
iptables -A FORWARD -m state --state NEW -i ! eth0 -j ACCEPT
iptables -A FORWARD -j DROP

Next is the 2.6 kernel example. The only change is the line specifying what interface we accept new connections from.

iptables -N FORWARD
iptables -A FORWARD -m state --state ESTABLISHED,RELATED -j ACCEPT
iptables -A FORWARD -m state --state NEW -m physdev --physdev-in ! eth0 -j ACCEPT
iptables -A FORWARD -j DROP

NATing on a Bridging Firewall

It may seem strange that if you have a bridging firewall, why would you use NAT and in fact how can you use it. The answer is you may have several IP address but more computers. Put the servers into the DMZ with real addresses and NAT the PCs.

The setup I have has the hosts with the real and private addresses on the same physical network. This is generally a bad idea and is called multi-netting. If you can, put the private hosts on a third ethernet card.

With multi-netting, you get the bizzare situation where everything revolves around a single interface and the firewall is part bridge, part router, based on what IP address it sees.

The first thing to do is give the bridge interface (br0 in the example) two IP addresses. It needs to be in both the public and private networks to do the routing and NATing. If you are going the three interface method, the third interface gets the private address and the bridge interface gets the public one.

Next, you need to add some firewall rules to do the NAT itself. This is reasonably standard. You will need to qualify the rule with the private LAN address so you don't NAT the public IP addresses too. The example assumes the external IP address is 1.2.3.4

iptables -t nat -A POSTROUTING -s 192.168.1.0/24 --to 1.2.3.4

Finally protect your firewall, it now unfortunately has a public IP address so it can do NAT. You may want to make sure that your daemons, such as SSH, only listen to your private IP addresses. Also some firewall rules such as the following can help. Other than traffic already established, the firewall only accepts traffic to itself if it is from the private LAN IP range and it came from the internal interface and it is destined to the firewall itself. It also accepts traffic on the loopback interface but drops the rest.

iptables -F INPUT
iptables -A INPUT -j ACCEPT -m state --state ESTABLISHED,RELATED
iptables -A INPUT -j ACCEPT -s 192.168.1.0/24 -i eth1 -d 192.168.1.1
iptables -A INPUT -j ACCEPT -i lo

OpenVPN 簡介

簡介

何謂 VPN(Virtual Private Network) ? 可參考此篇文章 的說明.....

然而,市面上有許多 VPN solution,每個 solution 各有其優缺點,若是要考量到建置成本與彈性,可考慮使用這邊將會介紹的 OpenVPN

那 OpenVPN 有什麼特色呢? 以下是官方網站的簡單說明:
OpenVPN is a full-featured SSL VPN solution which can accomodate a wide range of configurations, including remote access, site-to-site VPNs, WiFi security, and enterprise-scale remote access solutions with load balancing, failover, and fine-grained access-controls.

OpenVPN implements OSI layer 2 or 3 secure network extension using the industry standard SSL/TLS protocol, supports flexible client authentication methods based on certificates, smart cards, and/or 2-factor authentication, and allows user or group-specific access control policies using firewall rules applied to the VPN virtual interface. OpenVPN is not a web application proxy and does not operate through a web browser.
上述說明中,最重要的部分在於 OpenVPN 中的安全機制,是建立在 OSI Layer 2 以及 Layer 3,並非在 Application Layer,不透過 Web Browser 進行操作,由於安全性架構在 OSI 的底層,因此在安全性上自然也是大大的提升。

此外,許多 VPN solution 都是走 IPSec 架構,因此就無法與 OpenVPN 相容了,因為在說明第一行中就提到,OpenVPN 是以 SSL 為安全架構,因此必須考量到實際的情形,已決定是否使用 OpenVPN。


OpenVPN 的優點

然而,OpenVPN 有何優點呢? 以下列舉 OpenVPN 的幾項優點供參考:
  1. 可實作在 OSI Layer 3 甚至於 Layer 2,因此可以傳送 Ethernet、IPX、NETBIOS....等協定的封包,相容性極高
  2. 提供連接 VPN 的使用者統一的通道進行網路傳輸,大大加強了安全性
  3. 透過 VPN 所建立的通道,幾乎可以與目前所有安全機制溝通無礙(例如:https)
  4. 支援代理(proxy)機制
  5. 僅需開啟防火牆的單一 port 即可處理來自多方的連線(multi tunnel),減少被惡意入侵的機會
  6. 管理者可根據需求自行撰寫 script,讓 OpenVPN 可以處理更多複雜的工作
  7. 針對動態 IP 使用者,提供了通透且高效能的服務;即使在使用 VPN 通道的同時更換了 IP,建立好的 VPN 通道也不會就此斷掉
  8. 在 NAT 的環境下運作是毫無問題的
  9. 在任何 OS 平台下皆可安裝
  10. 模組化的設計,因此管理者可以根據需求自行增加或減少 OpenVPN 的功能


資料傳輸方式

OpenVPN 會模擬出虛擬的網路裝置來進行資料的傳輸,而其所使用的虛擬裝置為TUN/TAP driver,而 TUN 以及 TAP 有何不同呢? 以下分別進行說明:

1、tun
可被視為虛擬的點對點裝置,就像一般家用的 modem、ADSL 一樣,使用此虛擬裝置的模式稱為 routed mode,因為是在連線後才決定 vpn 雙方的連線路徑,因此可瞭解 tun 裝置所處理的是 OSI Layer 3 的工作

2、tap
可被視為虛擬的 ethernet 網路卡,可以透過此裝置啟動一個 daemon 來接收 ethernet 訊框,稱為 bridge mode,因為此裝置是以 bridge 的方式來運作,這個是 tun 裝置做不到的! 因為 tap 裝置所處理的是 OSI Layer 2 的工作

最後,由於此兩個裝置處理的是 OSI Layer 2 與 3 的部分,因此自然可以容易的更上層的安全機制進行結合,例如:SSL/TLS(Layer 4)。

雖然這兩個裝置是虛擬的,但卻可以跟一般實體的網路卡一樣的運作,也因為有此特性,以下的情況都可以正常運作:
  • 在搜尋 Windows 內部網路或是區網遊戲時,需要發送廣播封包
  • 非 IP 協定的封包(例如:IPX),也可以透過 vpn tunnel 正常傳輸
  • 可以透過防火牆管理虛擬裝置的流量
  • 可以針對 vpn tunnel 的傳輸進行流量管控


OpenVPN 的缺點

OpenVPN 優點一堆,包括設定方便、功能強大、安全性佳....等等,但也是有缺點的! 最重要的缺點是與目前流行的 IPSec vpn 是不相容的,加上由於許多網路設備內建的都是支援 IPSec 的功能,因此跟OpenVPN 並不相容。

不過這並不要緊,技術是會進步的,相信廠商很快就會把相容於 OpenVPN 的功能也加入其設備中。


安裝 OpenVPN

現在要安裝 OpenVPN 可說是方便多了,Windows 下可以直接到官方網站下載,Linux 下可以直接透過 apt 或是 yum 進行網路安裝。

2007年5月7日 星期一

VPN 基本運作原理

何謂 VPN ?

VPN(Virtual Private Network) 中文翻譯為「虛擬私有網路」,以下從網路上擷取 VPN 的定義進行說明:

原文說明:
A virtual private network (VPN) is a private communications network often used by companies or organizations, to communicate confidentially over a public network. VPN traffic can be carried over a public networking infrastructure (e.g. the Internet) on top of standard protocols, or over a service provider's private network with a defined Service Level Agreement (SLA) between the VPN customer and the VPN service provider. A VPN can send data e.g. voice, data or video, or a combination of these media, across secured and encrypted private channels between two points.
中文說明:
VPN 是利用 Internet IP 的技術,建立 Internet 上的加密通道 (Tunneling) 來架構網際網路上的虛擬內聯網路(VPN),IP網路的擴充性良好,所使用的加密技術是標準的 IPSEC (IP Security) 方式,IPSec 結合了加密(Encryption)、認證(Authentication)、密鑰管理 (Key Management)、數位檢定 (Digital Certification) 等安全標準,具有高度的保護能力。

VPN透過Internet傳送企業重要資料自然成為競爭對手覬覦的對象,因此,保障通訊安全即為建置VPN的首要考量。這裡的安全除了保證資訊的隱密 (Confidentiality),避免第三者「竊聽」到通訊內容,同時還須確保網路傳送內容不被篡改破壞,亦即所謂資料的一致性 (Integrity);另外就是資料來源的驗證(Authentication),確定資料並非來自網際網路上第三者所偽造。至少達成這三點,我們才能確保跨越開放式網際網路的VPN有如專線構成的封閉式內聯網路一樣安全。
而由上述的說明,可瞭解到 VPN 是希望透過價格低廉的 WAN 線路,以 Tunneling 的技術,加上特殊的安全、傳輸等附加機制後,可以破除地理限制,讓 Intranet、Extranet、Internet 都可以用類似區域網路的方式進行連結。


VPN 的優點

VPN 擁有相當多的使用上優點,例如:
  1. 使用 WAN 的線路作為基礎,破除地理因素
  2. 安全性高
  3. 使用與維護成本低
  4. 增加生產力
  5. 原理與使用操作上簡單、容易
  6. 增強企業合作伙伴間、或是與企業與用戶間的聯繫


相關安全機制

由於 VPN 是架構在現有的 WAN 上面,當然在安全性的部分要注意的地方可是相當多,一般來講,大概有以下幾種加強安全性的方式:

1、防火牆 Firewall

防火牆是個很普遍的概念,因此這邊就不多做說明了,除了可參考坊間的許多書籍外,以下再附上介紹防火牆概念的連結資訊:

2、加密 Encryption

加密的方式,大致有以下兩種:
  1. 對稱式加密 Symmetric-key encryption
  2. 非對稱式加密 Public-key encryption

上述兩種加密方式,在密碼學裡面都有詳細的探討,以下附上幾個連結供參考:

3、IPSec

IPSec 的部分其實蠻複雜的,可以閱讀以下兩篇文章,相信觀念會相當清楚:

IPSec 的特色在於其架構於網路層的安全機制,因此即使傳輸層 or 應用層的部分沒有安全機制的防護,IPSec 依然可以保護網路通訊的內容。


Tunneling

VPN 的運作原理即稱為 Tunneling

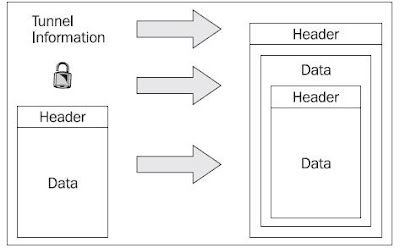
簡單來說,Tunneling 是一種用於在不同通訊協定間傳遞資料的方法,其運作的在於將資料封包視為另外一個封包中的 Data,並加上不同協定的控制訊息後,轉變為適用於另一種通訊協定的資料封包,進而達到讓資料封包在不同通訊協定間傳遞的目的。

以下用一張圖,來解釋原本的 packet 加上了 encrypt information 以及 tunnel information 後的樣子:


看見了嗎? 要進行 tunneling 的資料,必須額外加掛上一層一層的資訊,雖然安全性與便利性提升了,不過也造成網路傳輸的 overhead 很高,這是管理者必須注意到的地方。

在原本的資料封包中,即使內含的 IP Address 是區域網路的 IP,甚至是自訂的 Protocol,經過加入外層 header information 後,便可以標準的通訊協定進行傳輸,而接收封包的兩端,則必須具有解析封包的能力,因此又稱為 Tunneling Interface。

而 Tunneling 需要三種不同的協定來組合而成:
  1. Carrier Protocol
    用來在網際網路上傳遞封包用的協定
  2. Encapsulation Protocol
    用來包裝原本封包資料用的協定,例如:GRE、IPSec、PPTP、L2TP....etc
  3. Passenger Protocol
    原本封包資料所使用的協定

此外,Tunneling 還可以根據其協定實作的層級不同,分為以下三種:

1、實作於 OSI Layer 2

在 Layer 2 就將 packet 進行封裝有一個相當大的好處,即是此 tunnel 在兩端使用非 IP 的協定時依然可以進行傳輸(IP 屬於 Layer 3),雖然 IP 在 internet 上被廣泛使用,但不代表只有 IP 一種協定,例如 Netware 系統中所使用的 IPX。

在此模式下,若 vpn 兩端要進行傳輸,client 會產生一個虛擬的 Point-to-Point(點對點) 的裝置來與 server 連結,而實作 Layer 2 tunneling 的技術,目前有以下四種較為熱門,不但提供了加密的功能,也提供了使用者認證的機制:
  1. Point to Point Tunneling Protocol (PPTP)
    其為擴充功能後的 PPP 協定,由 Microsoft 所協助發展而成,當然在 Windows 下也直接支援,所建立的 tunnel 可以用來傳送 IP 以及 IPX 的封包,不過主要缺點在於傳輸雙方一次只能建立一個 tunnel
  2. Layer 2 Forwarding (L2F)
    由 Cisco 所發展而成,提供了比 PPTP 更多的功能,在傳輸上較有效率,也可同時產生多個 tunnel
  3. Layer 2 Tunneling Protocol (L2TP)
    廣為使用的協定,原因是因為此協定結合了 PPTP 以及 L2F 的優點,卻沒有其缺點,並可與其他安全機制進行結合
  4. Layer 2 Security Protocol (L2Sec)
    似乎是發展用來處理與 IPSec 相容性的問題

當然選擇使用的 tunneling 協定時,要考量的還有很多,例如:
  1. 支援的使用者認證機制是否廣泛
  2. 是否支援在不同的網路環境下運作,例如:NAT
  3. 是否支援 dial-up 模式以方便僅有動態 IP 的使用者
  4. 是否支援 PKI 安全機制
當然還可能有更多的考量,都是管理者在選擇 tunneling protocol 時,必須針對需求來謹慎考慮的!

2、實作於 OSI Layer 3

實作於 Layer 3 中最著名且最為廣泛使用的 tunneling 技術則是 IPSec 了,IPSec 在前面已經有提供網頁介紹,因此這邊不再贅述;不過 IPSec 所提供的功能相當的多,不過也因此產生了一個很主要的缺點,即是設定過於複雜,不過在許多硬體中都支援 IPSec。

而 IPSec 是如何建立 tunnel 來傳輸資料呢? 有以下兩種方式:
  1. Tunnel mode
    此種模式下,packet 進行傳輸前,會將整個 packet 加密後,再加上 tunnel information 後進行傳輸
  2. Transport mode
    此種模式下,僅針對 packet 中的 data 進行加密(並非整個 packet),再加上 tunnel information 後進行傳輸;這樣做的缺點,在於惡意人士可以知道 packet 實際傳送的 source 以及 destination 為何,不過相對所產生的 overhead 也小。

3、實作於 OSI Layer 4

當然,vpn tunnel 也可以建立於 application layer,而 TLS 以及 SSL 就是為了此目的而產生的。透過此種方式,就可以直接透過 browser 連線到已經實作 SSL 的 https 網站進行相關的認證手續,以便建立起vpn tunnel,此種方式已經被廣泛測試過了,是相當可靠的一種方式。


範例說明

為了瞭解 Carrier ProtocolEncapsulation ProtocolPassenger ProtocolTunnel InterfaceInternet 之間的關係,以下用一個實際的簡單範例進行說明:
  1. 假設使用者透過網路訂購一台電腦,廠商製造完成後,要將此台電腦(原本的資料封包)透過快遞業者送交到使用者手上
  2. 而快遞業者收到廠商委託後,將此台電腦進行裝箱打包(Passenger Protocol)進送貨專用的箱子(Encapsulation Protocol)裡,再來會被統一送至快遞業者的貨物運送中心(Entry Tunnel Interface)
  3. 接著快遞業者用送貨車(Carrier Protocol),行經高速公路、一般道路(Internet)後,送達至使用者家中 (Exit Tunnel Interface)
  4. 最後,使用者打開箱子(Encapsulation Protocol),並取出裡面的電腦(Passenger Protocol)開始使用
由上述的範例可知,其實 Tunneling 的原理僅僅就是如此而已。


參考資料
  1. Virtual private network
  2. How Virtual Private Networks Work
  3. VPN

2007年5月5日 星期六

bash 基本觀念

何謂 shell ?

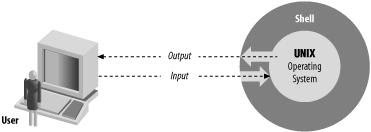
以 Unix-Like 的作業系統為例,shell 是介於使用者與 OS 之間的的交談介面。所有來自使用者的指令,都會被 shell 轉換為 OS 可以認得的命令並執行,相對的,OS 所回傳的內容自然也會被 shell 轉換為使用者可以辨識的訊息。

以下用一張簡單的圖來說明使用者shellOS 三者的關係:


shell 其中一個很重要的工作,就是將使用者所下達的指令,轉換為可以交由 OS 所執行的命令,以下用一個簡單的 command 為例:
shell> sort -n phonelist > phonelist.sorted
以上指令的作用,在於將 phonelist 檔案中的內容,以數字大小進行排列後,輸出至檔案 phonelist.sorted 中

而 shell 是如何將此段指令進行轉換呢? 它做了以下步驟:
  1. 將整段指令分解為「sort」、「-n」、「phonelist」、「>」、「phonelist.sorted」五個部分,每個部分皆稱為 word
  2. 判斷每個 word 的目的為何:
    「sort」是排序的指令、「-n」以及「phonelist」是參數、「>」以及「phonelist.sorted」被合在一起視為一個 I/O 的指令。
  3. 啟動一個 I/O 的動作,準備將內容寫入 phonelist.sorted 中。
  4. 開始將原檔案進行排序。

每個步驟的執行細節就不在這邊介紹,這裡只是要表達出 shell 在 parse 一個指令大概的流程為何。


bash 的特色與優點

在之後針對 shell 的介紹,都是以 bash 為主,因為它是目前最流行的 shell,功能也相對最為強大;而到底 bash 有哪些特色與優點呢? 以下有兩篇好文章,說明的相當詳細:
  1. Shell by OSL3
  2. 使用 bash 的優點


檔案

在 bash 中,檔案被分為三種,分別是純文字檔、執行檔(binary)、以及目錄(directory),其中目錄結構在學習 Linux 上是個相當重要的議題,不過這邊並不贅述,主要把重心放在 bash 上,而且盡量寫些大家容易忘記的部分。

所以像是符號「~」代表使用者家目錄,這種很基本的觀念,就不再多著墨了!

【備註】在 Unix-Like 的檔案系統,沒有所謂的「副檔名」,並非像 Windows 一樣,*.txt 代表純文字檔、*.exe 代表執行檔....等等,這是必須注意的!

1、檔案名稱與萬用字元

首先,要說明的是隱藏檔,在 Windows 中,隱藏檔是以檔案的屬性來決定;不過在 Linux 中,隱藏檔的檔名則是以「.」作為開頭。

接著介紹萬用字元(wildcard),基本的萬用字元有以下幾種:
萬用字元
符合的內容
?
任何單一字元
*
一個或多個任何字元
[set]
符合[set]中設定的任何字元
[!set]
不符合[set]中設定的任何字元


其中 ? 與 * 的差別就是符合單一字元或是多個字元而已,以下介紹 [set] 的用法:
[set] 描述 符合的內容
[abc] a or b or c
[.,;] 句號 or 逗號 or 分號
[-_] 減號 or 底線
[a-c] a or b or c
[a-z] 任一小寫英文字母
[!0-9] 任一非數字字元
[0-9!] 任一數字 or 驚嘆號
[a-zA-Z] 任一英文字母
[a-zA-Z0-9_-] 任一英文字母 or 數字 or 底線 or 減號


以下用個簡單例子來說明,假設有兩個目錄 /home/user1 以及 /home/user2,想要一次把這兩個目錄列表出來,可以用下指令:
shell> ls /home/user*
假如又要列出上述兩個目錄中,名稱為 a 或是 c 開頭的目錄或檔案,可用以下指令:
shell> ls /home/user*/[ac]*
其他的應用,就是由使用者自行去發揮了!

2、Brace Expansion

在 bash 3.0 以後,提供了 Brace Expansion 的功能,它是以左右大括號來設定字元的篩選條件,的用法跟 wildcard 有點不太一樣,以下直接用範例來說明:
Brace Expansion
符合的內容
b{ed,olt,ar}s
beds, bolts, bars
b{ar{d,n,k},ed}s
bards, barns, baeks, beds
{2..5} 2 or 3 or 4 or 5
{d..h}
d or e or f or g or h


輸入與輸出(I/O)

1、Standard I/O

所謂的 standard Input,可能是來自使用者的鍵盤、或是某個檔案內容; standard output 可能就是使用者的螢幕、印表機、或是其他輸出設備....等等,不過這些都是基本的,一般的 shell 都一定會支援的。

而為了讓 I/O 在使用上更有彈性,bash 支援了 pipeline(管線) 的功能,透過 pipeline 的方式,可以將多個程式結合起來,將 A 程式的 output 當作是 B 程式的 input,如此一來,就可以藉由此方式來完成更複雜的 I/O 工作了! 例:將 mail 檔案中的內容直接透過 lp 指令輸出到印表機上,而不是顯示在螢幕上。

pipeline 的支援,讓許多複雜的 I/O 工作變得容易完成,加上之後會介紹的 filtering 的功能(Linux 中有許多用在 filtering 的指令,例如:catgrepsortcutsedtr....等等),便可以撰寫 shell script 來自動完成許多日常工作。

2、I/O Redirection

redirection 的功能可用來取代原本的 standard input 以及 standard output,分別以符號「<」代表 input,符號「>」代表 output,以下用個範例來說明:
shell> cat < file1 > file2
上述指令會將 file1 的內容複製一份變成 file2,效果等同一下的指令:
shell> cp file1 file2
瞭解了嗎? 在 bash shell 中,I/O 是可以做很多不同變化的。

3、Pipeline

在 standard I/O 中就有提到 pipeline 啦! 它的作用就是將某支程式所產生出來的 output 丟給另一支程式作為 input,所使用的符號為「|」,透過此符號將兩個以上不同的指令連結起來,讓前面指令的 output 成為下一個指令的 input。

以下舉個簡單例子:
shell> ls -al /home | more
此指令會將 /home 目錄中的子目錄以及檔案通通列出來,包含隱藏檔,但是若內容很多,超過畫面一頁可以顯示的範圍,就透過 pipeline,將輸出交給 more 指令來做分頁瀏覽的效果,甚至可以交由 lp 指令直接從印表機輸出。

不過當然實際情況不會這麼簡單,在舉個例子,以儲存使用者帳號資訊的檔案 /etc/passwd 為例,每個使用者的帳號都會一行一行的存於此檔案中,格式如下:
man:x:6:12:man:/var/cache/man:/bin/sh
每行中都包含著非常多的資訊,並且以冒號(:)作為間隔,至於這些資訊代表什麼意思,這邊不多做探討,假設我們只需要使用者帳號的部分,如果管理者希望將使用者帳號以字母的順序作排序後,並交由印表機列印出來,則可透過以下指令來完成:
shell> cut -d: -f1 < /etc/passwd | sort | lp

# 以下指令跟上面的相同
shell> cut -d: -f1 /etc/passwd | sort | lp
看見了嗎? 在指令中把 redirection 跟 pipeline 的功能一起用上了! 如此一來達成我們想要的效果。當然,更複雜的指令也是可以完成,只是這就必須要透過大家的巧思了。


工作管理

由於 Unix-Like 系統強大的工作管理功能,不但讓使用者可以下指令同時做多個工作,也可以讓多個不同使用者同時登入,每個使用者有不同的 login session,可說是真正的 Multi-User 的操作環境。

在下指令進行某工作時,一般正常情況下,必須等到工作處理結束,才可以下另一個指令,但若是工作要處理很久的(例如:大型檔案的搬移),那可就要等半天囉! 但若不想這樣等,可以在指令的最後加上符號「&」,如此一來,工作就會移至背景去執行,馬上就可以下達下一個指令來處理另外一個工作了!

而透過加入符號「&」的指令所處理的工作,會產生一個 process number,供使用者隨時檢視之用,還可以使用 renice 的指令調整工作的處理優先權;此外,若要瞭解目前移至背景處理的工作的狀況,可用指令 jobs 來檢視。

不過需要注意的是,一般的 I/O 工作並不適合移到背景去執行,原因如下:
  1. 因為假如被移到背景的 I/O 工作需要使用者的 input,此時整個工作就會 stop,直到使用者將工作刪除,或是移回前景(foreground)來處理才會繼續。
  2. 假設被移至背景處理的 I/O 工作有任何資料要輸出時,一樣會出現在使用者的螢幕上,這樣一來,就會跟使用者正在處理的工作所產生的訊息混合輸出,造成螢幕訊息很混亂。不過這當然這也不是沒有解決方法,只要利用 redirection 的方式將輸出訊息轉到檔案或是 /dev/null 中,就可以解決此問題了!


特殊字元及引號

Unix-Like 系統提供了強大的功能,當然也需要有許多不同的特殊符號來搭配使用,例如「<」以及「>」使用來處理 I/O redirection,「&」則是將工作移至背景處理....等等,以下介紹各種不同特殊字元及引號的用法:
字元
功能說明
~
home directory
`
command substitution
#
comment
$
variable expression
&
background job
*
string wildcard
(
start subshell
)
end subshell
\
quote next character
|
pipe
[
start character-set wildcard
]
end character-set wildcard
{
start command block
}
end command block
;
shell command separator
'
strong quote
<">
weak quote
<
input redirect
>
output redirect
/
pathname directory separator
?
single-character wildcard
!
pipeline logical NOT


1、引號與跳脫字元的使用

當使用者要在螢幕上單純顯示上述這些符號,為了讓 shell 不會誤判為特殊用途,必須搭配引號以及跳脫字元使用,假設我們要在螢幕上輸出「2 * 3 > 5 is a valid inquality」這一行訊息,其中包含了「*」及「>」兩個特殊字元,以下用幾個例子說明:
# 無法顯示正確訊息,反而會有其他非預期的訊息輸出至名稱為「5」的檔案中
shell> echo 2 * 3 > 5 is a valid inquality

# 正確顯示
shell> echo '2 * 3 > 5 is a valid inquality'

# 正確顯示
shell> '2 * 3 > 5' is a valid inquality

# 正確顯示
shell> echo 2 \* 3 \> 5 is a valid inquality
假設要顯示的訊息中,有引號呢? 如果這次訊息換成「"2 * 3 > 5" is a valid inquality」,這就一定非得要跳脫字元的協助不可了,可用以下指令來完成此需求:
shell> echo \"2 \* 3 \> 5\" is a valid inquality

2、指令過長的處理方式

當使用者下的指令很長時,應該要怎麼處理呢? 這時候可以使用反斜線(\),也就是要使用跳脫字元所用的反斜線,shell 會認為指令尚未結束,讓使用者在下一行繼續輸入。

3、控制鍵

控制鍵可以在許多情況下可能會用到,例如:不小心下錯指令,要趕快停止時,按 Ctrl+C 停止指令的執行;或是想要暫停目前的工作,可按 Ctrl+Z.....等等,善用這些熱鍵,可讓工作更為順利,以下介紹常用的控制鍵:
控制鍵
功能說明
Ctrl + C
終止目前執行中的命令
Ctrl + D
結束輸入
Ctrl + \
終止目前執行中的命令(假設 Ctrl+C 沒有效用的話)
Ctrl + S
停止螢幕輸出訊息
Ctrl + Q
重新輸出訊息至螢幕
Del or Ctrl + ?
清除最後一個字元
Ctrl + U
清除目前命令列中的指令
Ctrl + Z
暫停目前的工作


參考資料:
  1. 認識 Bash Shell
  2. GNU Bash
  3. Shell by OSL3
  4. 使用 bash 的優點
  5. Learning the bash Shell, Third Edition

2007年5月4日 星期五

Linux NAT 設定

基本上,要設定 NAT server,以下的語法是必須的:(假設連外介面為 ppp0)
# (start)============================== 清除防火牆規則 ==============================(start)
iptables -F
iptables -X
iptables -t nat -F
iptables -t nat -X
iptables -t mangle -F
iptables -t mangle -X
# (end)============================== 清除防火牆規則 ==============================(end) # (start)============================== 設定預設規則 ==============================(start)
iptables -P INPUT DROP
iptables -P OUTPUT ACCEPT
iptables -P FORWARD ACCEPT
# (end)============================== 設定預設規則 ==============================(end) # (start)============================== NAT設定 ==============================(start)
# 檢查相依模組
depmod -a

# 預先掛載模組
modprobe ip_tables
modprobe ip_nat_ftp
modprobe ip_conntrack
modprobe ip_conntrack_ftp
modprobe ip_conntrack_irc
modprobe iptable_nat

echo "1" > /proc/sys/net/ipv4/ip_forward # 封包遞送
echo "1" > /proc/sys/net/ipv4/ip_dynaddr # 針對動態IP使用者

# 此僅為設定範例(請視情況修改)
iptables -t nat -A POSTROUTING -o ppp0 -s 192.168.1.0/24 -j MASQUERADE # SNAT(封包偽裝)
# (end)============================== NAT設定 ==============================(end)
大致以上這些設定,在大部分的 distribution 中,就可以讓 NAT 正常運作了!


【注意】

但在 Ubuntu 上面要設定 NAT,跟其他的 distribution 有些不太一樣,如果對外連線是以 pppoe 的方式連線的(也就是一般的ADSL),還需要多加上以下這一行:
iptables -A FORWARD -o ppp0 -p tcp -m tcp --tcp-flags SYN,RST SYN -m tcpmss --mss 1400:1536 -j TCPMSS --clamp-mss-to-pmtu

參考連結:

[Ubuntu] VNC Server 設定

在 Windows 中有方便的 Terminal Service 可以遠端操控電腦,但在 Linux 上呢? 首推當然是 VNC 了!

以下以 TightVNC 為範例來說明!

首先要安裝 TightVNC server:
shell> sudo apt-get -y install tightvncserver
接著進行第一次啟動(此時會詢問 VNC 登入密碼):
shell> vncserver
接著螢幕會輸出 VNC 第一個終端機成功啟動的訊息,相對的也會啟動 TCP port 5901 提供使用者連線。

當然也可以輸入同時執行多個 VNC 終端機,則會有相對應的 TCP port (5901、5902、5903.....等) 供連線,因此管理者可以根據需求進行防火牆的相關設定。


若要關閉 VNC 終端機,可以使用以下指令:
# 關閉第一個終端機
shell> vncserver -kill :1

# 關閉第二個終端機
shell> vncserver -kill :2

不過需要注意的是,如果開機沒有登入 GNOME or KDE 桌面環境,登入後會只有一個終端機畫面可用;因此為了讓 VNC client 登入後可以直接有桌面環境可以用,必須修改 ~/.vnc/xstartup 這個檔案。

首先將檔案中的所有內容註解,並輸入以下內容:(管理者必須根據主機中的桌面環境進行調整)
# 開機即啟動GNOME
exec gnome-session

# 開機即啟動KDE
exec startkde
如此一來啟動 VNC 終端機後,VNC client 登入就馬上有桌面環境可以使用了!


成功登入後,卻發現桌面環境實在很醜也小小的,因此要把畫面弄的漂亮一點,只要在啟動 VNC 終端機時,使用以下指令即可:
# 解析度: 1024 * 768 # 色彩品質:16 bit # 字型大小:100 dpi
shell> vncserver -geometry 1024x768 -depth 16 -dpi 100
如此一來,就有美美的畫面可以看囉!


參考連結:

[PHP] mail.log 中出現 501 Syntax error in parameters or arguments 訊息

若在 Ubuntu 上,以 PHP 開發收發 Mail 相關的程式時,一定會使用到 PHP Mail 相關 function,而若在收發信發生問題,並且檢查 /etc/logs/mail.log 中發現了類似以下的訊息:
Apr 10 23:54:04 ubuntu postfix/pickup[5118]: 49E6369C05D: uid=33 from=<www-data>
Apr 10 23:54:04 ubuntu postfix/cleanup[5304]: 49E6369C05D: message-id=<20070410155404.49E6369C05D@ubuntu>
Apr 10 23:54:04 ubuntu postfix/qmgr[4958]: 49E6369C05D: from=<www-data@ubuntu>, size=682, nrcpt=1 (queue active)
Apr 10 23:54:04 ubuntu postfix/smtp[5306]: 49E6369C05D: to=<godleon1202@yahoo.com.tw>, relay=mx1.mail.tw.yahoo.com[203.188.197.10]:25, delay=0.48, delays=0.13/0.02/0.32/0.01, dsn=5.0.0, status=bounced (host mx1.mail.tw.yahoo.com[203.188.197.10] said: 501 Syntax error in parameters or arguments (in reply to MAIL FROM command))
Apr 10 23:54:04 ubuntu postfix/cleanup[5304]: BCEE869C05E: message-id=<20070410155404.BCEE869C05E@ubuntu>
Apr 10 23:54:04 ubuntu postfix/bounce[5307]: 49E6369C05D: sender non-delivery notification: BCEE869C05E
Apr 10 23:54:04 ubuntu postfix/qmgr[4958]: BCEE869C05E: from=<>, size=2444, nrcpt=1 (queue active)
Apr 10 23:54:04 ubuntu postfix/qmgr[4958]: 49E6369C05D: removed
Apr 10 23:54:04 ubuntu postfix/local[5308]: BCEE869C05E: to=<www-data@ubuntu>, relay=local, delay=0.14, delays=0.03/0.07/0/0.04, dsn=2.0.0, status=sent (delivered to mailbox)
Apr 10 23:54:04 ubuntu postfix/qmgr[4958]: BCEE869C05E: removed
表示對方的 MTA 看不懂主機寄出去的信中所包含的 domain name,此時只要修改設定檔 /etc/postfix/main.cf 的內容,將以下兩行設定註解即可:
append_at_myorigin = no
append_dot_mydomain = no
如此一來,PHP 的 mail function 就可以正常使用了!

[OpenSSL] CA建置(2) - Signed CA

產生 CA certificate

上一篇說完建置 Self-Signed CA (亦即 root CA) 後,這裡繼續要以 root CA 為基礎,為其建立一個 Signed CA (亦即 child CA)....

首先要到 root CA server 中,產生給 child CA 的憑證:
# 產生憑證要求(Certificate Request)
shell> /usr/share/ssl/misc/CA.pl -newreq
Generating a 1024 bit RSA private key
.............++++++
......................................................++++++
writing new private key to 'newreq.pem' # 從這裡可以知道 Certificate Request 的檔案名稱為何
Enter PEM pass phrase: # 此處要輸入密碼
Verifying - Enter PEM pass phrase: # 此處要進行密碼確認
-----
You are about to be asked to enter information that will be incorporated
into your certificate request.
What you are about to enter is what is called a Distinguished Name or a DN.
There are quite a few fields but you can leave some blank
For some fields there will be a default value,
If you enter '.', the field will be left blank.
-----
# 以下會問一下憑證相關資訊,若不知道怎麼回答,就輸入「.」吧! 該欄位會被省略!
Country Name (2 letter code) [GB]:TW # 國家名稱縮寫
State or Province Name (full name) [Berkshire]:. # 縣市名稱
Locality Name (eg, city) [Newbury]:Taipei # 地區名稱
Organization Name (eg, company) [My Company Ltd]:. # 組織名稱
Organizational Unit Name (eg, section) []:. # 單位名稱
Common Name (eg, your name or your server's hostname) []:gLiteCA # 主機名稱
Email Address []:godleon@gmail.com
# E-Mail address

# 額外資訊(可不填)
Please enter the following 'extra' attributes
to be sent with your certificate request
A challenge password []:
An optional company name []:
Request (and private key) is in newreq.pem
如此一來,certificate request 就產生出來了!


而這裡產生的 certificate request,基本上跟一般 client 用的是相同的,沒有什麼特別,不過若是要給 child CA 用的 certificate,則 CA 在簽署的方式就有差別了,以下是簽署給 child CA 用的 certificate 的實作方式:
shell> /usr/share/ssl/misc/CA.pl -signCA
Using configuration from /usr/share/ssl/openssl.cnf # 仔細看喔! 這邊是使用 openssl.cnf 中的設定!
Enter pass phrase for /CA/private/cakey.pem: # 輸入 CA private key 的密碼
Check that the request matches the signature
Signature ok
Certificate Details: # 以下是此憑證的詳細內容
Serial Number: 3 (0x3)
Validity
Not Before: Apr 16 16:35:44 2007 GMT
Not After : Apr 15 16:35:44 2008 GMT
Subject:
countryName = TW
localityName = Taipei
commonName = gLiteCA
emailAddress = godleon@gmail.com
X509v3 extensions:
X509v3 Subject Key Identifier:
8F:12:C8:AC:59:86:F6:4B:F1:18:FE:28:2C:00:A3:F5:BE:E4:90:D0
X509v3 Authority Key Identifier:
keyid:BC:3C:4F:65:62:82:A6:3E:C5:8F:F7:96:D5:94:D1:00:C8:76:47:FA
DirName:/C=TW/L=Taipei/CN=rootCA/emailAddress=godleon@gmail.com
serial:00

X509v3 Basic Constraints:
CA:TRUE
Certificate is to be certified until Apr 15 16:35:44 2008 GMT (365 days)
Sign the certificate? [y/n]:y


1 out of 1 certificate requests certified, commit? [y/n]y
Write out database with 1 new entries
Data Base Updated
Signed CA certificate is in newcert.pem
看清楚了嗎? 如果要將 certificate request 簽署為給 child CA 用的 certificate,必須使用「signCA」參數。

而且從簽署的內容中也可以看出跟簽署一般 client 的 certificate 不同,可以看到在「X509v3 Basic Constraints」的下一行,有 "CA:TRUE" 的內容出現;以及在最後一行中,有 "Signed CA certificate is ......." 的內容出現,可以看出此 certificate 是給 child CA 用的。


建置 Signed CA

CA certificate 產生後,此即為 child CA 的 public key,而 private key 則必須從原本的 certificate request 取出,假設將其命名為 cakey.pem,接著將 newcert.pem 以及 cakey.pem 透過 scp 或其他方式傳送到 child CA server 上。

child CA server 有了這兩個檔案後,就可以來建置 Signed CA 囉! 首先當然還是要安裝 OpenSSL 相關套件,以後也是以 CA.pl 這支 Perl script 進行設定說明。

在建置 Self-Signed CA 時,可以用 newCA 參數直接建立 CA 相關目錄以及所需要的 certificate 檔案,那在 Signed CA 中呢? 其實很簡單,既然 certificate 檔案已經有了,只要再透過 newCA 參數將相關目錄建立起來,再用 root CA 所給的 certificate 以及 cakey 將 目錄中的檔案覆蓋掉即可!

其中 newcert.pem 可以直接取代,而 cakey.pem 則在目錄 private 中。

如此一來,Signed CA 就建置完成了! 至於使用 Signed CA 產生給一般 client 用的 certificate 的方式,就跟 root CA 一樣,就不再贅述了!


參考資料:
  1. Certificate authority
  2. CA (Certificate Authority) 憑證管理中心
  3. OpenSSL入門
  4. 產生一張 SSL 電子證書
  5. Creating a Certificate Authority
  6. Creating Your Own CA
  7. CA建置工具:Openssl的管理與使用介紹(上)
  8. CA建置工具:Openssl的管理與使用介紹(下)
  9. CA.pl(1)

[OpenSSL] CA建置(1) - Self-Signed CA

前言

上一篇文章中,簡單介紹了 CA(Certificate Authority),而在實作的部分,是以 OpenSSL 搭配 Perl script(CA.pl) 來進行建置,並分成 Slef-Signed CA 以及 Signed CA 兩個部分來介紹...

其中 Self-Signed CA 是 root CA(Parent CA);另外一個 Signed CA 則是 Child CA。


套件安裝

上面提到要用 OpenSSL 以及 Perl script 來實作 CA,在 Linux 上安裝這些套件是相當容易的,使用以下指令即可安裝完成:
# 安裝 OpenSSL 套件以及設定工具
# 每個 Linux distribution 的套件名稱都有點不太一樣,安裝前必須先注意
# 不過基本上關鍵字就是 openssl 與 perl
shell> apt-get -y install openssl openssl-perl
其中 Perl script 套件安裝後,會有一個主要的設定檔案 CA.pl 會安裝進系統中,管理者必須將找出這個檔案的正確位置以便使用。


建置 Slef-Signed CA

透過 CA.pl 建置 Slef-Signed CA 是相當容易的,而 CA.pl 這支 script 也是以 openssl.cnf 中的設定為依據進行設定,只是省略掉大部分人安裝時會省略的部分,讓安裝 CA 的工作可以更快完成,若要進行更細部的設定,還是必須要熟悉此設定檔才行。

而若要瞭解 openssl.cnf 的詳細設定方式,可以參考此文件


當要進行 CA server 設定前,必須先規劃好相關的憑證檔案要放置於何處,此時可以檢查一下 CA.pl 這支 script,看其進行設定工作時所使用的目錄是以那個檔案中記錄的為依據;基本上,只有以下兩種可能:
  1. openssl.cnf 中,[CA_default] 區段中的 dir 欄位
  2. CA.pl 檔案中已經指定 $CATOP 變數


接著就可以著手進行建置 CA server 的工作了! 首先執行以下指令:
# 建立新的 CA server
shell> /usr/share/ssl/misc/CA.pl -newca
CA certificate filename (or enter to create) # 這裡就按 Enter 跳過直接用設定檔中的內容

Making CA certificate ...
Generating a 1024 bit RSA private key
................................................++++++
........................................................................++++++
writing new private key to '/CA/private/cakey.pem'
Enter PEM pass phrase: # 此處要輸入密碼
Verifying - Enter PEM pass phrase: # 此處要進行密碼確認
-----
You are about to be asked to enter information that will be incorporated
into your certificate request.
What you are about to enter is what is called a Distinguished Name or a DN.
There are quite a few fields but you can leave some blank
For some fields there will be a default value,
If you enter '.', the field will be left blank.
-----
# 以下會問一下憑證相關資訊,若不知道怎麼回答,就輸入「.」吧! 該欄位會被省略!
Country Name (2 letter code) [GB]:TW # 國家名稱縮寫
State or Province Name (full name) [Berkshire]:. # 縣市名稱
Locality Name (eg, city) [Newbury]:Taipei # 地區名稱
Organization Name (eg, company) [My Company Ltd]:. # 組織名稱
Organizational Unit Name (eg, section) []:. # 單位名稱
Common Name (eg, your name or your server's hostname) []:rootCA # CA 主機名稱
Email Address []:godleon@gmail.com # E-Mail Address
透過「newca」參數,可以直接完成下列工作:
  1. 產生 CA 的 private key
  2. 產生 self-signed 的 certificate

接著相關目錄以及檔案都會建立完成,以下介紹這些檔案與目錄的意義:
# 切換到 CA server 相關檔案所在目錄
shell> cd /CA/

# 列出檔案清單
shell> ls -al
total 32
drwxr-xr-x 6 root root 4096 Apr 10 07:57 .
drwxr-xr-x 20 root root 4096 Apr 10 07:54 ..
-rw-r--r-- 1 root root 1220 Apr 10 07:57 cacert.pem # CA 的憑證(certificate),也就是 Public Key
drwxr-xr-x 2 root root 4096 Apr 10 07:54 certs # 此目錄存放 CA 簽署過的憑證
drwxr-xr-x 2 root root 4096 Apr 10 07:54 crl # 此目錄存放 Certificate Revoke List
-rw-r--r-- 1 root root 0 Apr 10 07:54 index.txt # CA log file
drwxr-xr-x 2 root root 4096 Apr 10 07:54 newcerts # 複製 certs 目錄中的內容存放
drwxr-xr-x 2 root root 4096 Apr 10 07:54 private # 此目錄中存放 CA 的 Private Key
-rw-r--r-- 1 root root 3 Apr 10 07:54 serial # 記錄簽發憑證的序號(serial number)
如此一來,Self-Signed CA 即設定完成囉!


簽發憑證

CA server 建置好後,如果沒有繼續建置下一層 child CA 的需求,就可以用此 CA 來簽發憑證了! (其實即使有 child CA 的需求,還是可以用 root CA 簽發憑證)

CA 簽發的憑證有分為兩種,一種是簽發給一般的 client 使用,另外一種則是簽發用來建置 child CA 用,兩種的設定方式是不一樣的,這邊先說明如何簽發給一般 client 用的憑證,而簽發用來建置 child CA 用的憑證則到下一篇再來談!

建立憑證(certificate)的過程,可以參考「產生一張 SSL 電子證書」一文,有很清楚的圖片說明,首先要有一台 CA server 負責簽署 certificate 之用;再來要產生 certificate request(其中會包含 client 用的 private key),連同 CA 的 certificate(CA 的 public key),一起交給 CA 進行簽署,簽署完後則會產生新的 certificate(client 的 public key) 以提供 client 使用。

如此一來, client 就有一組 public key(certificate) 以及 private key(在 certificate request 中,必須另外複製出來),作為資料傳輸加密之用。

而要產生 certificate,必須先要產生 certificate request,實作方式如下:
# 產生憑證要求(Certificate Request)
shell> /usr/share/ssl/misc/CA.pl -newreq
Generating a 1024 bit RSA private key
.............++++++
......................................................++++++
writing new private key to 'newreq.pem' # 從這裡可以知道 Certificate Request 的檔案名稱為何
Enter PEM pass phrase: # 此處要輸入密碼
Verifying - Enter PEM pass phrase: # 此處要進行密碼確認
-----
You are about to be asked to enter information that will be incorporated
into your certificate request.
What you are about to enter is what is called a Distinguished Name or a DN.
There are quite a few fields but you can leave some blank
For some fields there will be a default value,
If you enter '.', the field will be left blank.
-----
# 以下會問一下憑證相關資訊,若不知道怎麼回答,就輸入「.」吧! 該欄位會被省略!
Country Name (2 letter code) [GB]:TW # 國家名稱縮寫
State or Province Name (full name) [Berkshire]:. # 縣市名稱
Locality Name (eg, city) [Newbury]:Taipei # 地區名稱
Organization Name (eg, company) [My Company Ltd]:PCCU # 組織名稱
Organizational Unit Name (eg, section) []:CIC # 單位名稱
Common Name (eg, your name or your server's hostname) []:vpn_client1 # 主機名稱
Email Address []:godleon@gmail.com # E-Mail Address

# 額外資訊(可不填)
Please enter the following '
extra' attributes
to be sent with your certificate request
A challenge password []:
An optional company name []:
Request (and private key) is in newreq.pem
產生的 certificate request 內容如下:
shell> cat newreq.pem
# private key 要自己保留好啊!
-----BEGIN RSA PRIVATE KEY-----
Proc-Type: 4,ENCRYPTED # 表示 private key 已經被加密
DEK-Info: DES-EDE3-CBC,12CF88E03148CC47 # 使用「DES-EDE3-CBC」的方式加密

uoZw4VuWz6yyo+C8gTOv0u3BGDtvB8p2bWx8qJ/O7H9UspnWD+/xpxQ2VVdxArgs 8fGxqrOEV11RtXjAGyAKzSj+fO5VYHYjFgVjJsBuKpuWfs3diTiMktFtwpbRhhwV vZwX+5yljHscSXtiuLRMGGxbOqx8Tg81QDo1AxNBgF2wwOV60Seesk4A70pw1iZ5 0CWbb3h/1dqwxIuY6pFNGkyTwiGx0dp5uchaMC99MVFgolGDVJmiYEkiUPtbINBh 33u+sLFbL1iugeh0UaXjz6a027bJmn0gQPpQ4Wtg3Yrp7vc25/+SanDM4pJy17mk lC80vnjs7vgCj1vqpAjKKO6w2h7g8JRNm24hsp13kE3lPnacTtUXS3Y9GoZ0in5K hT9ZO2Gx4dmTm8VHGH6OZ/T/qdiqddF65sskjvd2IEOtTQe0d46EyjvuJmpf7iY9 CydLu8TBxNrHI6WlgrNocL5Gv8MFevl4X7wXJYAK2ndBP2SaGcuVgGFKwAyUeaA6 Wa8iK7MIWs4alPkI9GkoOhPaf88QOsuWq0XzzggLNdKuNzAUDrcQ5KADdIL0byEf PVVJtDJ9lPWYhsOlLwuSRTcJADWFrXir9SoUhwCDXb7AALAsqMyVTh8juHQl9n8B Bzio7uFJ/bpL2ZvsmitWoJ44Bg/8BIsmbLGHsVfumvUoyhq9AW7rsRk9UZSGxt4u XyT84VjI7a+4bbObGEYUPF0kNhZ2fAsob/z0tQ+zyVqY2vzFkEeHE1ELriIJdIdS hAybvNAg+iR2El8VcO8hdAYEDCuTwiJYFbSQSgTmPis= -----END RSA PRIVATE KEY-----
# 此部分必須交給 CA,證明 private key 是屬於本人擁有
-----BEGIN CERTIFICATE REQUEST-----
MIIBtjCCAR8CAQAwdjELMAkGA1UEBhMCVFcxDzANBgNVBAcTBlRhaXBlaTENMAsG
A1UEChMEUENDVTEMMAoGA1UECxMDQ0lDMRcwFQYDVQQDEw5TZWxmLVNpZ25lZCBD
QTEgMB4GCSqGSIb3DQEJARYRZ29kbGVvbkBdbWFpbC5jb20wgZ8wDQYJKoZIhvcN
AQEBBQADgY0AMaGJAoGBAMQvzgz3Rtg/erfUXo6VYZ2aYhBkEFIM7cfWVqJVWDds
DieFJkgqshvE1zsOCTF0xuRwYlHwU5sH6eGw8DyVwR/4YzMR2mHV8IJe9Cx8gJ+j
Nu7MDBlIKCnwgox5oBnOQ3T3pWl2g52rRGsdlxvmy36JxzYDjKX3NUkZFd5+Z2hV
AgMBAAGgADANBgkAhkiG9w0BAQQFAAOBggBlQl0HKZmyp6GOeCUAA4w2FhFshVhk
8KsB0P1A9iVUa23LcbEsYvMJ7E7DsFMgsaoKGIljoTWat+nPd+kCohMUxxZspy3l
vQDIwBjn+mkKdYCSXAtbvZHtjLmRVjCRNtDXVJgeknOQHnK2mD3q1NoE1meKyxgr
tiavyD6VQRttOA== -----END CERTIFICATE REQUEST-----
其中紅色字體的部分,是 client 的 private key,可以將其複製起來後,另外編輯的新文字檔並儲存起來,之後交給 client 使用!

接著要讓 CA 簽署此份 certtificate request:
shell> /usr/share/ssl/misc/CA.pl -sign
Using configuration from /usr/share/ssl/openssl.cnf # 說明使用的是 openssl.cnf 中的設定值
Enter pass phrase for /CA/private/cakey.pem: # 此處輸入 CA 密碼
Check that the request matches the signature
Signature ok
Certificate Details: # 以下是 certificate request 內容,檢查是否正確!
Serial Number: 4 (0x4)
Validity
Not Before: May 4 08:51:31 2007 GMT
Not After : May 3 08:51:31 2008 GMT
Subject:
countryName = TW
localityName = Taipei
organizationName = PCCU
organizationalUnitName = CIC
commonName = vpn_client1
emailAddress = godleon@gmail.com
X509v3 extensions:
X509v3 Basic Constraints:
CA:FALSE
Netscape Comment:
OpenSSL Generated Certificate
X509v3 Subject Key Identifier:
3C:B4:FB:F4:FD:3A:F6:C0:96:5C:B4:17:49:AD:89:CF:69:C5:87:0A
X509v3 Authority Key Identifier:
keyid:BC:3C:4F:65:62:82:A6:3E:C5:8F:F7:96:D5:94:D1:00:C8:76:47:FA
DirName:/C=TW/L=Taipei/CN=rootCA/emailAddress=godleon@gmail.com
serial:00

Certificate is to be certified until May 3 08:51:31 2008 GMT (365 days)
Sign the certificate? [y/n]:y # 是否簽署此 certificate


1 out of 1 certificate requests certified, commit? [y/n]y # 確認簽署 certificate
Write out database with 1 new entries
Data Base Updated
Signed certificate is in newcert.pem # 產生的 certificate 名稱為 newcert.pem
如此一來,給 client 用的 certificate 就成功產生了! 加上上一個步驟中,從 certificate request 中複製出來的 client private key,將檔案透過 scp 或其他方式傳給 client 後,就可以讓 client 使用了!


參考資料:
  1. Certificate authority
  2. CA (Certificate Authority) 憑證管理中心
  3. OpenSSL入門
  4. 產生一張 SSL 電子證書
  5. Creating a Certificate Authority
  6. Creating Your Own CA
  7. CA建置工具:Openssl的管理與使用介紹(上)
  8. CA建置工具:Openssl的管理與使用介紹(下)
  9. CA.pl(1)

2007年5月3日 星期四

[WWF] Windows Workflow Foundation

今天組長突發奇想,要我去看看 Windows Workflow Foundation.......看是否能用在學校表單e化的工作上...

不過目前手頭工作很多....先留一些連結下來之後看...
  1. Windows Workflow Foundation
  2. 和我一起學Windows Workflow Foundation(1)-----創建和調試一個WF實例
  3. 和我一起學Windows Workflow Foundation(2)-----讓WF通過參數接收數據
  4. 跟我一起學Windows Workflow Foundation(3)-----使用If/Else活動,定製活動處理工作流,使用事件傳遞數據
  5. 跟我一起學Windows Workflow Foundation(4)-----使用Listen,Delay,和其他envnt-based定製活動
  6. 跟我一起學Windows Workflow Foundation(5)-----使用activity設計器創建一個整合的定製activity
  7. 跟我一起學Windows Workflow Foundation(6)-----製作一個基本的定製活動
  8. 跟我一起學Windows Workflow Foundation(7)-----給定製活動添加有效性驗證

說實在,這個作者還真不賴,Windows Workflow Foundation 是 .NET Framework 3.0 才提供的功能,竟然已經寫了一堆教學出來了! 而且還是從一月份就開始....汗顏阿...@_@"

Certificate Authority(CA) 簡介

何謂 CA ?

在網路蓬勃發展的時代,安全議題越來越受到重視,因此也有許多人提出如何將傳輸在網路上的資料進行加密傳送以增加安全性;然而有了憑證(certificate)的發明,除了用來將傳輸資料加密外,還可用來驗證資料傳送者與接收者的身份。

而若要瞭解 certificate,則首先必須知道何謂 CA(Certificate Authority)!

以下有兩段解釋:
certificate authority or certification authority (CA) is an entity which issues digital certificates for use by other parties. It is an example of a trusted third party. CAs are characteristic of many public key infrastructure (PKI) schemes.
憑證管理中心(Certification Authority,CA)為具公信力第三者(Trusted ThirdParty) ,對個人及機關團體提供認證及憑證簽發管理等服務,以建立具有機密性、鑑別、完整性、不可否認性、接取控制及可用性而的資訊通信安全環境與機制。在建置營運憑證管理中心時,須依憑證管理中心之營運政策及策略,制訂憑證政策與憑證實作準則,規範其運作規定與作法,一方面讓用戶瞭解在使用上的作業規定,另一方面則藉此表明其在安全及公證性上的信賴度。


CA建置流程說明

從CA建置到憑證的簽署,步驟如下:
  1. 自行建立CA(假設沒有花錢使用公用CA的情況下)
  2. 建立 Private Key
  3. 建立 Certificate Request(憑證要求)
  4. 將 Certificate Request 送交 CA 來簽證此憑證

而在 CA server 的部分,要介紹的重點在於:
  1. 建置 CA server
  2. 簽發憑證、報廢憑證
  3. 設定 CA 簽證的 policy


CA server 種類

首先有些觀念必須說明,即是 CA server 的種類有兩種:
  • Self-Signed CA
    亦可稱為 root CA。由於此種 CA 所發的憑證(certificate)是不經由任何上層 CA 所認證,而是以「自行認證」的方式進行認證。因此像是最上層的商業 CA,或是自行架設內部認證用的 CA,都可以屬於此類。
  • Signed CA
    不同於 Self-Signed CA,此種 CA 所發佈的憑證,可被上層的 CA 進行認證,而兩種 CA 的關係則是「Parent CA <==> Child CA」。 而通常設定上層 CA 時,除非是內部使用,不然使用商業 CA 是必須付費的!

[WinXP] STOP: c000021a Unknown Hard Error 解決方法

今天一位老師拿了他的 NB 來資中.....說無法開機,要請我們協助修復....

結果某人就把這個任務交給我了...... Orz (心中OS:好康的都沒我的份啦!)


情況如下:

開機後會出現 winlogon.exe 應用程式錯誤之類的訊息,會詢問 user 是否要進行偵錯;不過不論是按確定或取消,最後就會進入 Windows 常見的藍白畫面,出現以下訊息:
STOP:c000021a Unknown Hard Error
這.......我可從來沒遇過....搞了我一個下午.....

查到了一堆奇怪的資料:

奇怪資料一:

Winlogon.exe 是木馬! 而且是一支極為難處理的木馬! 看到這我心都涼一半了,印了 google 大神給的指示後開始處理,發現電腦的症狀跟網路上的說明完全不符.......結果發現搞錯了!

木馬的 Winlogon.exe 的「W」是大寫的喔!! 不是小寫的.....


奇怪資料二:

這時候某人就給我看了一篇大陸網友的說明,說只要找台正常安裝 Windows XP SP2 的電腦,在 C:/WINDOWS/system32 目錄下,複製一份正常的 winlogon.exe,然後在 copy 到壞掉的電腦中,就可以「激活」那台電腦了!(激活是啥意思我也不太懂,應該是讓他復活的意思吧! 呵呵....)

於是從電腦中複製一份 winlogon.exe 出來,結果進安全模式,死都不讓我覆蓋原檔案........好吧,拆機把硬碟拿下來,接上外接盒來做,就 OK 啦! 不過問題有解決嗎? 當然沒有! 不是說可以激活嗎?? @_@


奇怪資料三:

奇怪資料還真多,而且這次的奇怪資料還是由微軟提供的......他說這種錯誤訊息,需要把 Windows 升級到 Service Pack 2(已經是SP2了好ㄅㄟ),或是 IE 要升級到 Service Pack 1(早就已經是SP1啦!!),想當然爾,問題有解決嗎? 依然沒有..........而且我還下載 IE7 來裝ㄌㄟ....也是沒用......


終於找到的正解:

最後終於找到一篇文章(連結忘記了....Orz),裡面說明到,只要把 XP 光碟放進去讓他開機,"修復" Windows 就好了! 啥......原來只要用修復就行了....真是浪費了好多無謂的時間.....@_@

不過要記得,不是一開始按 "R" 選修復喔! 這樣會跑進 console 模式....

而是要選擇繼續,讓安裝程序搜尋出電腦中安裝的 Windows,再進行修復! 整個程序大約三四十分鐘,就可以正常登入了!


不用輸入帳號密碼的登入方式:

由於老師的電腦,不需要輸入帳號密碼就可以登入了,之前又手賤設定了管理者密碼,因此必須要把他設定回來........可是這個我也沒設定過.... Orz

還好在網路上找到資料了! 只要在開始->執行那邊,輸入「control userpasswords2」進行設定就行了! 圖文教學可以看這一篇文章 !

2007年5月2日 星期三

[CentOS] 增加 YUM repository套件支援

設定說明

要加入 yum repository,除了可以加到 /etc/yum.conf 中之外,亦可在 /etc/yum.repos.d 目錄中,新增名稱為「xxxx.repo」的檔案(其中 xxxx 的部分可以自行命名),管理者可以自行選擇,而加入的 repository 內容如下:
[base]
name=CentOS-$releasever - Base
mirrorlist=http://mirrorlist.centos.org/?release=$releasever&arch=$basearch&repo=os
#baseurl=http://mirror.centos.org/centos/$releasever/os/$basearch/
gpgcheck=1
gpgkey=http://mirror.centos.org/centos/RPM-GPG-KEY-centos4
enabled=1

#released updates
[update]
name=CentOS-$releasever - Updates
mirrorlist=http://mirrorlist.centos.org/?release=$releasever&arch=$basearch&repo=updates
#baseurl=http://mirror.centos.org/centos/$releasever/updates/$basearch/
gpgcheck=1
gpgkey=http://mirror.centos.org/centos/RPM-GPG-KEY-centos4
enabled=1

#packages used/produced in the build but not released
[addons]
name=CentOS-$releasever - Addons
mirrorlist=http://mirrorlist.centos.org/?release=$releasever&arch=$basearch&repo=addons
#baseurl=http://mirror.centos.org/centos/$releasever/addons/$basearch/
gpgcheck=1
gpgkey=http://mirror.centos.org/centos/RPM-GPG-KEY-centos4
enabled=1

#additional packages that may be useful
[extras]
name=CentOS-$releasever - Extras
mirrorlist=http://mirrorlist.centos.org/?release=$releasever&arch=$basearch&repo=extras
#baseurl=http://mirror.centos.org/centos/$releasever/extras/$basearch/
gpgcheck=1
gpgkey=http://mirror.centos.org/centos/RPM-GPG-KEY-centos4
enabled=1

#additional packages that extend functionality of existing packages
[centosplus]
name=CentOS-$releasever - Plus
mirrorlist=http://mirrorlist.centos.org/?release=$releasever&arch=$basearch&repo=centosplus
#baseurl=http://mirror.centos.org/centos/$releasever/centosplus/$basearch/
gpgcheck=1
enabled=1
gpgkey=http://mirror.centos.org/centos/RPM-GPG-KEY-centos4

#contrib - packages by Centos Users
[contrib]
name=CentOS-$releasever - Contrib
mirrorlist=http://mirrorlist.centos.org/?release=$releasever&arch=$basearch&repo=contrib
#baseurl=http://mirror.centos.org/centos/$releasever/contrib/$basearch/
gpgcheck=1
enabled=1
gpgkey=http://mirror.centos.org/centos/RPM-GPG-KEY-centos4

# ============== 以下為 third party 所維護的 repository ==============

[dries]
name=Extra Fedora rpms dries - $releasever - $basearch
baseurl=http://ftp.belnet.be/packages/dries.ulyssis.org/redhat/el4/en/i386/dries/RPMS
gpgcheck=1
enabled=1

[kbs-CentOS-Extras]
name=CentOS.Karan.Org-EL$releasever - Stable
gpgcheck=1
gpgkey=http://centos.karan.org/RPM-GPG-KEY-karan.org.txt
enabled=1
baseurl=http://centos.karan.org/el$releasever/extras/stable/$basearch/RPMS/

[kbs-CentOS-Misc]
name=CentOS.Karan.Org-EL$releasever - Stable
gpgkey=http://centos.karan.org/RPM-GPG-KEY-karan.org.txt
gpgcheck=1
enabled=1
baseurl=http://centos.karan.org/el$releasever/misc/stable/$basearch/RPMS/

[kbs-CentOS-Misc-Testing]
name=CentOS.Karan.Org-EL$releasever - Testing
gpgkey=http://centos.karan.org/RPM-GPG-KEY-karan.org.txt
gpgcheck=1
enabled=1
baseurl=http://centos.karan.org/el$releasever/misc/testing/i386/RPMS/

[atrpms]
name=RedHat Enterprise Linux $releasever - $basearch - ATrpms
baseurl=http://dl.atrpms.net/el$releasever-$basearch/atrpms/stable
gpgkey=http://ATrpms.net/RPM-GPG-KEY.atrpms
gpgcheck=1
enabled=1
其中在 [base][update][contrib][centosplus][addons][extras] 這幾個部分,會與原本的 repository 重複,因此要將原本的 repository 拿掉才不會出現 repository 重複的訊息(不過不管它的話,似乎也不會有啥影響......)。


接著要匯入 third party 的 GPG key,以 root 的身份執行以下指令:
shell> rpm --import http://centos.karan.org/RPM-GPG-KEY-karan.org.txt
shell>
rpm --import http://dries.ulyssis.org/rpm/RPM-GPG-KEY.dries.txt
shell>
rpm --import http://ATrpms.net/RPM-GPG-KEY.atrpms
如此一來,yum 的 repository 就增加很多囉! 相對的,許多套件也就可以直接透過網路安裝了!


third party 套件維護網站:

除了基本的以外,若要安裝的是特殊一點的套件,一般都必須加入 third party 的套件庫支援才有辦法透過網路安裝,以下是一些網路上公開的 third party 套件庫網站:

進入這些網站,都會有如何安裝套件庫的說明,不一定需要按照第一部份的指示進行,隨管理者的個人喜好決定囉!


參考網站:

[Ubuntu] TCP Wrapper 設定

安裝了 Ubuntu 7.04 後,發現無法使用 TCP Wrapper 了.....

原來是要安裝「tcpd」這個套件,不清楚之前版本的情況是如何.....反正有沒有預設安裝似乎也不怎麼重要,需要時再裝起來就好了!


以下為設定說明:

/etc/hosts.deny
# 預設就全部服務都不提供了! 僅對 hosts.allow 中的設定對象開放
ALL: ALL : deny

/etc/hosts.allow
# 針對某個 IP 開放全部服務
ALL: 221.169.40.120/32 : allow

# 開放 ssh 服務 給特定網段
sshd: 140.137.0.0/16 : allow

2007年5月1日 星期二

MySQL 基本操作入門

初始化管理者密碼

由於現在安裝 MySQL 真是太方便了,Linux 上面隨便 APT 或是 YUM 就可以拉下來裝,還是最新版的,所以我這邊就不說明安裝的部份了,而直接切入初始化管理者帳號的部份

MySQL 中預設的管理者帳號就是 root 啦!

用以下語法就可以進行設定:(兩種任選一種吧!)
shell> mysqladmin -u root password '<管理者密碼>'

shell> mysqladmin -h <主機位址或名稱> -u root password '<管理者密碼>'

登入 MySQL Server

登入方式如下:
shell> mysql -h <host> -u <user> -p
Enter password: ********
參數說明:

-h
指定要連線的主機

-u
進行連線的使用者名稱

-p
在下一個步驟時輸入使用者密碼

若要離開 MySQL 則是相當簡單,只要在命令提示字元下達 quit 即可離開。


參考連結:


下達指令前的注意事項

在 MySQL 的命令提示字元中下達指令,有以下幾點必須注意:
  1. 每個指令必須以分號(;)作為結束
  2. 輸入 Enter 不代表指令結束,若沒有加入分號,則會被視為同一個指令
  3. 每個指令都有其代表的關鍵字,輸入的是大小寫並不會影響執行的結果


資料庫建立與相關資訊的擷取

1、建立、使用、查詢資料庫(Database)

要使用 MySQL,當然要懂得如何建立一個新的資料庫了! 假設這邊要建立的資料庫名稱為 MyDB,不需額外指定 character set 以及 collate,則建立的語法如下:
mysql> CREATE DATABASE MyDB;
接著可以查詢資料庫是否建立成功,可用下列指令:
mysql> SHOW DATABASES;
在上個步驟中,一共有出現三個資料庫,若要使用剛剛建立的資料庫 MyDB,應該要怎麼做呢? 只要下達以下指令即可:
mysql> USE MyDB;
Database changed
透過 USE 關鍵字,就可以指定要使用的資料庫為何。


參考連結:


2、資料表(Table)的建立與查詢

其實建立 Table 的語法介紹是很複雜的,column、index、reference.....etc,都有複雜的設定語法,不過在這邊以簡單為主,以下就來個建立 table 的範例:
mysql> CREATE TABLE pet (
-> name VARCHAR(20),
-> owner VARCHAR(20),
-> species VARCHAR(20),
-> sex CHAR(1),
-> birth DATE,
-> death DATE );
若是要查詢有哪些 table 在資料庫,以及 table 的詳細結構呢? 可以用以下的語法:
# 查詢資料庫有哪些 table
mysql> SHOW TABLES;

# 查詢 table 結構
mysql> DESCRIBE pet;
參考連結:


批次模式(Batch Mode)

何謂 batch mode? 就是一次執行大量的 SQL 命令!

而 batch mode 應該用在什麼地方? 又有什麼好處呢? 以下做個簡單說明:
  1. 當一個例行性工作需要執行大量的 SQL 命令時,將這些命令寫成純文字檔,再開發 script 將其以 batch mode 進行,方便也不容易出錯
  2. 當多台電腦要執行相同且大量的 SQL 命令時,將命令編輯成純文字檔,以 batch mode 進行,快速也不會出錯
  3. 假設一次要建立 database 中的所有 table,可將命令先編輯為純文字檔,再以 batch mode 進行,比較不容易出錯
  4. 如果查詢結果將會產生大量輸出時,也可以利用 batch mode 將結果輸出至其他檔案觀看(亦可搭配 more 或是 less 等指令分頁瀏覽)
  5. 在某些情況下必須用 batch mode,例如執行例行性(cron)的資料庫相關工作,不允許使用互動模式。

基本上,batch mode 相當好用,不論是一次將所有 table 以及相關資料建立完成,或是將備份資料還原回資料庫,甚至是一些例行性的資料庫工作,都可能會使用到這個功能。

一般來說,若要進行 batch mode,必須將要執行的 SQL 命令編輯為一個純文字檔案,才可以正確執行。

【註】在備份時,用指令 dump 出來的也是純文字檔案

若要執行 batch mode 的 SQL 命令,必須使用「mysql」指令,另外還必須指定主機位址、使用者帳號密碼、儲存SQL命令的純文字檔....等資訊,以下用範例來介紹:
shell> mysql -h <主機位址> --user=<登入帳號> --password='<登入密碼>' <資料庫名稱> < <檔案名稱>
當然上述的語法是最詳細的方式,因為所有的參數都指定上去了,但是其實許多情況下,並沒有如此複雜,可以視以下情況進行修改:
  1. 在本機執行,則 -h 參數就可以不需指定
  2. 若想要後來再打密碼,也可以改用 -p 指令,就不需要在指令中就輸入密碼
  3. 若檔案內容中有「use 資料庫名稱;」的內容,也不需再指定資料庫為何了
因此使用者可以根據自身的情形進行適當的修改。

然而,以 batch mode 執行大量 SQL 命令時,有可能會有許多訊息的輸出,若是想要捕捉這些訊息,可以搭配 more 或是 less 指令,或是以 redirect 的方式將訊息輸出到指定檔案中,以下是兩種輸出方式的語法介紹:
# 以 more 進行分頁瀏覽
shell> mysql < batch-file | more

# 將訊息全部輸出至檔案 mysql.out 中
shell> mysql < batch-file > mysql.out
參考連結:

帳號與權限的控管

1、建立帳號

在一台剛安裝完 MySQL 的機器中,使用者只有 root 一個,但總不能每次存取 database 都用 root 的權限吧.....

所以這裡介紹怎麼新增帳號,首先以下是新增帳號的語法:
CREATE USER <使用者帳號> [IDENTIFIED BY [PASSWORD] '<使用者密碼>']
[, <使用者帳號> [IDENTIFIED BY [PASSWORD] '<使用者密碼>']] ...
由上面的語法可以看出,可以一次增加多個帳號,不過以下只用個簡單範例來說明,建立一個帳號即可:
# 建立登入帳號為「testuser」,登入密碼為「thisispassword」
mysql> CREATE USER testuser IDENTIFIED BY 'thisispassword';

2、權限設定

新增了帳號之後,若沒有設定相關資料庫的權限,也只能用該帳號登入 MySQL 而已,卻不能做任何事情,因此要給帳號分配資料庫權限,而由於這邊因為只是簡單介紹,就用分配給某帳號某個資料庫的所有權限為例好了! 以下是簡單的範例:
# 分配資料庫 MyDB 所有的存取權限給使用者 testuser,並限制僅能本機存取,密碼為 thisispassword
mysql> GRANT ALL PRIVILEGES ON MyDB.* TO 'testuser'@'localhost' IDENTIFIED BY 'thisispassword';

# 在主機端的部份,也可以用萬用字元「%」
mysql> GRANT ALL PRIVILEGES ON MyDB.* TO 'testuser'@'%' IDENTIFIED BY 'thisispassword';

# 進行權限分配後,還要將資料 flush
mysql> FLUSH PRIVILEGES;
參考連結:

備份

備份對資料庫來說,是絕對不可或缺的,因此定期的備份工作是需要的;不過由於這裡僅是做個簡單介紹,因此就以最簡單的備份方式來說明,直接指定某個資料庫完整備份,以下是備份的指令:
# 需要輸入 root 的密碼
shell> mysqldump -u root <資料庫名稱> -p > <檔案名稱>
Enter password: ********

# 直接指定 root 密碼,此種方式適合用於撰寫自動化備份的 shell script 時用
shell> mysqldump -u root --password='<密碼>' <資料庫名稱> > <檔案名稱>
透過此種方式,會產生出一個可以用來還原 database 的純文字檔,只要透過上面說的 batch mode,就可以將資料庫還原了。(尚未說明使用者以及權限的相關備份)

參考連結: